Category: Expat & Immigrating

Whether you are deciding to live outside your home country tentatively as an expat or deciding to immigrate permanently there are a few things you need to know beforehand. Make moving abroad as easy and as stress-free as possible by following these simple tips.

  • Moving to the UK from Australia

    Moving to the UK from Australia

    Moving to the UK

    Australians love to move abroad. It’s in our blood. As people would say, we are bloody everywhere and the UK is one of those places that we flock to. It’s no surprise given:

    • It’s next door to Europe.
    • We get easy movement between our countries, Canada included.
    • No language to learn.

    Smooth on paper.

    Moving fourteen thousand kilometres across the sea is one of those things that toughens you up. I have the learning experiences to prove it.

    I’m a career girlie. I built my whole life around the nine to five and I moved over in 2013 with seven years’ experience and a CV I was proud of.

    Then I landed in London and literally tried to wing the rest. I didn’t know how to open a bank account. Finding a place to live was another wing-it job, because I hadn’t done any of the research. That didn’t turn out as well as I thought it would, but I survived. Then someone took eight thousand dollars out of my account, which wasn’t my doing, but it didn’t stop the tears either.

    Here’s the checklist and the adulting I’d do to help you move over:

    • a brief intro to your visa options
    • what it costs before you’ve earned a pound here
    • the Australian admin to sort before you fly

    I’m still cleaning mine up thirteen years later. My Medicare I was still sorting out when I was back home earlier this year.

    Kat in 2013, before the move, with a Rough Guide to Europe in one hand, The Travel Book in the other and a glass of wine. This is where the plan started.
    Covers
    Ancestry, Youth Mobility, Skilled Worker and Partner: who each one’s for, what it costs and the catch.
    Have up front
    The visa fee for your route, the health surcharge for the whole visa, up to five weeks’ deposit plus the first month and three to four months of living costs.
    Do first
    Your Australian admin, before you fly.
    Works for
    You, if you’re moving over solo with a suitcase and want the visas, the money and the admin in one place before you book anything.

    Fact check · 6 and 7 September 2026

    I’m not an immigration adviser. This is one Australian’s move in 2013 with today’s rules and prices next to it, checked at gov.uk, the Australian government sites and every other source linked on this page on 6 and 7 September 2026. The rules and the fees change. The basics of moving haven’t. Read the guide for your route on the day you apply, or speak to an immigration adviser. Use this to make your own call.

    Disclosure

    Some links on this page are affiliate links. If you click one and buy something, I earn a commission at no extra cost to you. It never changes what I recommend.

    Which route you’re on

    Your visa decides how much you need to save and how long it’ll be before you can move. This might be the point where you realise you need another year of saving before you go. Add up the visa and the surcharge below, then the first few months in London on top. If that’s not in the bank yet, the Ancestry visa might not be the one for you right now. You might be lucky and have a job that relocates you, or you start on Youth Mobility and build up the funds for the rest from here.

    So here are the cliff notes on the four visas I’ve watched Australians move here on: who can apply, what it costs, what you get and the catch points that catch people out. The exact requirements are on gov.uk and that’s where to check yours.

    Route
    Who it’s for
    What it costs
    What you get
    The catch
    A grandparent born in the UK
    £726, plus the health surcharge at £1,035 a year, so about £5,175 up front over five years
    Five years, then you can apply to settle
    The surcharge is about seven times the visa fee
    Aged 18 to 35
    £340, plus the surcharge at £776 a year. You also have to show £2,530 in savings
    Up to two years, plus a one-year extension for Australians
    It doesn’t lead to settlement, so the clock runs out
    A UK job offer paying at least £41,700 a year
    £819 for up to three years or £1,618 for more, plus the surcharge at £1,035 a year. You also have to show £1,270 in savings
    Up to five years, then you may be able to settle
    You need the employer before you need the visa
    A British or settled partner and a combined income of £29,000 a year
    £2,064 from outside the UK or £1,407 from inside, plus the surcharge at £1,035 a year
    Two years nine months, then an extension, then settlement after five years
    The old £18,600 floor only applies if you first applied before 11 April 2024

    Right of abode, Global Talent and Innovator Founder exist too and they depend on your circumstances more than anything I can generalise about, so go straight to gov.uk for those. Investor and Start-up are closed to new applicants. If you’re not sure where you land, start with gov.uk’s check if you need a UK visa tool.

    The Australians I know who came over on Youth Mobility went one of three ways when it ran out: home, sponsored by an employer or a British partner. The extra year for Australians makes it a better visa than the two years I watched people run out of, because two years is barely enough to work out whether you want to stay.

    Mine was Ancestry. I went travelling for three months first, landed in October 2013 and here I am, indefinite leave to remain and a British passport later. Different routes suit different lives. This one suited mine.

    Worth it

    The Ancestry visa, if you’ve got the grandparent. Five years, then you can settle, then a passport. Spenny now, but it’s the route that ends somewhere.

    Worth it

    Youth Mobility, if you haven’t. Two years plus one is enough to know whether you want to stay. The Australians I know who stayed switched to a job or a partner visa before it ran out.

    What the visa costs, all in

    Whichever visa you’re on, the fee on the gov.uk page is not the cost. The Immigration Health Surcharge comes on top and you pay it up front for the whole length of the visa: £1,035 a year, or £776 a year on Youth Mobility or a student visa.

    What that looks like for your visa:

    • Youth Mobility, two years: £1,552 of surcharge on top of the £340 fee.
    • Skilled Worker, three years: £3,105 on top of the £819 fee.
    • Ancestry, five years: £5,175 on top of the £726 fee.

    The rounding works against you too. More than six months but under a year is charged as a full year.
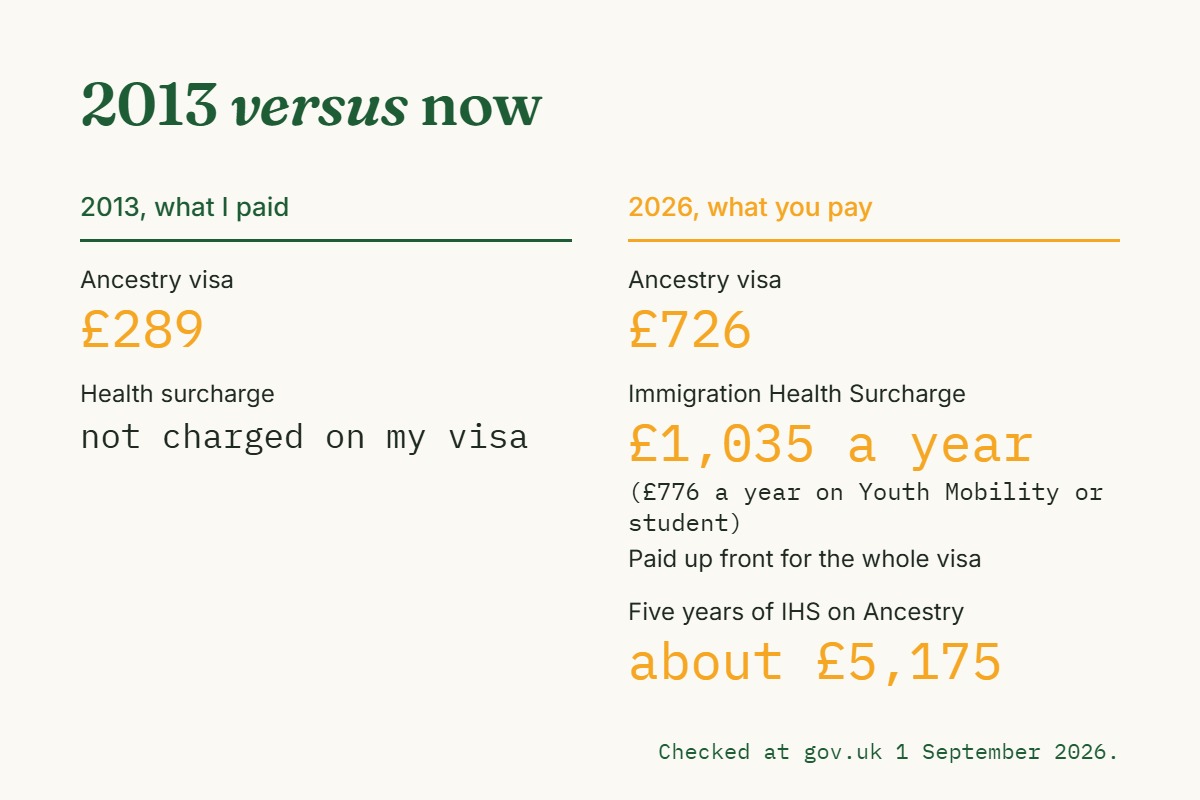
    An information card comparing the Ancestry visa in 2013 and now: AUD 459 and no surcharge charged in 2013, £726 plus £1,035 a year of surcharge today.

    My visa in 2013 cost AUD 459, about £289 at the time and no surcharge, because it didn’t apply to the Ancestry visa then. It does now, so it’s a spenny visa these days. For an Australian the visa plus five years of surcharge is roughly ten thousand Australian dollars before you’ve bought a flight, give or take the exchange rate.

    It prices a lot of people out and it’s a much higher entry point than I had. I didn’t need savings to get in. The savings I did have went on travelling first. I was very fortunate.

    What to have in the bank before you land

    The question I get asked most is how much to bring and I won’t give one number, because it depends on where you end up living and how long the job takes. What I can give you is the things to forecast and how to work each one out, with my own figures in it. Every rent here is London, from my own tenancies in southwest London and Shoreditch. Prices are different elsewhere in the UK.

    Forecast these before you fly:

    • rent, plus the deposit and first month you pay before you’ve slept there
    • bills, if they’re not in the rent
    • living, so food, transport and a bit of going out
    • the gap before your first payday
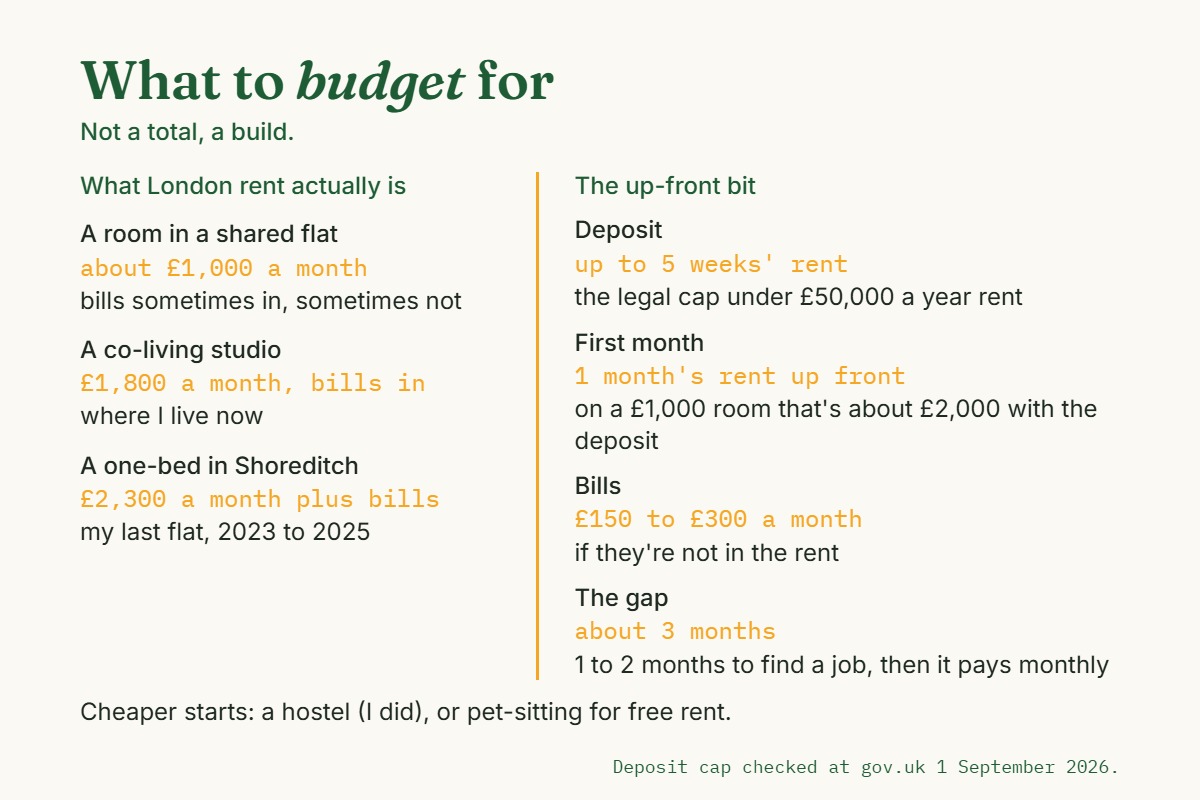
    An information card listing what to budget for your first three months: rent, deposit, first month, bills and the gap before a payday.

    Rent. The average room in inner London is £979 a month on SpareRoom’s figures for the second quarter of 2026 and the southwest London average is £1,039. Call it £1,000 a month for a room to do the maths with.

    Deposit and first month. The deposit is capped at five weeks’ rent where the annual rent is under £50,000. Most places ask for the first month at the same time. On a £1,000 room that’s about £1,150 deposit plus £1,000 rent, so roughly £2,150 before you’ve bought a pillow.

    Bills. Where they’re on top, allow £150 to £300 a month depending on whether you’re sharing. Co-living buildings fold them in, mine does, which is part of why they cost more.

    What they’ll ask you for. Any rental will want the same things: proof of your right to work, bank statements showing you can pay and sometimes an employment contract. It depends on the agency or the landlord. Renting a room in a shared house can be easier, because the other housemates already carry the tenancy. A lodger agreement, where you rent from someone who owns and lives in the place, runs on its own rules.

    The old way round having no UK payslips was to offer months of rent up front. That door shut on 1 May 2026. A landlord in England now can’t take more than a month’s rent before you move in, so the bank statements are what carry you.

    The gap. Give yourself two to three months to find a job. Then remember UK pay is monthly, so your first payday can be a month after you start. I was used to fortnightly pay in Australia and this caught me out. Realistically you’re covering three to four months of everything from savings, with pay landing around month four or five. Mine ran out. My dad sent me money for Christmas that first year and it went straight on the credit cards and the rent.

    The worked example, on a £1,000 room with bills on top:

    • deposit, about £1,150
    • first month’s rent, £1,000
    • three more months’ rent before payday, £3,000
    • four months of bills, £600 to £1,200
    • four months of food, transport and living, your number, because mine from 2013 won’t hold

    That’s about £5,750 to £6,350 on rent and bills alone before you’ve eaten. Put your own living number on top and that’s your minimum.

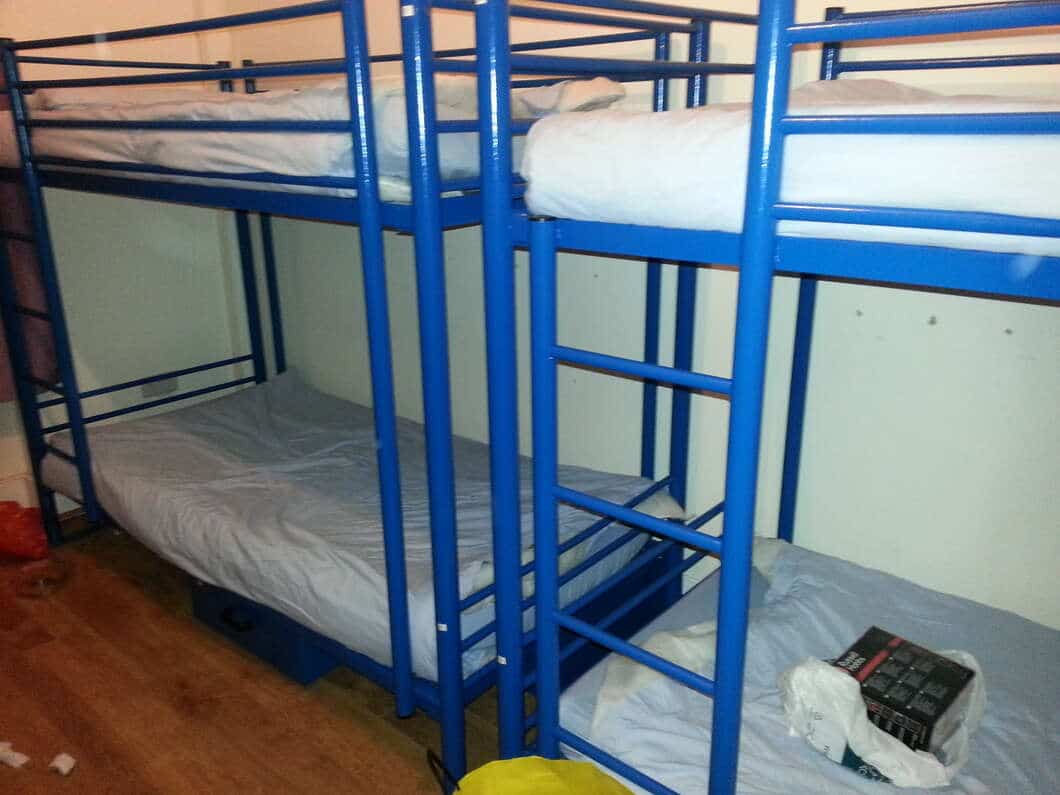
    How to bring it down. A hostel at the start is a real option. Mine was Saint James Backpackers in Earl’s Court, a bed in an eight-bed dorm, £110 for four nights in October 2013, so £27.50 a night. I stayed in hostels from October until the end of January 2014 while I sorted a job and a room. Ask around the hostel too, in case someone’s renting out a room. The pet-sitting websites are the other one, free rent while you find your feet, but you need to build up a portfolio of sits first, so it’s not a day-one option.

    Worth it

    A hostel for the first stretch. £27.50 a night in 2013 and it bought me three months to find a job and a room without burning through the savings.

    What I pay now, for scale. A co-living studio in southwest London at £1,883 a month with bills included, think university halls for working professionals. Before that, a one-bed in Shoreditch from 2023 to 2025 at £2,300 a month with bills on top. Yes that’s an expensive area, but I haven’t seen many one-beds much under that anywhere I’d want to live. The co-living place wanted the same as any flat before they’d rent to me: bank statements, right to work and previous tenancy references.

    Moving the money. Sort the transfer before the money moves. In 2013 the banks took a cut I never saw coming and I lost real money to it before I worked out there was a better way. Wise is what I use now for moving money between here and Australia. There are other transfer companies out there, but this one is the most hassle-free for me and I like it.

    I didn’t keep receipts for the move itself, because it was 2013 and I wasn’t running a website out of my own move. So this is “about”, not itemised to the penny. I’d rather tell you that than dress a guess up as a figure.

    I flew with one suitcase, no shipping, no excess baggage and took roughly $15,000 AUD, most of which went in the first four months while I had no income here. I’m not going to translate that into what it “would be now”, because that’s a guess wearing a number’s clothes.

    Before you get on the plane

    This is the section I’d want someone to read before they book the flight, because it’s the part I got most wrong and I’m still tidying up thirteen years later.

    One thing to keep in mind: I came over on a five-year visa, so a lot of what I did, I did because five years is a long time to not live somewhere. If you’re coming for a year to three, on Youth Mobility say, you might make different choices.

    Two hard deadlines first, then everything else.

    If you’ve got a HECS debt (the Higher Education Loan Program, or HELP, as it’s called now), or any other study loan, leaving doesn’t pause it. Once you’ll be out of Australia for 183 days or more in any 12 months, the Australian Taxation Office (ATO) wants an overseas travel notification within seven days of you leaving.

    Then every year, by 31 October, you report your worldwide income to them if it’s over a quarter of the repayment threshold, which is $16,750 AUD for the 2025 to 2026 year. Once it’s over the threshold itself, $67,000 AUD that year, you keep repaying, in pounds converted back to dollars. I don’t have a HECS debt, so this one never applied to me. If you do, it’s a deadline with a penalty on the end of it.
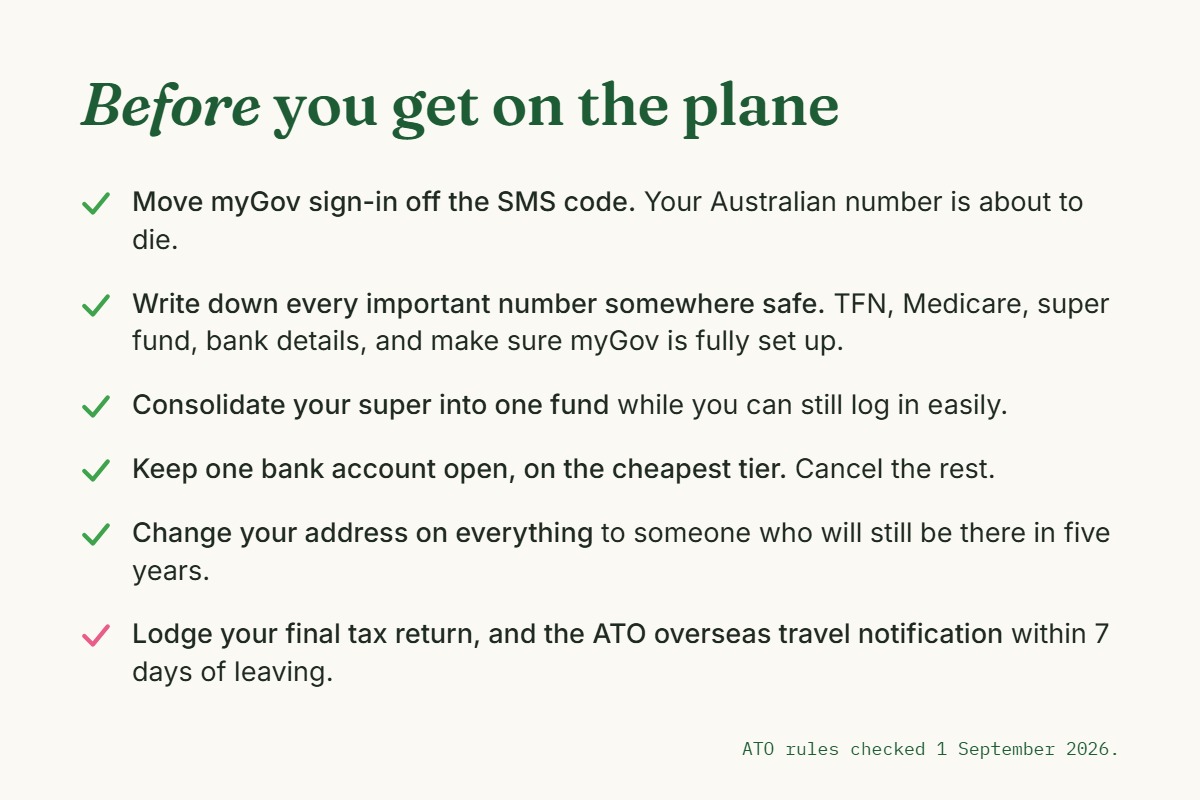
    An information card listing six things to do before you get on the plane.

    Write it all down and scan it. Your tax file number, your Medicare number, your super details, your bank logins. Scan every critical document and send the copies to someone at home. I sent mine to my mum. Even a copy makes the conversation easier when something like a passport goes missing.

    Change your address on everything to someone reliable. The day they move house, or the address quietly goes stale, you lose the thread on all of it. The government consolidated my old super funds while I was mid-move and it was only luck that my family still got my mail so I saw it happen.

    Set up myGov and link the ATO and Medicare before you leave, because linking asks for identity documents that are far easier to have to hand in Australia than from a hostel in London. Then move your sign-in off the SMS code to a passkey or an authenticator app, while your Australian number still works.

    I didn’t. I left mine on SMS to a number I’d already cancelled, so I put the codes through mum’s phone. Then she changed number and I was locked out. Then my sister’s phone, then she switched providers and I was locked out again. Every time I had to prove who I was all over again to get back in. It took embarrassingly long to fix.

    Consolidate your super while you’re in there, if that’s your call. The ATO lets you do it through myGov, under Australian Taxation Office, Super, Manage, Transfer super. This one’s a personal choice and not financial advice. I just wanted my small ones, about $1,500 AUD each, in my big fund and not getting eaten by fees. The government’s clean-up scheme did most of mine for me and I did the last one years later when mum posted me the letter. Don’t run it the way I did.

    Close off your tax year before you go. I didn’t lodge a final return before I left and ended up sorting it out a couple of years later, from here, which is the harder way round.

    Cancel what you don’t need and know what you’re keeping. I kept one Australian bank account open so I wouldn’t lose my history and I’ve paid about $5 AUD a month for it ever since, which is the fee on my account type. Other account types charge differently or not at all, so look at your options rather than paying for the privilege like I do. Everything else, the credit cards, the extra accounts, I closed.

    Bring the things you can’t get here. You can buy a lot of Australian food in London (a shop like Sanza, for example), but for the niche stuff, pack it or organise a care package for when you land. Mine is Cherry Ripes. A friend of mine swears by one particular sanitary product and brings a supply every trip home.

    Kat packing one suitcase for the UK. Everything else can be bought here or posted over.

    Worth it

    Sorting your Australian admin before you fly. myGov, super, the tax year. The cheapest thing on this page and the one I got most wrong.

    Not worth it

    Leaving your myGov sign-in on an Australian SMS number. Three lock-outs, three phones, three rounds of proving who I am.

    Your first weeks here

    The loop that ate my first weeks: I needed a UK address to open a bank account and I needed a bank account to get a place to live. Round and round, from a hostel bunk in Earl’s Court. It’s the thing to solve before you land. Here’s the order I’d do it in now.

    1. Money before you land. Set up Wise before you fly. You can get the card sent to your Australian address, so you land with a way to pay for things that isn’t your Australian bank.

    It’s the best way I’ve found to do the transfers. I don’t have other Australian accounts to compare it with and I know friends who use other things, but it’s been the best for me. It’s the upgrade on what I had in 2013.

    Affiliate

    Set up Wise before you fly. The card comes to your Australian address, so you land with a way to pay that isn’t your Australian bank.

    2. The address and bank account loop. I went through a relocation company called BritBound, who got me set up with Lloyds and sorted my National Insurance number, all of it by post, I never went in for an appointment. I’ve stayed with that Lloyds account since.

    I went looking for BritBound while writing this and I think they may have shut down, so take that as what got me sorted in 2013, not a recommendation. An HSBC overseas account, opened before you leave, is worth looking into as an option. I didn’t know it was a thing at the time.
    An HSBC branch. The overseas account is the one I'd have looked at in 2013 if I'd known it existed.

    3. Right to work and the National Insurance number. You don’t have to wait for your National Insurance number before you start working, you just need to prove your right to work. Your visa is that proof. Mine came through before I started, so I never had an emergency tax code.

    Worth it

    Wise, set up before you land. The card comes to your Australian address and you arrive with a way to pay that isn’t your Australian bank.

    What catches Australians out

    Six things that catch you after you land, none of them on the visa form. Most of them caught me.

    1. Your tax code. Out of twelve years of UK payslips, about eight have been fine and four haven’t, or not quite. Being self-employed for a stretch changed it and I get a bonus every year, which throws the tax office’s maths out every single time, so I always end up paying HM Revenue and Customs (HMRC) some back, out of a later payslip or as a lump sum.

    Anything unusual, a bonus, a second income, a bit of freelance, will change your tax code and it’s on you to check it’s running right rather than assume the payslip is.

    2. Swapping your licence and the manual catch. Australia is a designated country, so swapping your licence needs no test, just the paperwork and the Driver and Vehicle Licensing Agency (DVLA) fee of £43. You can drive on your Australian licence for 12 months after becoming resident and you have up to five years to make the exchange as long as the Australian licence hasn’t expired.

    The trap: you can get a manual licence, but your Australian licence needs to have it on there, or you provide proof you can drive a manual. Otherwise you’re issued with an automatic. Mine, on a manual Western Australian licence, went through fine and so did my sister’s on her automatic one. A friend of ours had to go back to VicRoads for a letter confirming her manual entitlement before hers would go through. If there’s any doubt about what your licence shows, sort that proof out before you apply.

    I’m not going to recommend a car insurer, because I’ve bought one policy in thirteen years and that’s not enough to have an opinion.

    Not worth it

    Buying a car early. I’ve owned one for two months in thirteen years. Everything else has been a rental.

    3. Qualifications that don’t transfer. Degrees don’t always carry across one to one. For most jobs it’s fine, but anything regulated, pharmacy, healthcare, allied health, has its own pathway: registering with the UK regulator (the General Pharmaceutical Council for pharmacy, say) or a bridging qualification before you can practise. Check where yours stands with UK ENIC, the official body that compares international qualifications against UK ones, before you land.

    A friend of mine, qualified as a pharmacist in New Zealand, couldn’t work as a pharmacist here on that qualification. She was only here on a two-year visa, so there was no point doing the bridging work and she worked as a pharmacist’s assistant instead. Right call for two years. If you’re coming for longer, factor the conversion in first.

    4. The Medicare clock. You can be out of Australia for five years without losing Medicare. Past that you re-enrol from scratch when you go back, with a current passport and two documents dated within the last six months proving you live in Australia again, a lease, proof of a job, a bank account. If you’ve been away more than 12 months you may need to re-enrol anyway.

    I rang Medicare last time I was back and they told me the five-year part but not the twelve-month wrinkle, so the written rule is the one to follow. Five years is where it stops being a phone call and starts being paperwork.

    5. Voting from overseas. Voting isn’t compulsory while you’re overseas, but if you skip an election without telling the Australian Electoral Commission (AEC) you’re away, they write to you and can take you off the roll.

    If you plan to be back within six years, register as an overseas elector and tick general postal voter, so the ballot papers come to you on their own. Otherwise it’s a postal vote or the embassy, high commission or consulate, which open for the two weeks before polling day.

    6. The Australian cards that keep charging you. The 28 Degrees Mastercard I moved over with in 2013, back when it had no fees at all, has changed hands since and now carries an $8 AUD monthly fee after the first year. Add my $5 AUD a month bank account and that’s money leaving every month for nothing. Check every Australian card and account in your wallet for a fee before you fly. Close or switch the ones that charge you for existing.

    Not worth it

    Keeping Australian cards and accounts you don’t check. Mine have quietly charged me for thirteen years.

    Where I’m at now

    Thirteen years on, I’ve gone from an Ancestry visa to indefinite leave to remain to British citizenship and I’ve helped a fair few Aussies land since. Both of those steps have their own pages if you’re on the same road.

    And I’m still mopping up the Australian admin I didn’t do before I left. So take the before-you-fly section from someone who learned it the slow way.
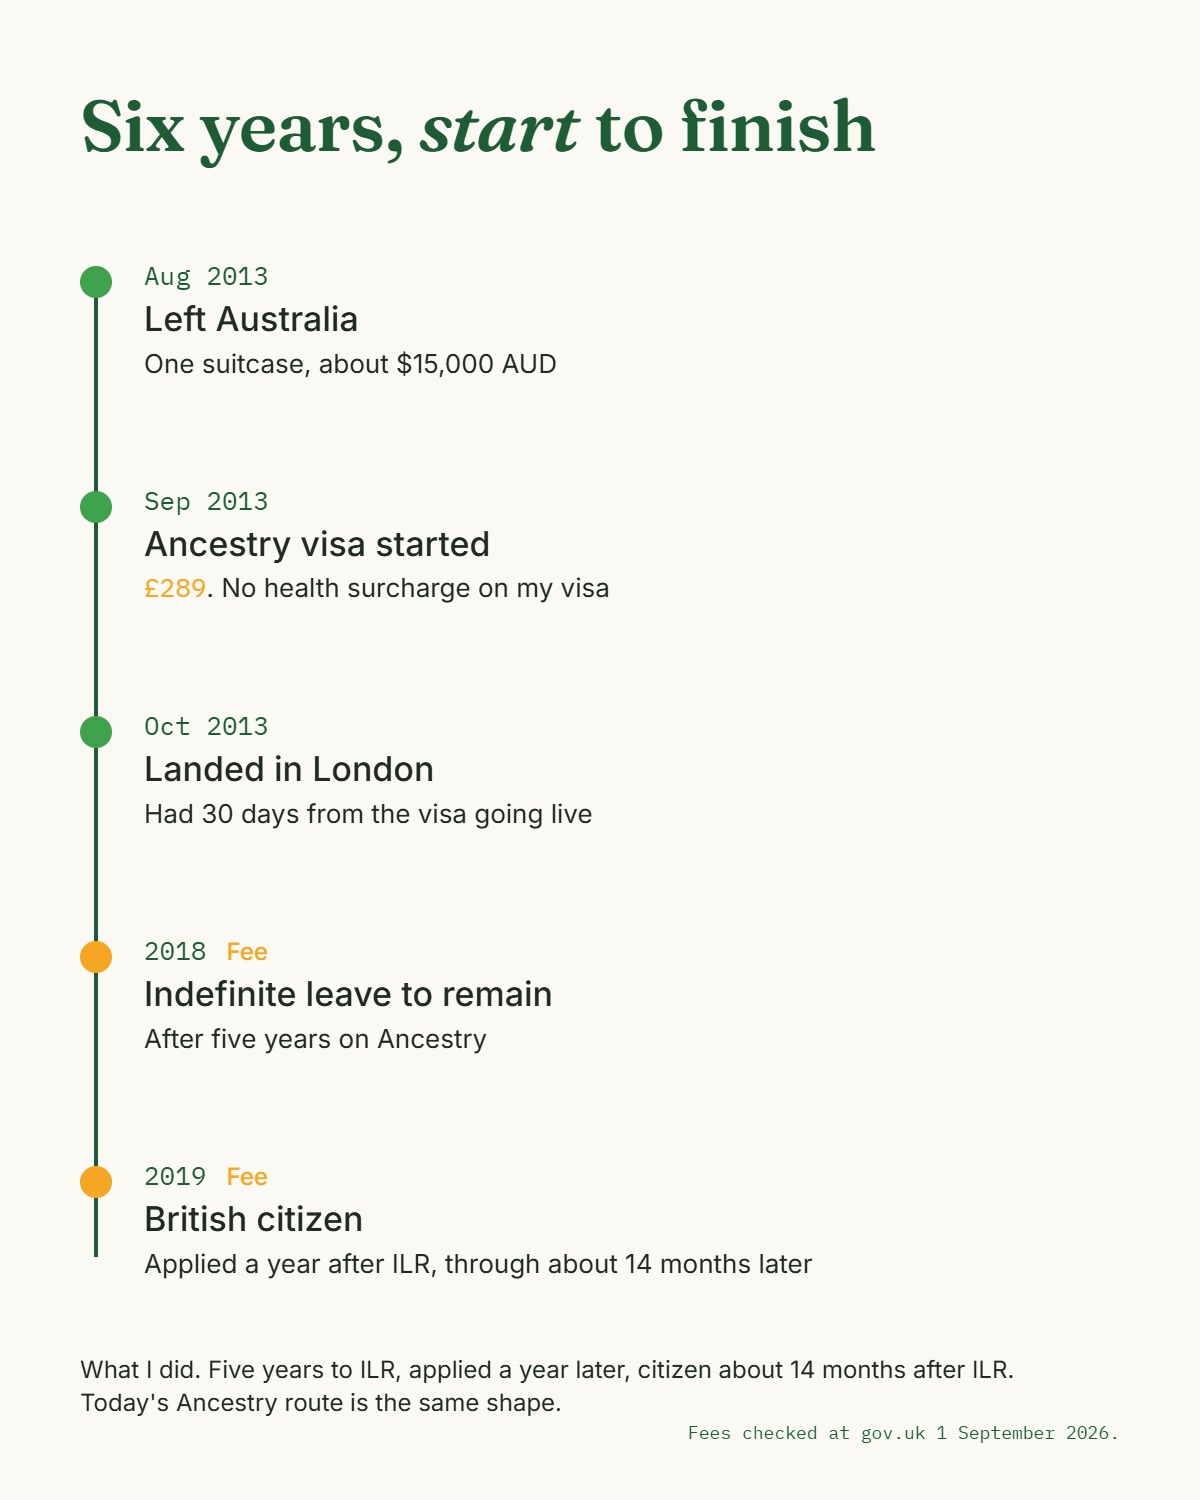
    Kat's timeline from leaving Australia in August 2013 to British citizenship in 2019: Ancestry visa, five years to indefinite leave to remain, citizen the year after.

    FAQ

    How much does it cost to move to England from Australia?

    Budget four things: the visa fee for your route, the Immigration Health Surcharge for the whole visa (£1,035 a year, or £776 on Youth Mobility or a student visa), a deposit of up to five weeks’ rent plus a month up front and enough to cover two to three months without a payday. I can’t give you one number that holds, because prices have moved a long way since 2013 and I don’t have receipts to back an updated figure.

    How much savings do I need moving to London specifically?

    Enough for three to four months of everything before your first monthly payday. Real rents: the inner London room average is £979 a month (SpareRoom, Q2 2026), my co-living studio in southwest London is £1,883 with bills in, my last one-bed in Shoreditch was £2,300 plus bills. Add up to five weeks’ deposit, the first month and bills of £150 to £300 if they’re on top. A hostel at the start brings it down. Pet-sitting does too, once you’ve built up a portfolio.

    Does the Youth Mobility visa lead to settlement?

    No. It runs up to two years with a one-year extension for Australians and there’s no route from it to indefinite leave to remain. The Youth Mobility page has the rules. The Australians I know who stayed did it by switching to a sponsored job or a partner visa before it ran out.

    What order should I do things in?

    Visa first, because it decides everything else. Then your Australian admin, before you fly: myGov linked, super consolidated, tax year closed, the ATO travel notification lodged if you’ve got a HECS debt. Then money you can spend from day one. Then the address and bank account loop, which is easier with the first three done.

    What’s different for someone moving from New Zealand?

    Most of the UK side is the same. The qualifications trap is the one that bit my own friend, who’s a New Zealand pharmacist, so check that before you assume your degree or registration carries across.

    Worth It / Not Worth It

    Worth it

    Moving to the UK. Every bit of it. Europe on your doorstep, a career you can build here and the friends who follow you over. Thirteen years in and I’d do it again tomorrow.

    Not worth it

    Winging it. I did. It cost me sleep, money and most of my first four months.

    The Pivot

    Worth it

    Worth it, every bit of it, though I’d do the admin in a different order if I went back. How I landed with almost nothing in the bank after three months around Europe and what my old employer did next is one for Controlled Chaos.

  • UK Ancestry Application (Explained)

    UK Ancestry Application (Explained)

    One of the most confusing things about applying for visas is the questions in the application and the evidence. What on earth do they expect you to answer and provide!? As it’s such a stressful process I wanted to make sure I could share on the information I entered on my UK Ancestry Visa.

    As the process does change regularly make sure you go to the gov.uk website before applying. This is all based on my information and when I applied. I have linked through all the official documents to speed up the process.

    Disclaimer: Please note this information is based on my application and evidence (I’m not a lawyer or immigration advisor). The article is to help guide you on what to expect question wise and get you thinking of what to prepare. Your answers should be tailored to you and your information. If you are unsure reach out to the Home Office or my friends at Britbound who will be able to help you. Here are some other documents that may be helpful:

    For more information about the visa process check out What You Need to Know When Applying for Your UK Ancestry Visa’. 

    Disclaimer: This is based on my experience and you should seek professional advice if you are unsure. Go to GOV UK to check if there have been any changes to the visa rule & fees.

    Where to Start Your UK Ancestry Visa Application

    The UK Ancestry visa is moving to the new application process so to apply you need to go to the gov.uk website. Depending on which country you are applying from the gov.uk website will direct you to the right place.

    I’ve had a lot of questions about whether you should use VFS Global or were they come into the process. VFS Global is just like using a visa service such as VisaFirst and 1stContact. I actually used VFS Global for my Russian visa as they run a few services for different countries. If you wish to go with a visa service to submit your application then they are a company you could choose to use. 

    VFS Global do run some of the visa application centres (as a contracted third party) and that’s mainly where they come into the process. This is where you do your biometrics appointment and get your application stamped.

    Please note the UK gov have announced that IHS surcharge will be increased to £625 in the coming months. This means that the 5 years will now cost £3,125.

    Start an Application

    To ensure you are directed to the right place (as they are migrating their systems) go to the gov.uk website. The form will look slightly different from the screenshots in my application and included in the article. The questions are basically the same so the information in this article still applies.

    Now for the Questions and Evidence…

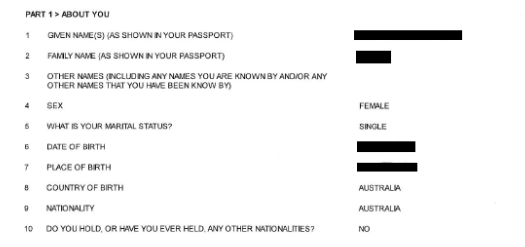
    Let’s go through the questions! I have put this in order of the sections within the online application and then added photos from my final application. You will notice that not all questions/answers end on the final application or in the same order so hopefully it all makes sense.

    Passport and Travel Information

    The Passport and Travel Information section is basically noting down what is stated in your passport or travel document so I won’t break this section down to much.

    Is this your first Passport? My answer was no.

    Then you need to enter your details of all other passports and travel documents held over the last 10years: Also state any non-documented nationalities you have held. I previous had a child’s passport so I entered these details and also submitted this passport along with my application as evidence.

    Are you travelling with anyone? I put no for this answer as I was moving here by myself.

    Date of planned arrival in the UK? i.e. when you planned to land in the UK

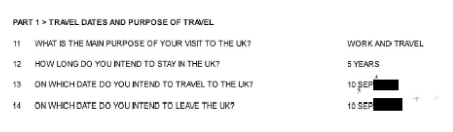
    How long do you intend to stay in the UK? I put 5 years for this answer (the length of the visa).

    What is the main address and contact details of where you will be staying whilst in the UK? I put the hostel that I would be staying at when I first arrived. Other options is hotel, Airbnb, friends or family etc.

    Example of my application:

    Ancestry Visa Application About You Section
    An extract from the final application. As you can see these should be pretty easy for you to fill 🙂
    Ancestry Visa Application Travel Purpose Section
    Example of the travel dates and purpose of travel section.
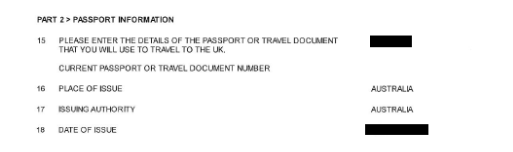
    Ancestry Visa Application Passport Information Section
    The passport information summary on the application.
    Ancestry Visa Application Passport Information Section2
    The passport information summary on the application.

    Personal Details and Travel History

    Personal details covers information like where you live, how long you have lived there and general information. The interesting section is where it covers your travel and criminal history, let’s begin!

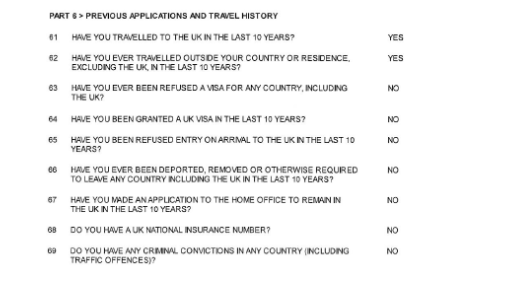
    Have you been issued any visa for the UK, UK Overseas Territories or Commonwealth Country in the last 10 years? I put no as Australians don’t need visas to visit the UK or Commonwealth countries and I have never had a work visa. If you are country that does then put any visitor or work visas you’ve had here. A quick summary of information you will need if you select yes:

    • Type of visa issued – State the type of visitoror wok visa here
    • Date of Issue – Date of Issue as stated in thepassport or travel document
    • Date of Expiry – Date of Expiry as stated in the passport or travel document. If the passport ortravel document has no date of expiry please enter 01 JAN 2050.
    • Issuing Authority – that authority issued yourvisa i.e. British Embassy, High Commission, Consulate

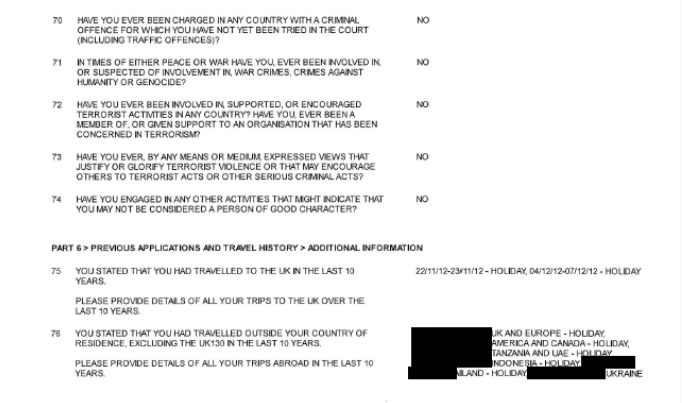
    Have you ever travelled to the UK in the last 10 years? The one and only trip  (technically two entries) I had to the UK was detailed here. You can put up to 5 trips you have had to the UK. I suggest putting latest to oldest dates (just my preference).

    Have you made an application to the Home Office to remain in the UK in the last 10 years? I put no for this answer. Unless you have requested for Settlement or any visa like that then you answer will be no.

    The application then goes into whether you have be refused entry, deported, elected to leave the UK and any other country. Hopefully you will be able answer no to all these questions.

    Have you ever travelled outside your country of residence, excluding the UK, in the last 10years? I listed out all my trips, this needs to be as arcuate as possible. For my most recent application I was given 30 lines however it was a different visa but expect to have between 10 to 30 lines in the application to enter this. Again using the latest to oldest trip order. If you feel like it you can add a spreadsheet detailing your remaining trips but I didn’t provide a spreadsheet with my application Ancestry application.

    Have you ever been issued with a UK National Insurance Number? E.g. QQ 123456A Unless you have lived in the UK previously you won’t have a National Insurance Number. If you curious to know more about National Insurance Number I have detailed everything in this article. 

    The application then goes into criminal records, whether you are a terrorist and other information around your criminal history. 

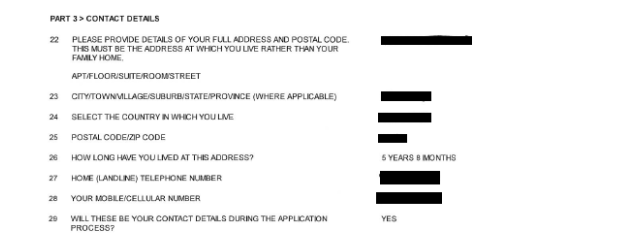
    Example of my application:

    Ancestry Visa Application Contact Details Section2
    Ancestry Visa Application Travel History Section
    Ancestry Visa Application Travel History Section
    ncestry Visa Application Travel History Section2
    ncestry Visa Application Travel History Section2

    Family Details

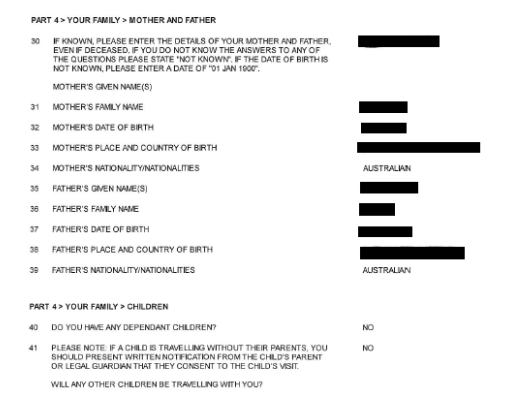
    Family details is about your mother and father, your relationship status and whether you have children. This section should be a breeze.

    For evidence I only provide my mums birth certificate as my dad isn’t linked to my ancestral heritage to the UK. If the birth certificates can tie your ancestral heritage then shouldn’t need a marriage certificate. If linking the heritage isn’t obvious then marriage certificates are a must.

    Example of my application:

    Ancestry Visa Application Family Details Section2
    Ancestry Visa Application Family Details

    Employment and Income

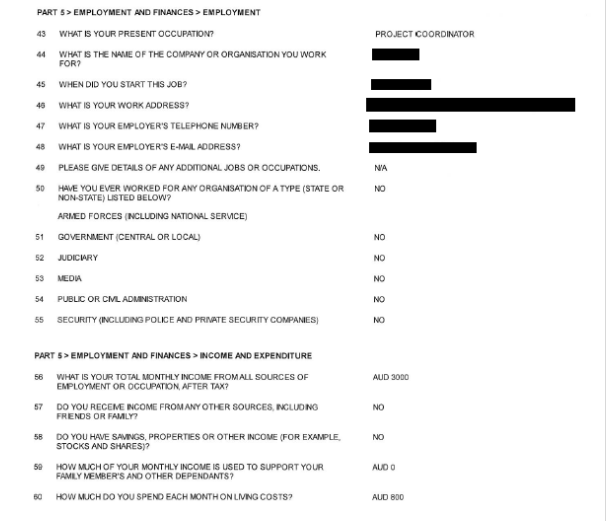
    What is your total monthly income from all sources of employment or occupation, after tax? WhenI submitted my application I added what currency I was paid in so my answer was: AUD 3000 (for example).

    The Type of work undertaken – For this question I just described my field and put IT ProjectManagement.

    Do you have any additional paid jobs or occupations? If you have any more jobs add them here.

    For evidence I also provided my employment contract to support the employment section.

    Income and Expenditure

    Do you have savings, properties or other income, for example from stocks and shares?  My answer was no as I didn’t have any income streams. If you do add them here.

    How much do you spend each month in GBP(£) on living costs? I actually put this in AUD and not GBP as it was the thing at the time. It’s just a summary of what you spend on rent, bills etc each month converted into GBP.

    The questions in the Income and Expenditure section is where people get the most confused. 

    For this sections first, work out the total cost of your trip: flights, hotels, meals, train tickets, everything, in the currencies you’re paying in. Then convert to pounds and calculate the total.

    Once establish the costs you need to figure out if you are paying for the whole trip or are you getting someone else to support your trip? If someone else is paying then did they buy your plane ticket? Will they be paying for the hotel stay? Are they reimbursing you for what you spend? Convert all that to pounds and add it up.

    How much of your total monthly income in GBP(£) is given to family members and other dependents? My answer was no but if your parents or anyone is supporting you add the amounts here.

    What is the cost to you personally of your trip in GBP(£)? I put a combination of my flights, accommodation and expenses for this. If someone is helping you pay for this then only put the amount that you are paying in this section so basically what is this personally costing you. I didn’t provide any evidence for this.

    The total amount of money you have for this trip? I just put what my total saving was for this answer, for example, AUD 8000. This was supported by bank statements as evidence.

    If you want to know how much to save before moving to the UK, I suggest reading ‘How Much Money Should I Save to Move to the UK?’. You can through all my suggestions out the window and wing it! In that case just have enough to show you can support yourself, I always recommend £1,890 as a minimum. 

    The cost of the aeroplane, boat or train tickets? Whatever you ticket cost to get to the UK. If you don’t have a ticket then find the most realistic cost by using Skyscanner etc. Slightly ironic that the advice is don’t book you travel before your visa is approved! I didn’t provide any evidence for this.

    The cost of your accommodation? I calculated my first months accommodation cost for this answer. I didn’t provide any evidence for this.

    The cost of your living expenses? I estimated this cost, for example, £600. It should cover things like transport, estimated food budget etc. It’s a bit of an odd question. I didn’t provide any evidence for this.

    If you want to know the cost of living in London I have you covered! It’s based on my costs living here. 

    Is someone other than you paying for all or a part of your trip? If someone is paying for a part of your trip this is where you add this. I didn’t have any one supporting me but having a statement from the person/ money in your account will help support the application (that’s just my personal opinion).

    Example of my application:

    As you can see in Employment and Income section, not all of my questions I had answered actually ended up on the final version. No idea why or whether this has now changed.
    As you can see in Employment and Income section, not all of my questions I had answered actually ended up on the final version. No idea why or whether this has now changed.

    Family and Friends in the UK

    Please enter details of what you plan to do whilst in the UK. My answer was ‘to live and work in the UK’.

    Do you have any friends or family in the UK? I didn’t so my answer was no.

    Medical Treatment

    There is a whole series of questions on whether you have ever received medical treatment in the UK. As someone that never had medical treatment in the UK my answer was no but if you have then put in the relevant information.

    UK Ancestry

    Finally where you put your heritage and how you qualify for UK Ancestry.

    How do you qualify for UK ancestry? Add your relevant grandparents details here.

    I provided my granddad’s birth certificate as proof, along side my mums birth certificate as mentioned in an earlier section.

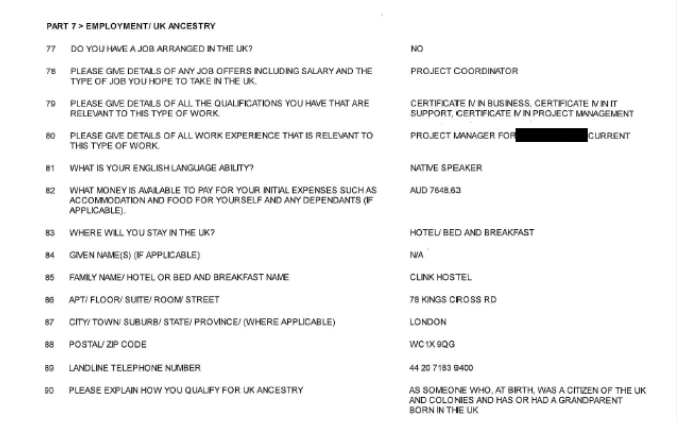
    Do you have a job arranged in the UK? You don’t need to have a job lined up to qualify to move to the UK on Ancestry. My answer was no as I didn’t have a job.

    For evidence I provided my resume. The GOV UK website states that the evidence can be in the form of job offers you’ve received or a business plan if you’re self-employed.

    What is your English Language ability? English is my native language was my answer. If it isn’t just put the level of English you speak (not exactly sure the terminology you should use).

    What money is available to pay for your initial expenses such as accommodation and food for yourself and any dependents (if applicable)? My answer was whatever was in my savings account at the time it was just under $8,000. You should add the currency code in front of your answer so the answer should look like AUD 8,000. I also linked this to the same amount I had in the ‘the total amount of money you have for this trip’.

    For the evidence I provide 3 months of bank statements to support this.

    Example of my application:

    Ancestry Visa Application Employment and Income Details
    The questions in this section have changed a little since I applied, at least it’s less information you need to enter.

    Additional Information

    Is there any other information you wish to be considered as part of your application? I didn’t have any extra evidence so I put no for this.

    Summary of Documentation 

    In the bullets below is a summary of all the evidence I provided for my UK Ancestry visa. I go more into detail about how to get grandparents birth certificates and the process inWhat You Need to Know When Applying for Your UK Ancestry Visa’. 

    I find lots of threads asking whether the documents must be originals or copies can be supplied. Just to add clarity to this point always provide originals to be safe, don’t worry the documents are returned to you.

    • The printout of your online application.
    • The copy of your biometrics appointment information.
    • Current passport, plus previous passports.
    • Birth certificate.
    • The birth certificate of your parent (only the parent of the grandparent you’re applying through).
    • The birth certificate of your grandparent.
    • Marriage certificate (to support heritage if unclear).
    • Three months of bank statements showing £1,600 (which was the requirement at the time). Bank statements should be printed on branch-specific letterhead with the contact info for the branch where it was printed. If not, each statement should be stamped and/or signed. If they won’t do that, a letter from a branch manager confirming their authenticity and correctness will suffice.
    • Resume/ CV (to prove that you can and intend to work in the UK) and you can also include printouts of registration emails from UK job sites e.g. Reed, London Jobs, Indeed.
    • I also included my employment contract to support the employment and finances (not sure if it was necessary, just something else I did include).

    Hopefully, that has given you some insight into what information you need for your application. If you are unsure reach out to the Home Office or my friends at Britbound who will be able to help you.

    More Moving to the UK Articles

  • Indefinite leave to remain via Ancestry visa route

    Indefinite leave to remain via Ancestry visa route

    Moving to the UK

    Five years on the Ancestry visa and the clock’s nearly up. You know you can apply to settle. What you’re after is an example of what someone else sent before you put yours together.

    I applied on 13 August 2018, the first day I could, paid for the fastest service going and had a decision the next day. My sister did hers in December 2020 on the standard service with about half the paperwork I sent. Both approved.

    Based on our two applications, this is what they looked at. It’s two people’s experience, written down so you can see what another human did. It isn’t a rulebook. The official guide for your route is the rulebook and I’ve linked it wherever I’ve used it.

    Here’s what I’ll take you through, in order:

    • the day you can apply, which is not your visa’s expiry date
    • what it costs, all in, with the faster services priced
    • the employer letter, what it has to say and what mine said
    • every document, in one list, with what I sent next to what you need

    Fact check · 6 September 2026

    I’m not an immigration adviser. This is two Australians’ experience of settling on the UK Ancestry visa, mine in 2018 and my sister’s in 2020, with the current rules and fees checked at gov.uk on 6 September 2026. I did the Ancestry route, but the core steps are the same shape on the other five-year routes: the test, the evidence, the absences, the fee. What differs is the detail, so read the guide for your route on the day you apply, or speak to an immigration adviser.

    Covers
    Settling after five years on the UK Ancestry visa, which is what I did. The core steps hold for the other five-year routes; the detail differs.
    Have up front
    £3,226 for the application, £50 for the Life in the UK test and £500 or £1,000 more if you want a fast decision.
    Do first
    Book the Life in the UK test. Then start your absences list today, not the week before.
    Works for
    You, if your visa runs out in the next year or so and you want to know exactly what to gather and when.

    The day you can apply

    You can apply up to 28 days before you reach five years in the UK on the visa. The five years counts from when you entered the UK. The gap between your visa being issued and you landing can count too. Both rules are in the Home Office’s continuous residence guidance.

    Don’t count back from your visa’s expiry date. Mine expired on 10 September 2018 and my five-year point was the same day, because the gap between my visa starting and me landing counted. That put my window at 13 August and that’s the day I applied. Your expiry date and your five-year point may not be the same day. Work off the five-year point.

    Four more things have to be true. All four are on the Ancestry settlement page:

    • You can work and plan to. The Ancestry route is for people who came to work and settling on it asks you to show that. The employer letter below is how I showed it.
    • You can support yourself and anyone applying with you. Bank statements do this job, see the document list.
    • You’re still a Commonwealth citizen. Your Australian passport covers it.
    • You haven’t been out of the UK for more than 180 days in any 12-month period. For visas granted on or after 11 January 2018 that’s counted on a rolling basis, so any 12 months you pick. For older visas it was fixed 12-month blocks. Mine was 2013, so I was on the old counting. Yours almost certainly isn’t. Same guidance as above.

    The two tests you’ll be asked about are further down: the Life in the UK test, which you have to sit and the English test, which as an Australian you don’t.

    What it costs, all in

    What
    Cost
    Source
    The application, per person
    £3,226
    Life in the UK test
    £50
    Priority service, decision usually within 5 working days
    £500 on top
    Super priority service, decision by the end of the next working day
    £1,000 on top
    Standard service
    no extra charge, usually a decision within 6 months

    The faster services were paused for a while. They’re back and both are open to settlement applications made in the UK. There’s no separate biometrics fee on the route page now. The fee last changed on 8 April 2026, so check the fee table’s date before you pay.

    What I paid. £2,389 in 2018, plus the super priority service, which took it to £3,189. I paid on my credit card, half for the air miles and half because it kept the savings in my account visible for the application.

    My sister paid £2,389 in December 2020, plus £19.20 for biometrics and £75 for an express appointment, on the standard service. None of those figures is the current one. The application alone has gone up by more than eight hundred pounds since her run.

    Was the fast service worth it? For me, yes. I’d read about people stuck in limbo with employers while they waited and I didn’t want that, so I paid the extra for the peace of mind. The decision came the same day. My sister waited on the standard service and was fine. How long hers took, I honestly can’t remember.

    The employer letter and what it has to say

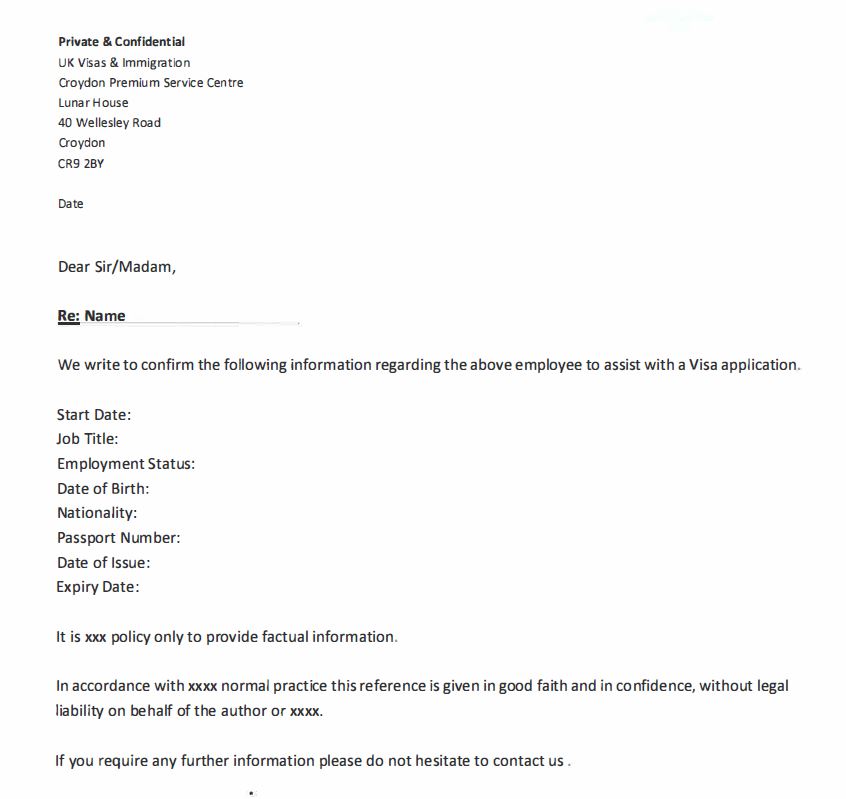
    Here’s the letter, properly. It’s your employer confirming you’re employed here, on headed paper, addressed to UK Visas and Immigration. Mine was drafted by my employer: I told them what I needed at a high level and HR wrote it and signed it.

    Kat's employer letter for her 2018 ILR application, on company headed paper, with the personal details blanked out.

    What mine confirmed, line by line:

    • start date
    • job title
    • employment status
    • date of birth
    • nationality
    • passport number, date of issue and expiry date

    Then two lines of company boilerplate: that it’s their policy only to provide factual information and that the reference is given in good faith without legal liability. Mine was addressed to the Croydon premium service centre, because that’s where my appointment was. Those centres are gone. Yours is addressed to UK Visas and Immigration and your appointment is at a UKVCAS service point, which is further down.

    That’s it. It doesn’t need to be long and it doesn’t need to say anything nice about you. It needs the facts the form asks for, on headed paper, signed.

    My sister’s was the same shape from a different company, two years later. It was accepted alongside her current contract and six months of payslips. Mine went in with every employment contract I’d had and five years of payslips, which I now think was two hundred documents’ worth of anxiety.

    The cover letter. I sent one. It was a one-page summary of every document in the bundle so the caseworker could find things. I don’t have it any more, so I can’t show you, but that’s all it was: a contents page, not an essay.

    Every document, in one list

    Two columns. What the application asks for and what I sent in 2018, with what my sister sent in 2020 where it differed. The online form gives you the exact list for your case. This is what the list looked like for two Australians on Ancestry.

    What they want
    What I sent
    Your current passport
    My Australian passport
    Proof of your UK ancestry
    My birth certificate, my mum’s and my granddad’s UK one, the chain from him to her to me. The same three I used for the Ancestry visa
    Proof of your immigration status
    In 2018, my biometric residence permit. Today your status is digital, see the timeline section below
    Consent for the Home Office to run verification checks
    The signed declaration in the form, plus the joint-account consent form because I had one
    Proof you’re employed
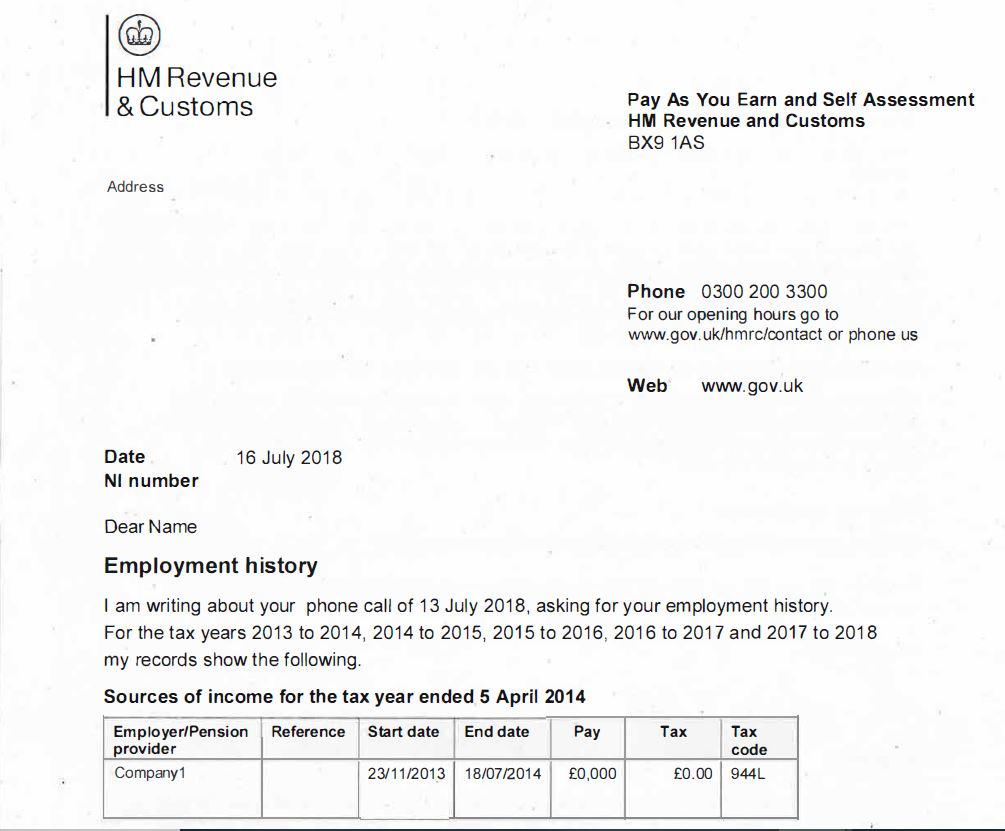
    The employer letter above, every employment contract I’d had, five years of payslips and an employment history letter from HMRC, which they post to you if you ring and ask. My sister: her current contract, her employer letter and six months of payslips. Hers was enough
    Proof of your finances
    Bank statements. HSBC gave me mine with a cover letter, no fuss. Lloyds would only print three months, stamped at the branch, which is the minimum they ask for. I forgot one small savings account statement entirely and it didn’t matter
    Every passport you’ve used to enter or stay in the UK
    My old passport and my new one, because the stamps were the proof of my absences
    Life in the UK test pass
    The pass notification, which is emailed to you now. Keep it. You need it again for citizenship
    Your absences from the UK
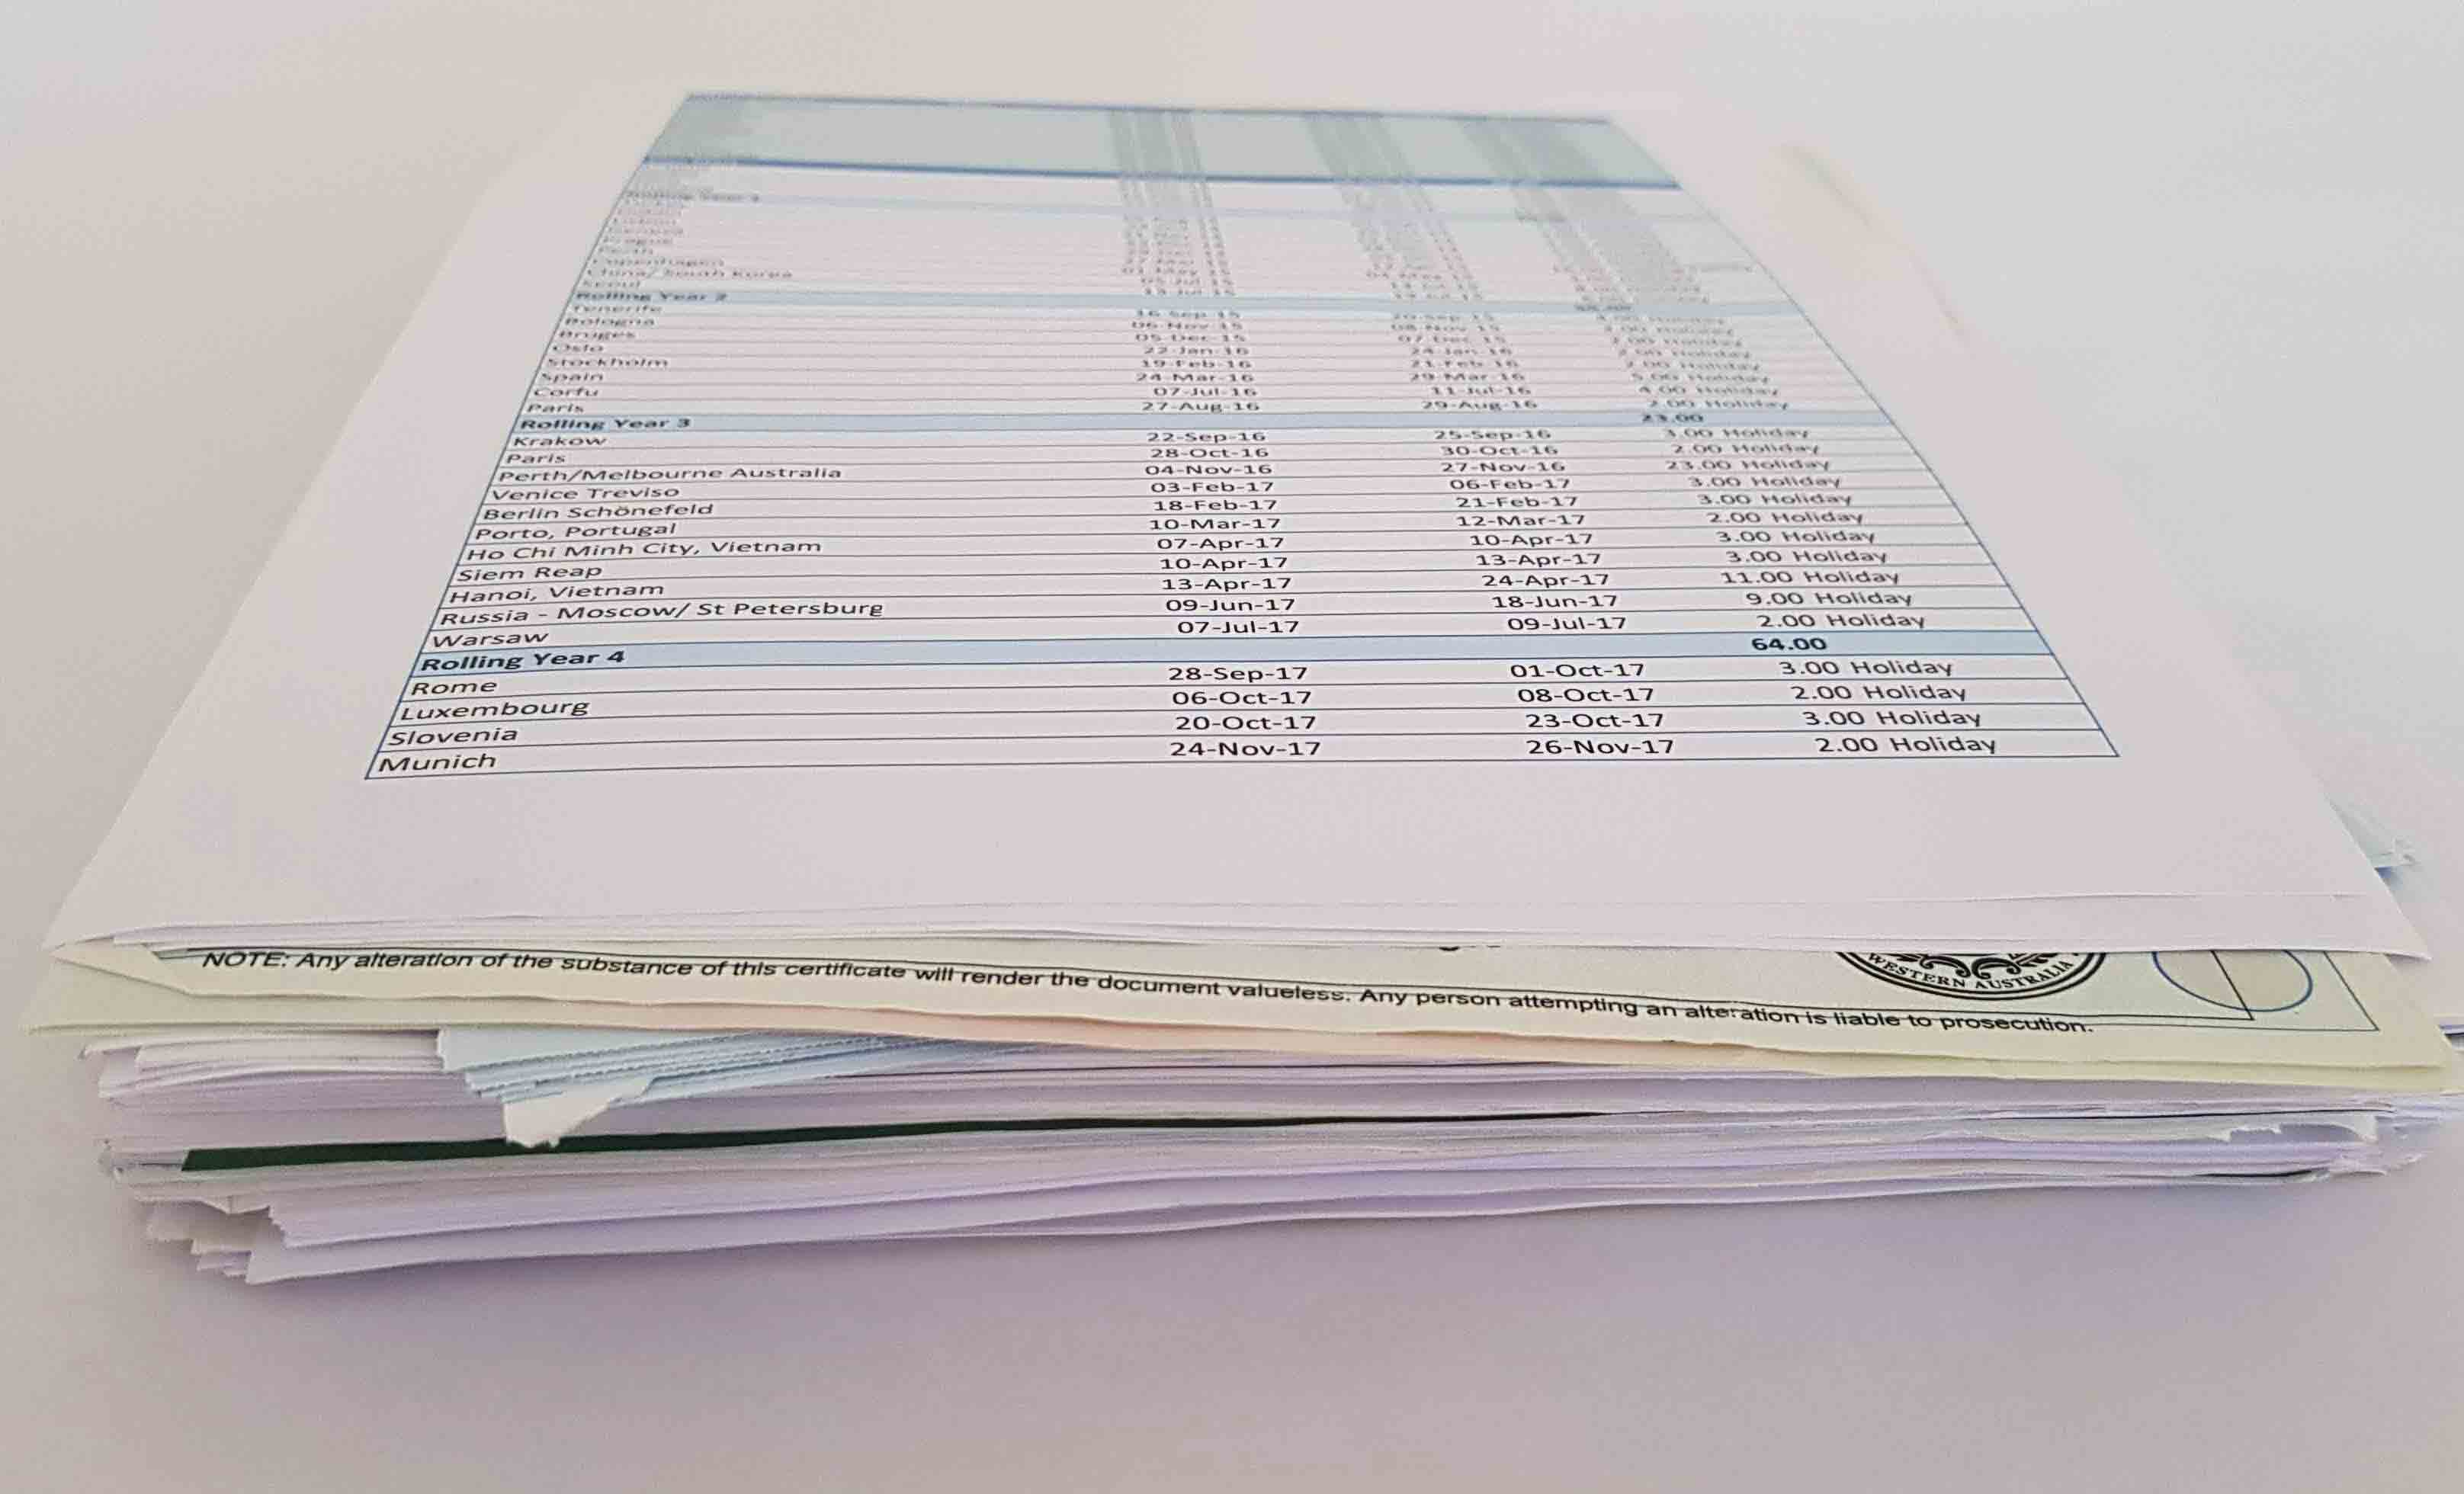
    A full list of every trip with dates and a tally of days, plus a spreadsheet because I had more than thirty lines. See the next section
    Proof of English
    My Australian passport. Australians are exempt
    The stack of documents Kat took to her 2018 ILR appointment, fanned out on a table.
    The HMRC employment history letter Kat included with her 2018 ILR application, details blanked.

    Originals or scans. You upload your documents to the UK Visa and Citizenship Application Services (UKVCAS) online service before your appointment, or have them scanned at the appointment. In 2018 I carried the whole stack to Croydon. Now most of it happens at home before you go.

    The absences tracker: start it today

    The application wants every trip out of the UK in the five years, with dates and the total days. If you’re reading this with a year to go, start the list now, because reconstructing five years of weekends away from memory is slow and I wouldn’t trust mine to catch a 180-day problem.

    Mine had more than thirty lines. I built it from both passports, stamp by stamp.

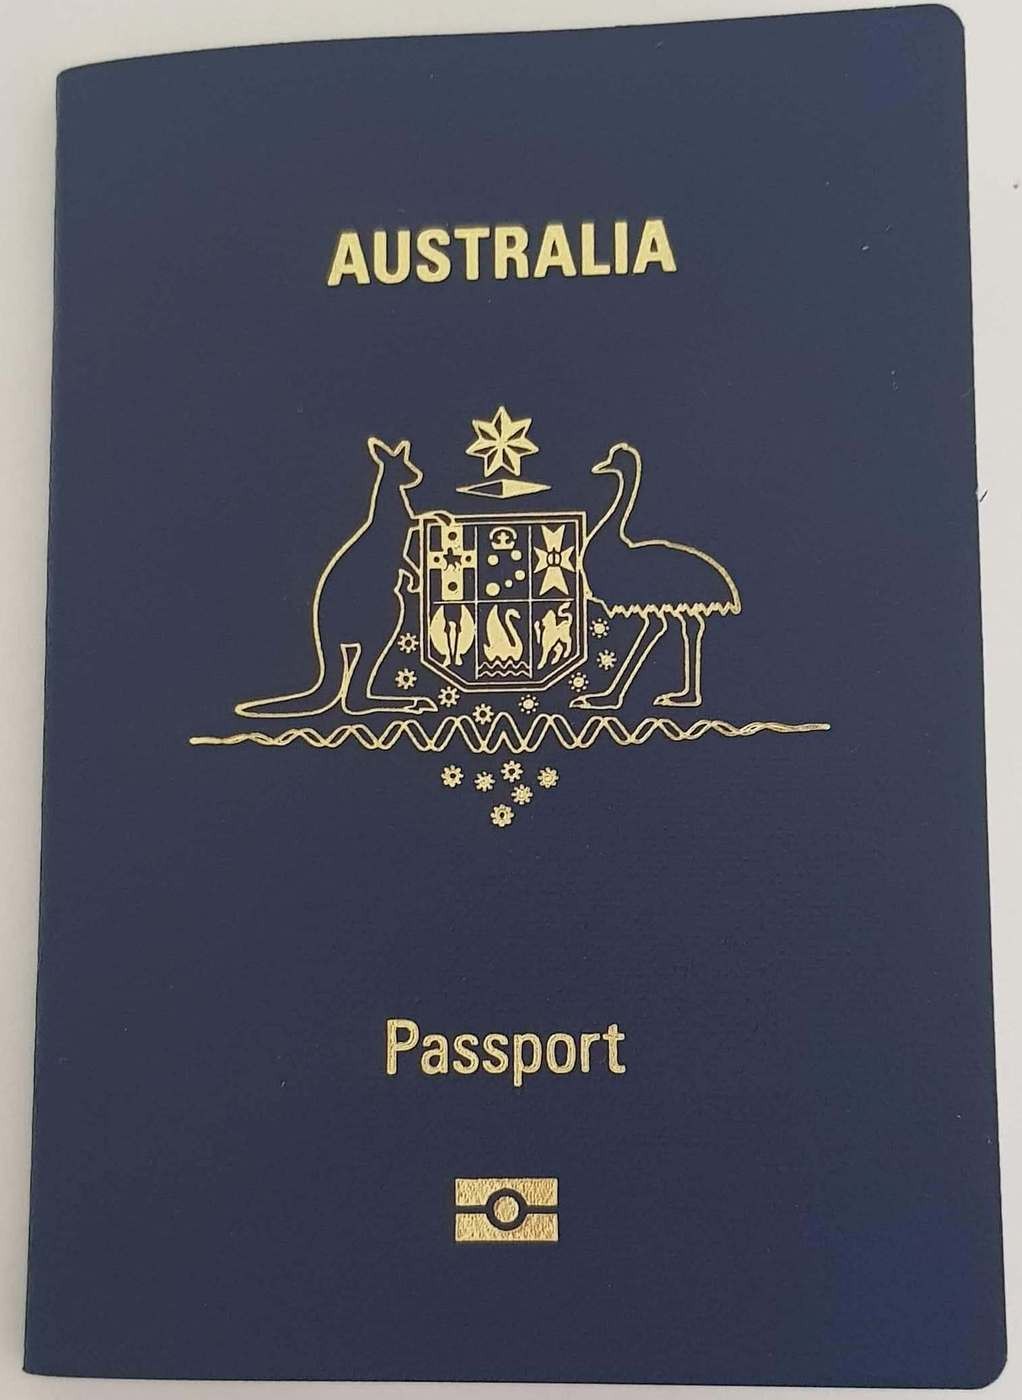
    The front cover of Kat's newer Australian passport.

    Passport stamps don’t exist any more, which makes this harder than it was for me. Two things fix it:

    • Request your Australian travel records. The Department of Home Affairs will send you your movement records, every entry and exit. I didn’t know this existed. It would have saved me hours.
    • Keep a rolling tally as you go. One row per trip: where, out, back, days, why. Remember it’s a rolling twelve months for anyone on a visa granted since 2018, so the total that matters moves with you.
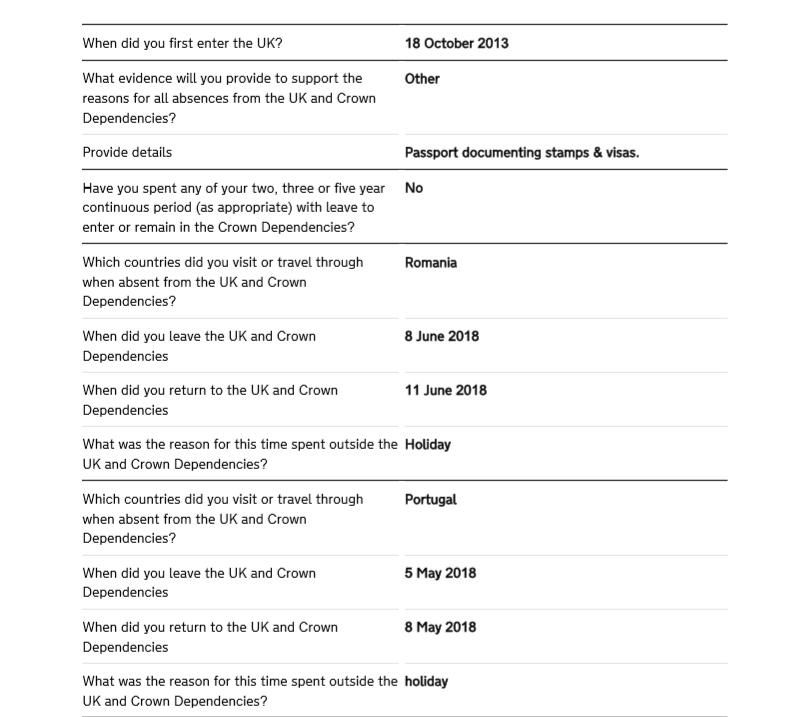
    The reasons-for-absences list Kat submitted with her 2018 ILR application: destination, dates and purpose for each trip, totals by rolling year.

    If you want a head start, here’s a blank copy of my spreadsheet. One row per trip and the rolling-year totals add themselves up.

    The Life in the UK test

    Book it early. It costs £50, you have to book at least three days ahead and the name on your booking has to match the name on your ID exactly. All of that is on the test page. I’ve known people turned away on the day because their ID cut off a middle name or had their country of birth wrong.

    Please, please, please don’t leave it to the last minute. If I’d failed, I’d have missed my ILR window. I sat mine for ILR and reused the same pass for citizenship a year later, which is allowed, so it’s one test, not two. The form asks for your test details, so you can’t submit until you’ve passed. I sat mine on 3 July, six weeks before my window opened.

    You’re exempt if you’re 65 or over. Otherwise it’s part of the deal.

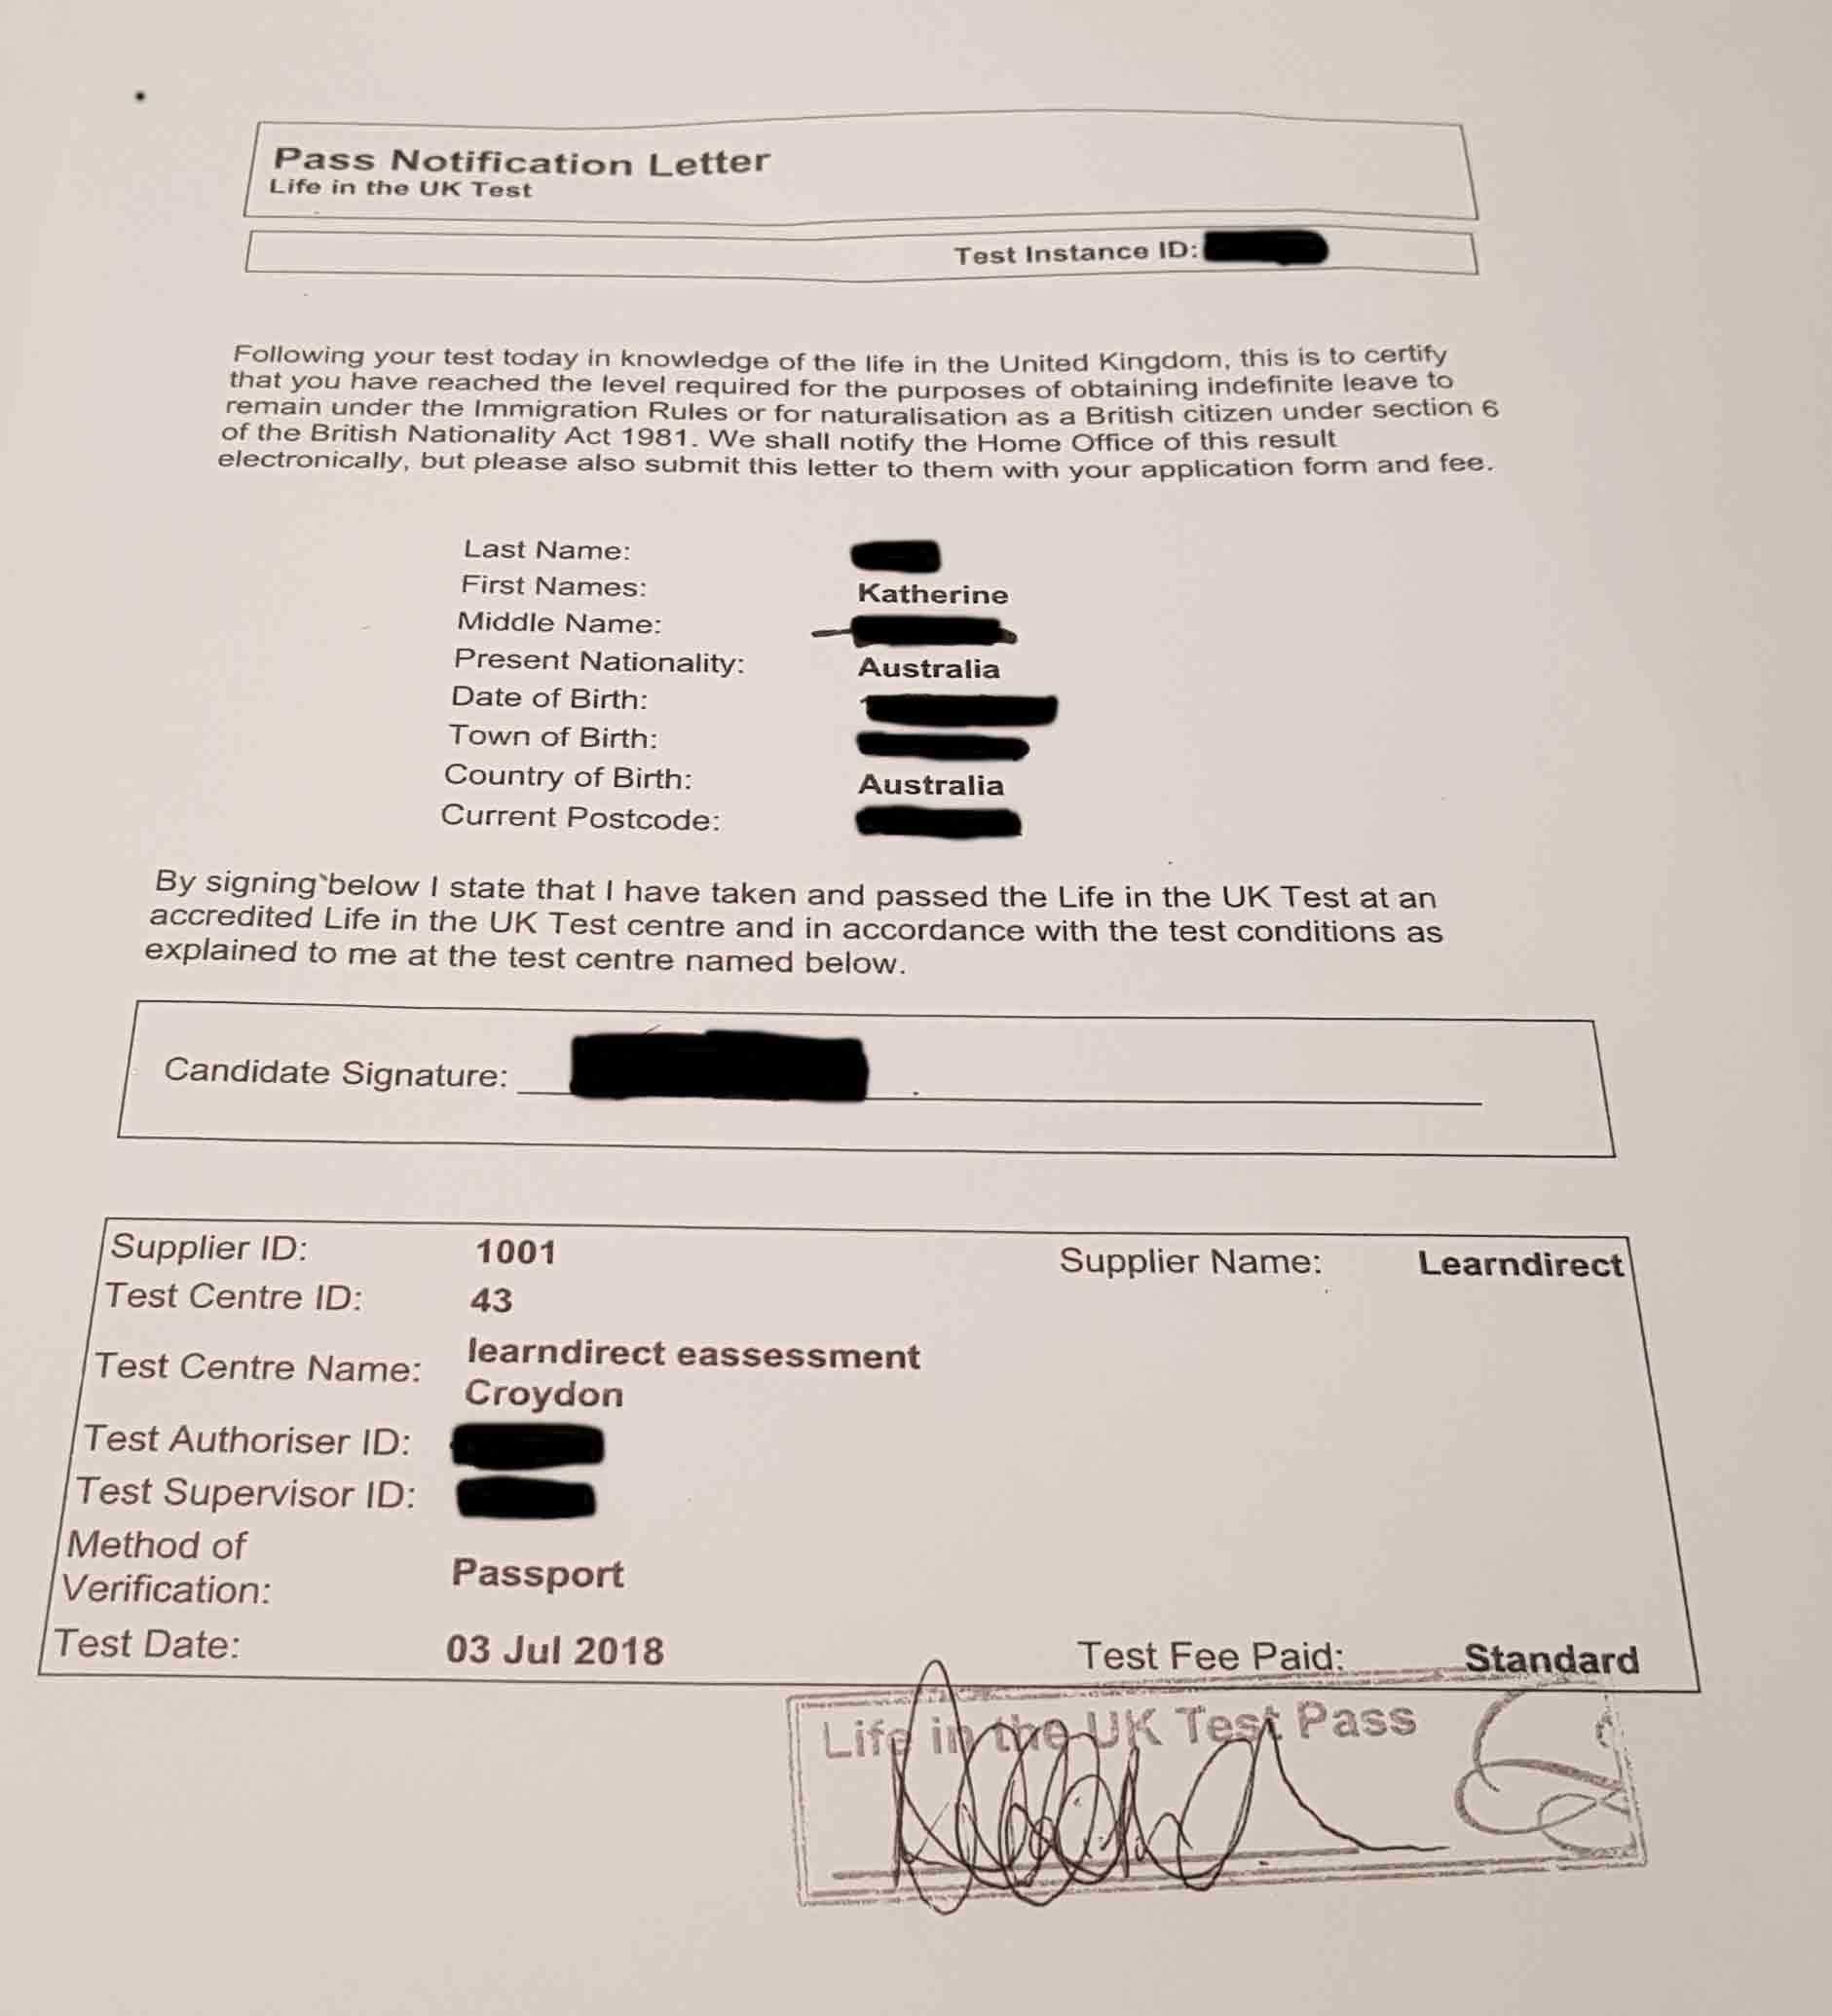
    Kat's Life in the UK test pass notification from 2018, details blanked. The same pass was used again for citizenship in 2019.

    The timeline, from submit to status

    1. Apply online through the settlement form for your route (form SET(O) for Ancestry).
    2. Pay and choose standard, priority or super priority.
    3. Book and attend a UKVCAS appointment for your fingerprints and photo. Take your passport, a printed copy of the appointment confirmation with its QR code and any documents you haven’t uploaded. Nobody hands you a decision in the room.
    4. Wait. Next working day on super priority, about five working days on priority, usually within six months on standard.
    5. Your status arrives as an eVisa. There’s no card any more. Every biometric residence permit (BRP) has expired and been replaced by a digital record you reach through a UK Visas and Immigration (UKVI) account. You prove your status to an employer or a landlord with a share code.

    Mine, in 2018: applied online on 13 August, super priority, appointment at the Croydon premium service centre on 14 August, decision the same day. I only found out it had been approved when the BRP card arrived in the post. I had no idea the card had an expiry date until it did. The photo was better than my passport one. Neither of those things can happen to you now, because there’s no card.

    Where my experience stops. I’ve never had an eVisa. I became a citizen before they existed, so I can point you at the UKVI account page and I can’t tell you what it’s like. If you still have an expired BRP, cut it up before you bin it. It can still be used for a few limited things until 31 December 2026 at the latest.

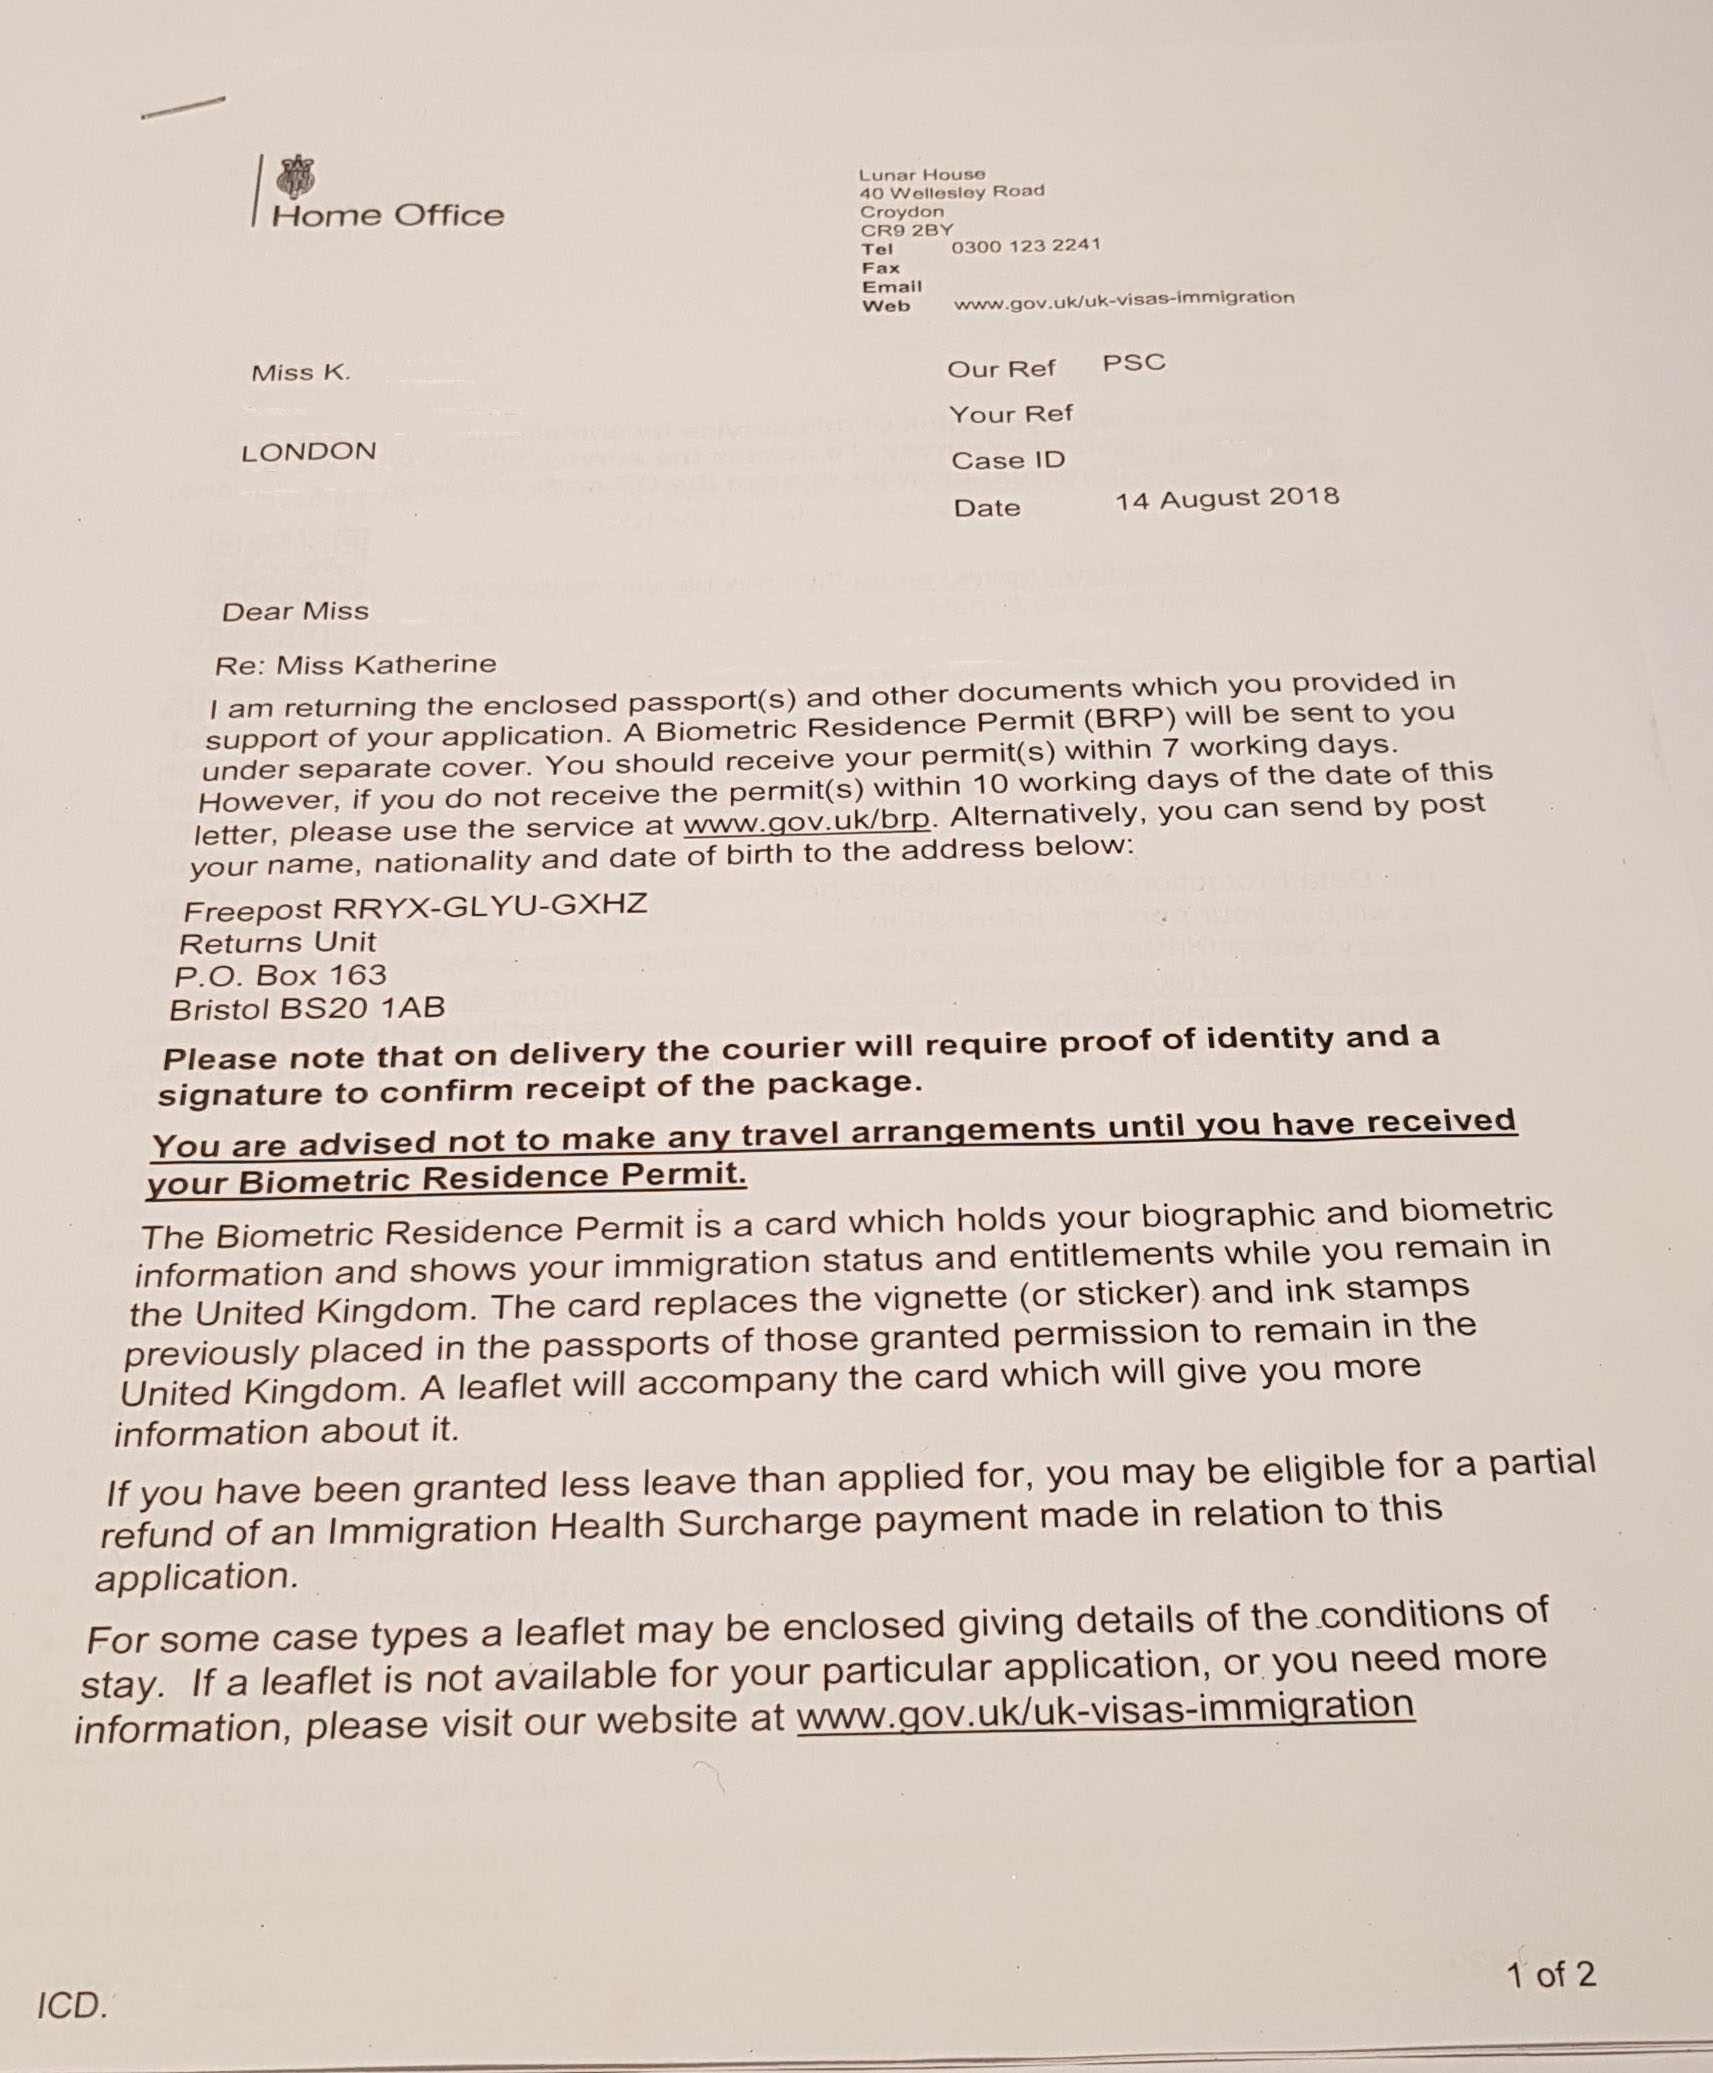
    The ILR approval letter the Home Office sent Kat in 2018, details blanked.
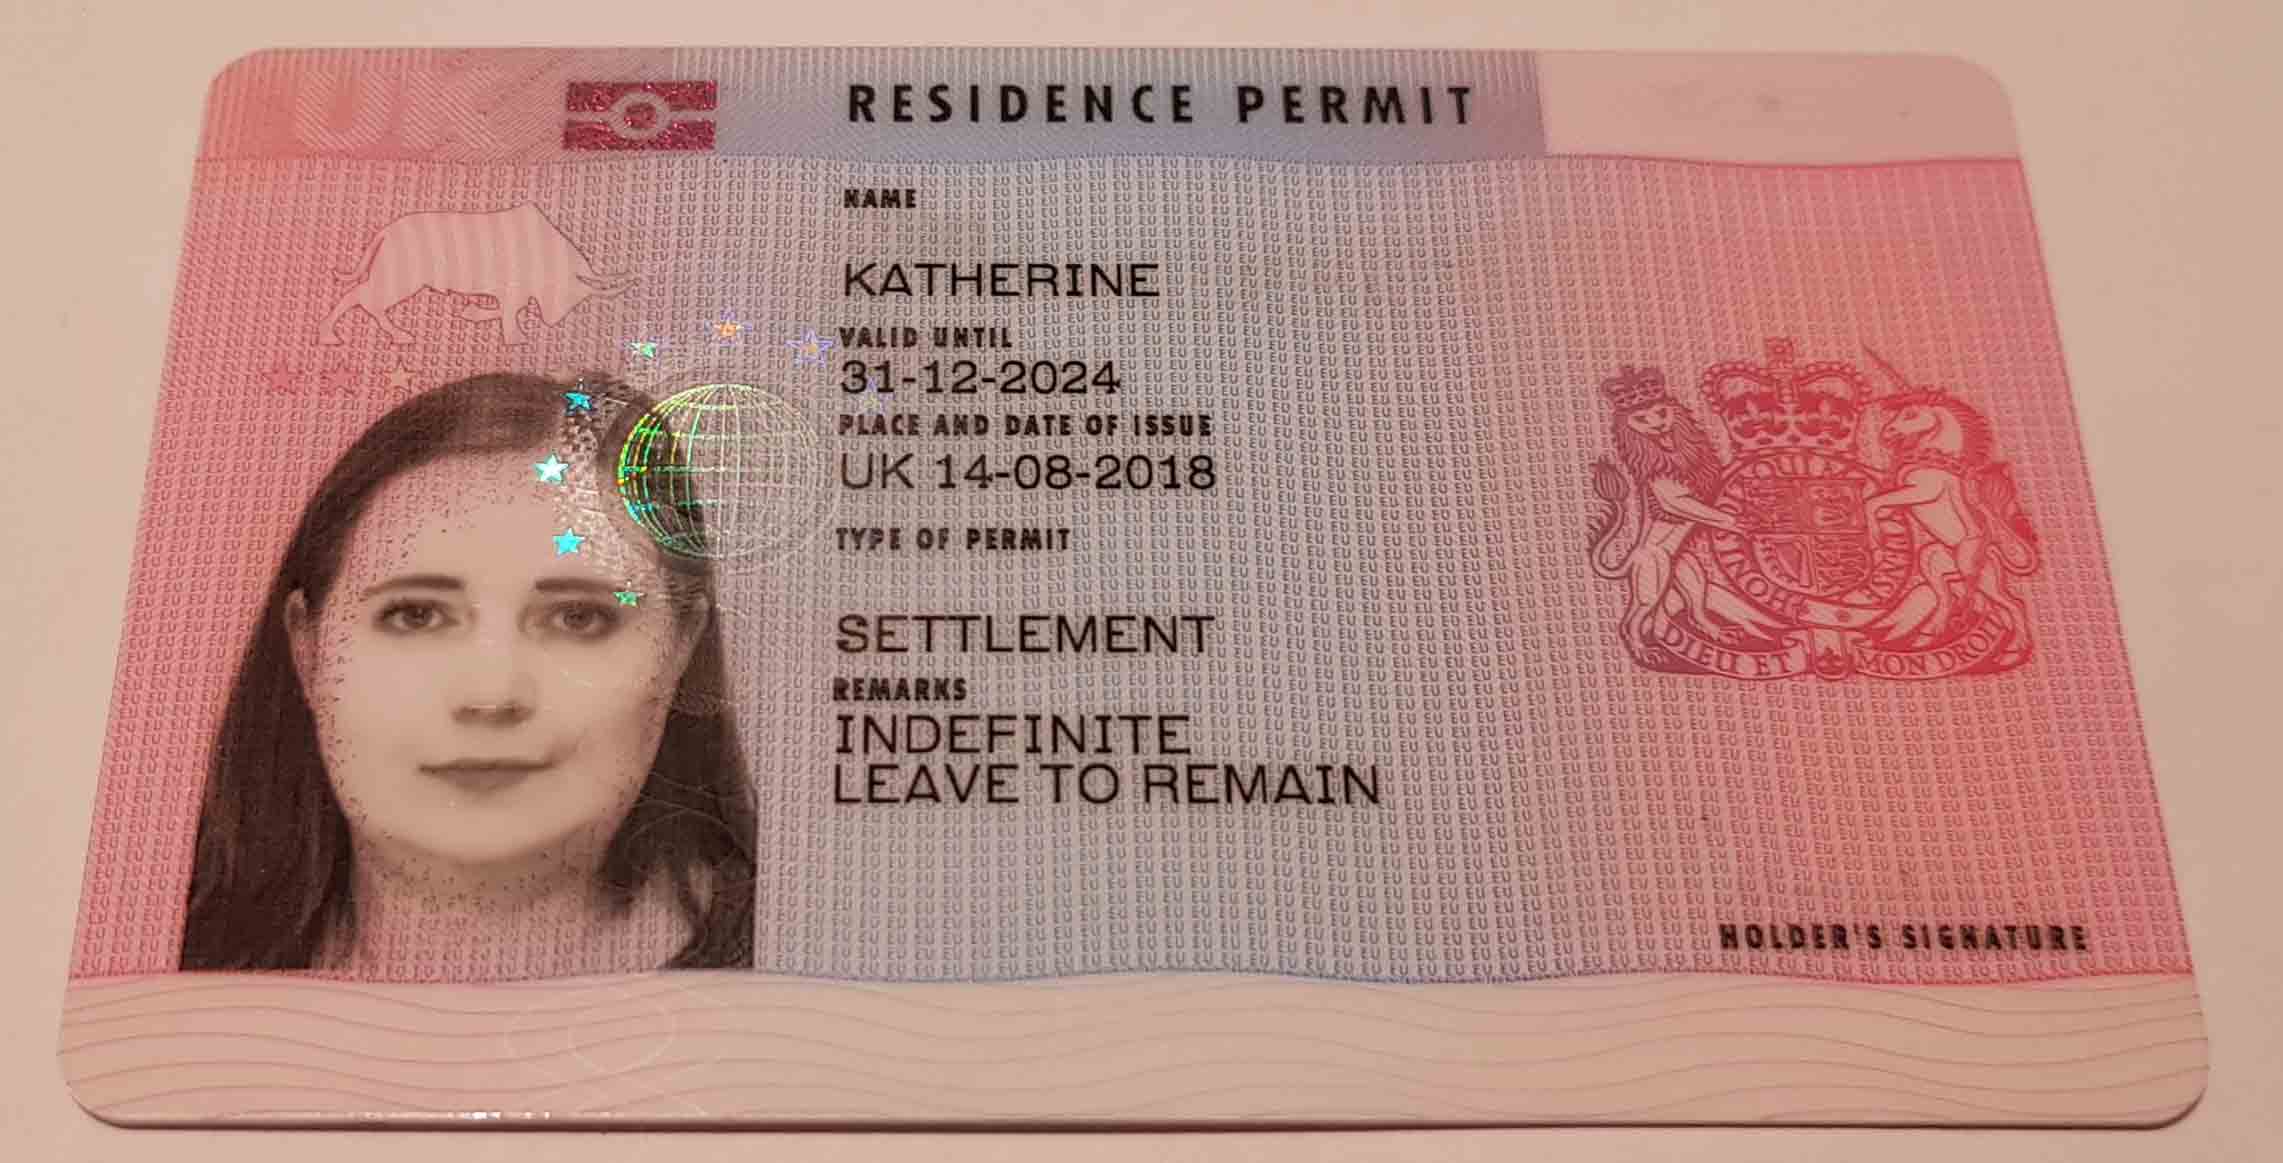
    Kat's 2018 biometric residence permit card, details blanked.
    My 2018 biometric residence permit. These don’t exist any more, but the photo was better than my passport one.

    What catches people out

    • Counting from the wrong date. Your five-year point, not your visa expiry. See the top of the page.
    • The name on the test booking. Exact match with your ID or you’re sent home and out fifty pounds.
    • Absences with nothing to count them from. Request the Australian travel records. Start the tally now.
    • Three-month bank statements. Lloyds only gave me three months, stamped at the branch. Ask your bank early what it will give you and in what form.
    • Leaving the UK for a long stretch after you get ILR. Two continuous years outside the UK and it’s gone. You’d need a Returning Resident visa at £726 to come back.
    • The fee date. It last changed on 8 April 2026. Applying either side of a change can be a different price.

    What’s changing

    Two things are moving. One is still a proposal, one is a rule with a start date. Neither changes what you’d do this year.

    • Five years could become ten. The Home Office ran an earned settlement consultation from November 2025 to February 2026 on a ten-year qualifying period for most routes. It’s still marked as analysing the responses and no outcome has been published. The rule today is five years.
    • The English standard goes up on 26 March 2027. A rules change made in March 2026 raises it from B1 to B2 for settlement, Ancestry included, for applications made from that date. Australians are on the exemption list today and that list hasn’t changed, so it shouldn’t touch you. Check it on the day you apply anyway.

    Doing it yourself or paying someone

    I did it myself. For an Ancestry settlement application it was straightforward: the form tells you what it wants, you gather it, you book the appointment. I knew what I was doing, so I felt comfortable. For me that was worth it. There were plenty of companies at the Home Office the day I went, so people do pay. If you don’t feel comfortable, that’s exactly why those services exist, to make it smooth and easy for you. Neither is wrong.

    What I’d do differently

    Request the travel records instead of reconstructing five years from stamps. Send my sister’s bundle, not mine: a current contract, the letter and six months of payslips did the same job as five years of everything. Book the test the month I became eligible, not the month before the deadline. And I’d still pay for the fast decision, because the waiting is the worst part and I’d already done enough of that.

    Worth it

    The super priority service. A decision the next working day for £1,000. I paid it in 2018 for the peace of mind and I’d pay it again.

    Not worth it

    Two hundred documents. My sister’s bundle was a third the size and did the same job.

    Worth it

    Doing it myself. I knew what I was doing, so for me it was worth it. If you don’t feel comfortable, that’s what the services exist for. Neither is wrong.

    Not worth it

    Leaving the test to the last month. A fail would have cost me the whole application window.

    Worth it

    Requesting your Australian travel records. The absences list builds itself. I wish I’d known.

    Not worth it

    Counting from your visa expiry. Mine happened to be the same day as my five-year point. Yours may not be. Work off the five-year point.

    Worth it

    Sitting the Life in the UK test early. One pass, reused for citizenship. Leaving it late was the most stressful part of the whole thing for me.

    Not worth it

    Relying on passport stamps. They don’t exist any more.

    The Pivot

    Worth it

    A year later it turned into a British passport.

    FAQ

    What does the ILR employer letter need to say?

    That you’re employed, on headed paper, addressed to UK Visas and Immigration: your start date, job title, employment status, date of birth, nationality and passport details. Mine was drafted by my employer’s HR team from a short brief. The redacted letter is above.

    Is there an ILR cover letter example?

    Mine was a one-page contents list of every document in the bundle, so the caseworker could find things. I don’t have it any more. It doesn’t need to be more than that.

    When can I apply for indefinite leave to remain on the Ancestry visa?

    Up to 28 days before you reach five years in the UK on the visa, counted from when you entered. Not 28 days before your visa expires. The rule is in the Home Office’s continuous residence guidance.

    How long does ILR take?

    By the end of the next working day on the super priority service, usually within five working days on priority and usually within six months on standard. Mine, on super priority in 2018, was the same day.

    How much is indefinite leave to remain in 2026?

    £3,226 per person for the application, £50 for the Life in the UK test, plus £500 for priority or £1,000 for super priority if you want them. The fee table has the current figures.

  • UK Visa Super Priority Appointment (Tips and Process)

    UK Visa Super Priority Appointment (Tips and Process)

    As of the 5th of November, the whole service has changed and it’s no longer the same Premium Service offering by UK Visa and Immigration (UKVI). There is a new service called UK Visa and Citizenship Application Service (UKVCAS) which is run by Sopra Steria in partnership with UK Visas and Immigration. I have searched the internet, so you didn’t have to! Here is everything you need to know about the changes.

    Psstt.. You can read more about the application process and documents I provided for the Indefinite Leave to Remain Visa (Settlement) here.

    Super Priority service is currently suspended. As things are changing (due 2020 events) with UKVCAS service please keep up to date with UKVI latest information and UKVAS.

    Disclaimer: This is based on my research and you should seek professional advice if you are unsure. Go to GOV UK to check if there have been any changes to the visa rule & fees.

    5th November 2018 Changes to Appointments

    With the rollout of the UK Visa and Immigration new streamlined services there have been several changes introduced which include:

    • a streamlined online journey for most application types, with an intuitive form making it easier to apply and the option to purchase additional services;
    • a modernised, digital and more secure process to submit key evidence and personal information, with most applicants able to retain their passports and other valuable evidence rather than sending them separately to UKVI;
    • fast and convenient self-service with the ability to make applications and upload evidence directly;
    • more flexible on-demand, mobile application services accessible at third party premises;
    • enhanced support for vulnerable customers through a range of financial support for travel costs and mobile services.

    You can read more of the details UKVI issued on this here.

    Timeline of the Changes

    • From 5th November: the new UK VCAS centres will open and slowly rolled out until the 29th of Nov. They are opening 57 locations across the country to make the process easier.
    • During the period of 5th November – 29th November, the old and new service will run which means there will be access to the new biometrics/document upload centres and Premium Services.  
    • 29th November: Premium Service Centres will close
    • January 2019: Service and Support Centres will open, for use by a small number of customers who require more support with their application. These customers will continue to use the current process until January and the UKIV will issue more information on this process shortly so look out for it.

    Premium Service Appointment Booking

    In order to book the premium service appointment, you need to complete the online application (for my ILR I used the new visa immigration website), it will be the last stage of the online application process providing you with two options to submit your application. The two options are Standard and Super Priority service and the type of visa’s this service is offered to are:

    • Tier 2 or 4 visa
    • Tier 2 or 4 dependant – applying on your own
    • Tier 1 or 5 dependant – applying on your own
    • Remain in the UK with family – applying in the partner, family life as a partner or private life in the UK routes
    • Indefinite Leave to Remain
    • And a few more.

    What does this mean for you?

    This changes the way the visa appointments used to work so instead of the appointments opening 45 business days in advance they now open within 5 working days of making your application. They encouraged to go to an appointment as soon as possible and will receive a reminder after 15 working days if you have not attended an appointment.

    If you want to visit one of these service points you can book an appointment:

    • up to 28 days in advance
    • the same day
    • the next day
    • outside of standard office hours

    If your application included family members or dependents you will need to attend the appointment at the same time.

    What are the Decision Timelines for the New Premium Service?

    The changes have introduced a new timeline for when a decision is made on your application, the choices are:

    Example of the new application

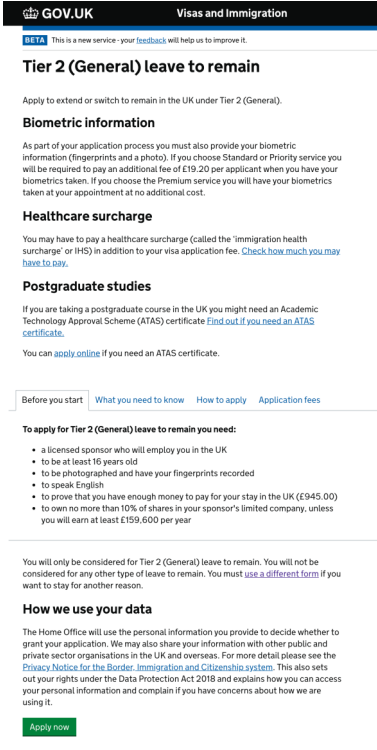
    Visit Gov.uk to commence your application, depending on the visa type you will be directed to the appropriate form you need to fill out. Once you commence the application you will be presented with an information page about your visa which will detail information about; biometric information, healthcare Surcharge, before you start applying, what you need to know, how to apply and application fees.

    Example of Tier 2 Application page.
    Example of Tier 2 Application page.

    Once you’ve completed the application and declaration you will get to the payments section.

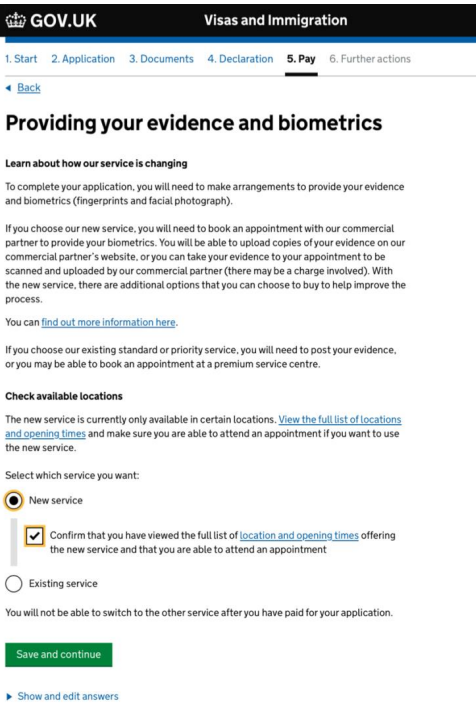
    The first step of this process is providing your evidence and biometrics information. Between 5th November and 29th November you will be offered the choice between the existing service or the new UK VCAS. This is still displaying on some applications. You will need to choose the new service as the existing service no longer exists.

    Example of page 2 of the Tier 2 application page for providing biometics.
    Example of page 2 of the Tier 2 application page for providing biometics.

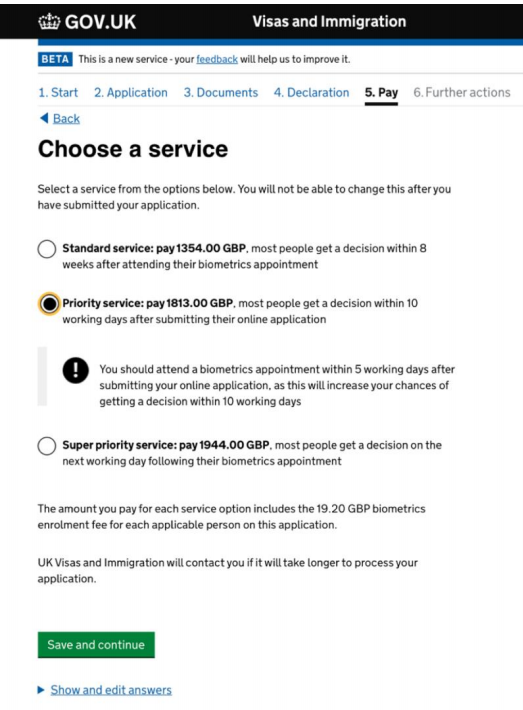
    The next step is choosing the service, to recap the decision timeline is:

    • Standard service – get a decision within 6 months
    • Super priority – get a decision in 24 hours
    Example of payment page and options available.
    Example of payment page and options available.

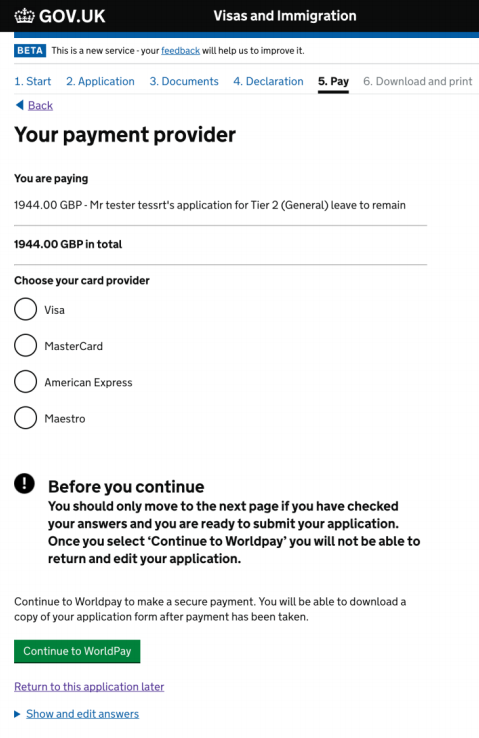
    The moment of spending your money is now here! Put in those card details.

    Choosing your payment method on UKVI.
    Choosing your payment method on UKVI.

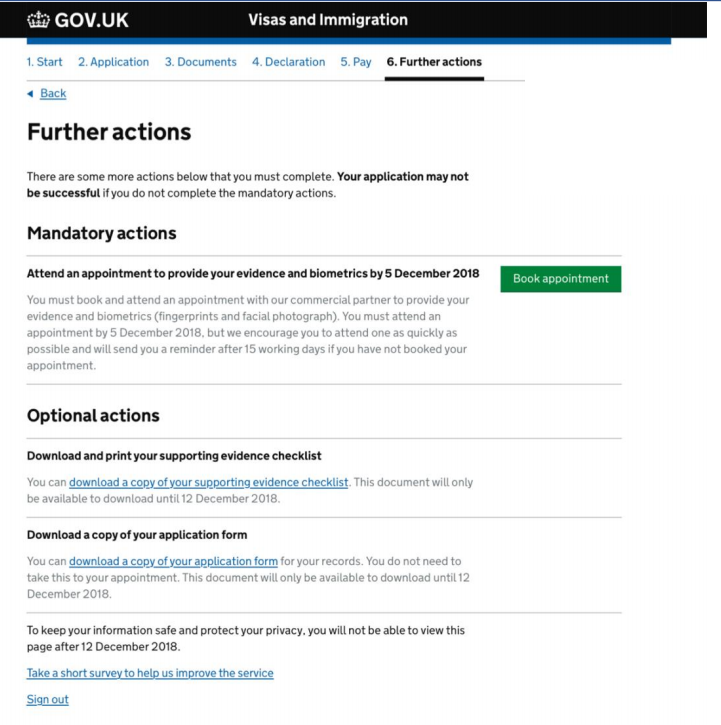
    The last page is further actions will cover booking appointment, downloading the checklist and application.

    Further actions page on UKVI which allows you to book an appointment with UKVCAS.
    Further actions page on UKVI which allows you to book an appointment with UKVCAS.

    Booking Your Appointment

    Once you complete your online form and pay the fees you will be emailed an access code. This is used to book an appointment through the online portal on the UKVCAS website.

    This is also the portal you will self upload your support evidence.

    What Locations Can You Get a Premium Service Appointment?

    Before the changes there only used to be 7 Premium Service Centres now there is now 57 UKVCAS centres across the UK:

    • 6 core service centres offering free appointments – Manchester, Birmingham, Glasgow, Cardiff, Belfast and Croydon.
    • 50 enhanced service centres offering charged appointments so it will be £60 for appointments between 10 am – 4 pm, £100 for weekday appointments outside of these hours, or £125 for weekend appointments.
    • 1 premium lounge for a fee of £200 (or £260 outside of10 am –4 pm hours). Choosing this service won’t improve your application processing time.

    To find your closest centre use the location tool here. When you are booking the appointments the location tool will also appear providing you with the 4 closest centres. If you wish to find another location then enter the postcode of that area and it will show you the centres to that area.

    For example, my closest centres in London are:

    • Croydon Core Service Point – Bedford Point, 35 Dingwall Road Croydon
    • Wimbledon Service Point – Wimbledon Library, 35 Wimbledon Hill Road London
    • Victoria Service Point – Regus, 52 Grosvenor Gardens London
    • Premium Lounge Service Point – 20 Mark Lane London

    Indefinite Leave to Remain Premium Service Fees

    The fee structure for the Premium Service was £800 which has now been transferred to Super Priority service (new arrangements).

    You can see the latest fee list here.

    Additionally, you can purchase the following services:

    Enhanced service points

    Basically, this is scanning and evidence checking services and cost £60 per person. I suggest doing this yourself instead of paying for the third party to do this on your behalf.

    Out of hours appointments

    This service was previously offered and is just appointments out of the core hours. Prices start from £100 per person on top of any other appointment-based fees.

    Next day appointments

    As the title states, they now offer next day appointments for £100 per person on top of any other appointment-based fees.

    Same day appointments

    For urgent applications you can now get a same day appointment. Prices start from £100 per person on top of any other appointment-based fees.

    How Long Does a Premium Visa Appointment Take?

    I would allow 30 to 60 minute for the appointment. The appointment will just the enrolment of your biometrics and a check supporting evidence has scanned correctly. If you have uploaded/scanned the documents, then it will be simply getting you biometrics done and you will be out the door.

    Once that is complete the decision process will be kicked off and should take 24 hours. I would allow up to three days and if you’ve not heard back by then you can call UKVI.

    Preparation for the Appointment

    The preparation before the appointment is just ensuring that you have your application completed, booking confirmation, checklist and all the documentation prepared. Make sure have certified translations of any documents that are not in English or Welsh.

    With the new service you will be told what you need to bring to your appointment when you submit your application, this will include:

    • appointment confirmation
    • passport or travel document
    • supporting evidence (bring the originals to the appointment)

    When I submitted mine there was no electronic way of uploading the information, so I brought mine all neatly separated into different files and categories to make it easier for the caseworker. It was all just placed in one folder, so it wasn’t necessary to prepare this. I would still put the documents in order as per the checklist to make it easier when someone is reviewing your case if you are bringing physical documentation.

    I’ve read horror stories with the new appointment service that their paper scanners didn’t work. Upload all the docs *before* the appointment and take the original documents to the appointment. No need to take photocopies of docs or passport photos.

    What to Expect During a Premium Service Appointment at the Visas and Immigration

    Since my appointment, the process has changed (I have included that below), the new process will be:

    • show your appointment confirmation (you will get this as an email containing a QR code) and ID documents to confirm your appointment – even if you pre-upload the documents you still need to bring the originals to the appointment.
    • enrol your biometric information (fingerprints, photograph) and digital signature
    • submit your supporting evidence (unless you choose to self-upload this)
    • show your passport or travel document and have your identity checked
    • speak to a member of staff who will check that your biometric information has been successfully enrolled and your passport and supporting evidence has scanned correctly

    Afterwards you are supposed to get an email confirming you’re biometric was enrolled but I’ve never received any confirmation stating this.

    Later, depending on the service you choose you should get a letter from the Home Office on that your application was approved or denied. If approved then you will receive by post your BRP and approval letter.

    Video Update on UK Visa Premium Service Appointments

    Video on the UKVCAS Biometric Appointment

    More UK Visa Articles

    Let me know of your experience in the comments below!

  • Passing the Life in the UK test first time

    Passing the Life in the UK test first time

    Moving to the UK

    Somewhere on your settlement or citizenship document list it says Life in the UK test. Twenty-four questions, 45 minutes, 18 right to pass, £50 a go. You sit it once. The same pass covers indefinite leave to remain (ILR) and citizenship, so it’s one test, not two.

    The irony is that British people fail it. Two thirds of the 270 people the University of Essex put through a version of it in 2021 failed, most of them UK citizens who’d done the history at school. The questions are that nuanced. Which cricketer did what in 1950 isn’t in most people’s heads.

    I sat mine in Croydon on 3 July 2018, a couple of weeks before my ILR application went in. I gave myself a month to study and did it in three days on practice tests. I still remember three of the questions. My sister sat hers in 2020 and had her result by email before she’d left the building. Both of us passed first time.

    Here’s what I’ll take you through, in order:

    • booking it and the name rule that gets people turned away at the door
    • what the questions are like, with the three I still remember
    • how I studied in three days, what I’d buy and what I wouldn’t
    • the day itself, from the security guard to the result
    • what a pass looks like now and how you use it twice

    Fact check · 7 September 2026

    I’m not an immigration adviser. This is my experience of sitting the Life in the UK test in 2018 for ILR and using the same pass for citizenship in 2019, plus my sister’s in 2020, with the fee and the rules checked at gov.uk on 7 September 2026. What you get when you pass has changed since I sat it, so I’ve said where mine differs from yours.

    Covers
    Booking, studying for and sitting the test once, then using the pass for both ILR and citizenship.
    Have up front
    £50 a sitting, the official handbook and the online practice tests, which were £6 for a year when I paid.
    Do first
    Book it, at whichever centre is least faff to get to. The pass doesn’t run out, so there’s no reason to wait.
    Works for
    You, if the test is on your list and you want to know what it’s actually like in the room before you walk in.

    Disclosure

    Some links on this page earn me a small commission if you buy through them, at no cost to you. I only link what I bought and used.

    Booking the test

    You book on the gov.uk test page. It’s £50, you have to book at least three days ahead and there are over 30 centres, so pick the one that’s least faff to get to. I chose Croydon because it was closest to where I lived.

    The catch · your name

    The rule that matters is the name. What you type into the booking has to match the ID you’ll bring, character for character. Middle names, hyphens, the lot. I’ve known people turned away on the day because their ID cut off a middle name or had their country of birth wrong. That’s £50 gone and no test, because gov.uk won’t give it back if you turn up with the wrong ID.

    The ID you can use, per the gov.uk list:

    • a valid passport, which is what I used
    • a valid national ID card from the EU, Switzerland, Iceland, Liechtenstein or Norway
    • a photo travel document, not an emergency one
    • a biometric residence permit (BRP) or card, as long as your test is within 24 months of the expiry printed on it and before 31 December 2026
    • your eVisa, shown with a share code

    Bring the original. A photo of it on your phone doesn’t count and they take your photo on the day too. The ID you booked with is the whole list now. No proof of address. I used my passport both times I needed ID for this and I’ve never had an eVisa, so I can’t tell you what the share-code check looks like at the desk.

    Cancelling. You get the £50 back if you cancel at least 72 hours before. Inside three days you get nothing, whether you cancel or rearrange.

    Who doesn’t sit it. Under 18, 65 or over, anyone with a long-term physical or mental condition that stops them (there’s an exemption form or a doctor’s letter) and anyone who’s passed it before. Australians don’t skip it. The English test you’re exempt from. This one you’re not.

    Worth it

    Sitting it early. Mine was a couple of weeks before my ILR application went in. If I’d failed, there was no room for a resit inside my window.

    Worth it

    The closest centre. I picked Croydon because it was easy to get to. Any centre works and the pass is the same.

    What the questions are like

    Twenty-four questions in 45 minutes. Some are true or false, the rest are multiple choice with four options. Every one of them comes out of the official handbook, the Guide for New Residents. You need 18 right to pass.

    The three I still remember, years later:

    • What year was the Great Fire of London? 1666. I’d walked past the Monument to it so many times on the way to work that this one was free.
    • What was the name of the cloned sheep? Dolly.
    • What was moved from Hyde Park after the Great Exhibition and where did it go? The Crystal Palace, to Sydenham. I was living in Crystal Palace at the time and had been to the little museum there, so I knew it. The palace reopened on Sydenham Hill in 1854 and burnt down in 1936.

    The rest I don’t remember, which tells you something. I got very good at guessing which of four answers looked most like a handbook sentence.

    You don’t get told your score. You either pass or you don’t. Mine was a receptionist calling my name. My sister’s, in 2020, was an email.

    How I studied in three days

    My study tactics are terrible. I’m notorious for last-minute cramming, it’s how I got through school and my teachers always said I’d have done better with more time. Probably. But by how much?

    What I did in those three days was the online practice tests, over and over, until I’d memorised the answers. I read the handbook at points, but the tests are what got me through. My sister, who is not one for pub quizzes or general knowledge, did the same method for a couple of weeks and passed first go.

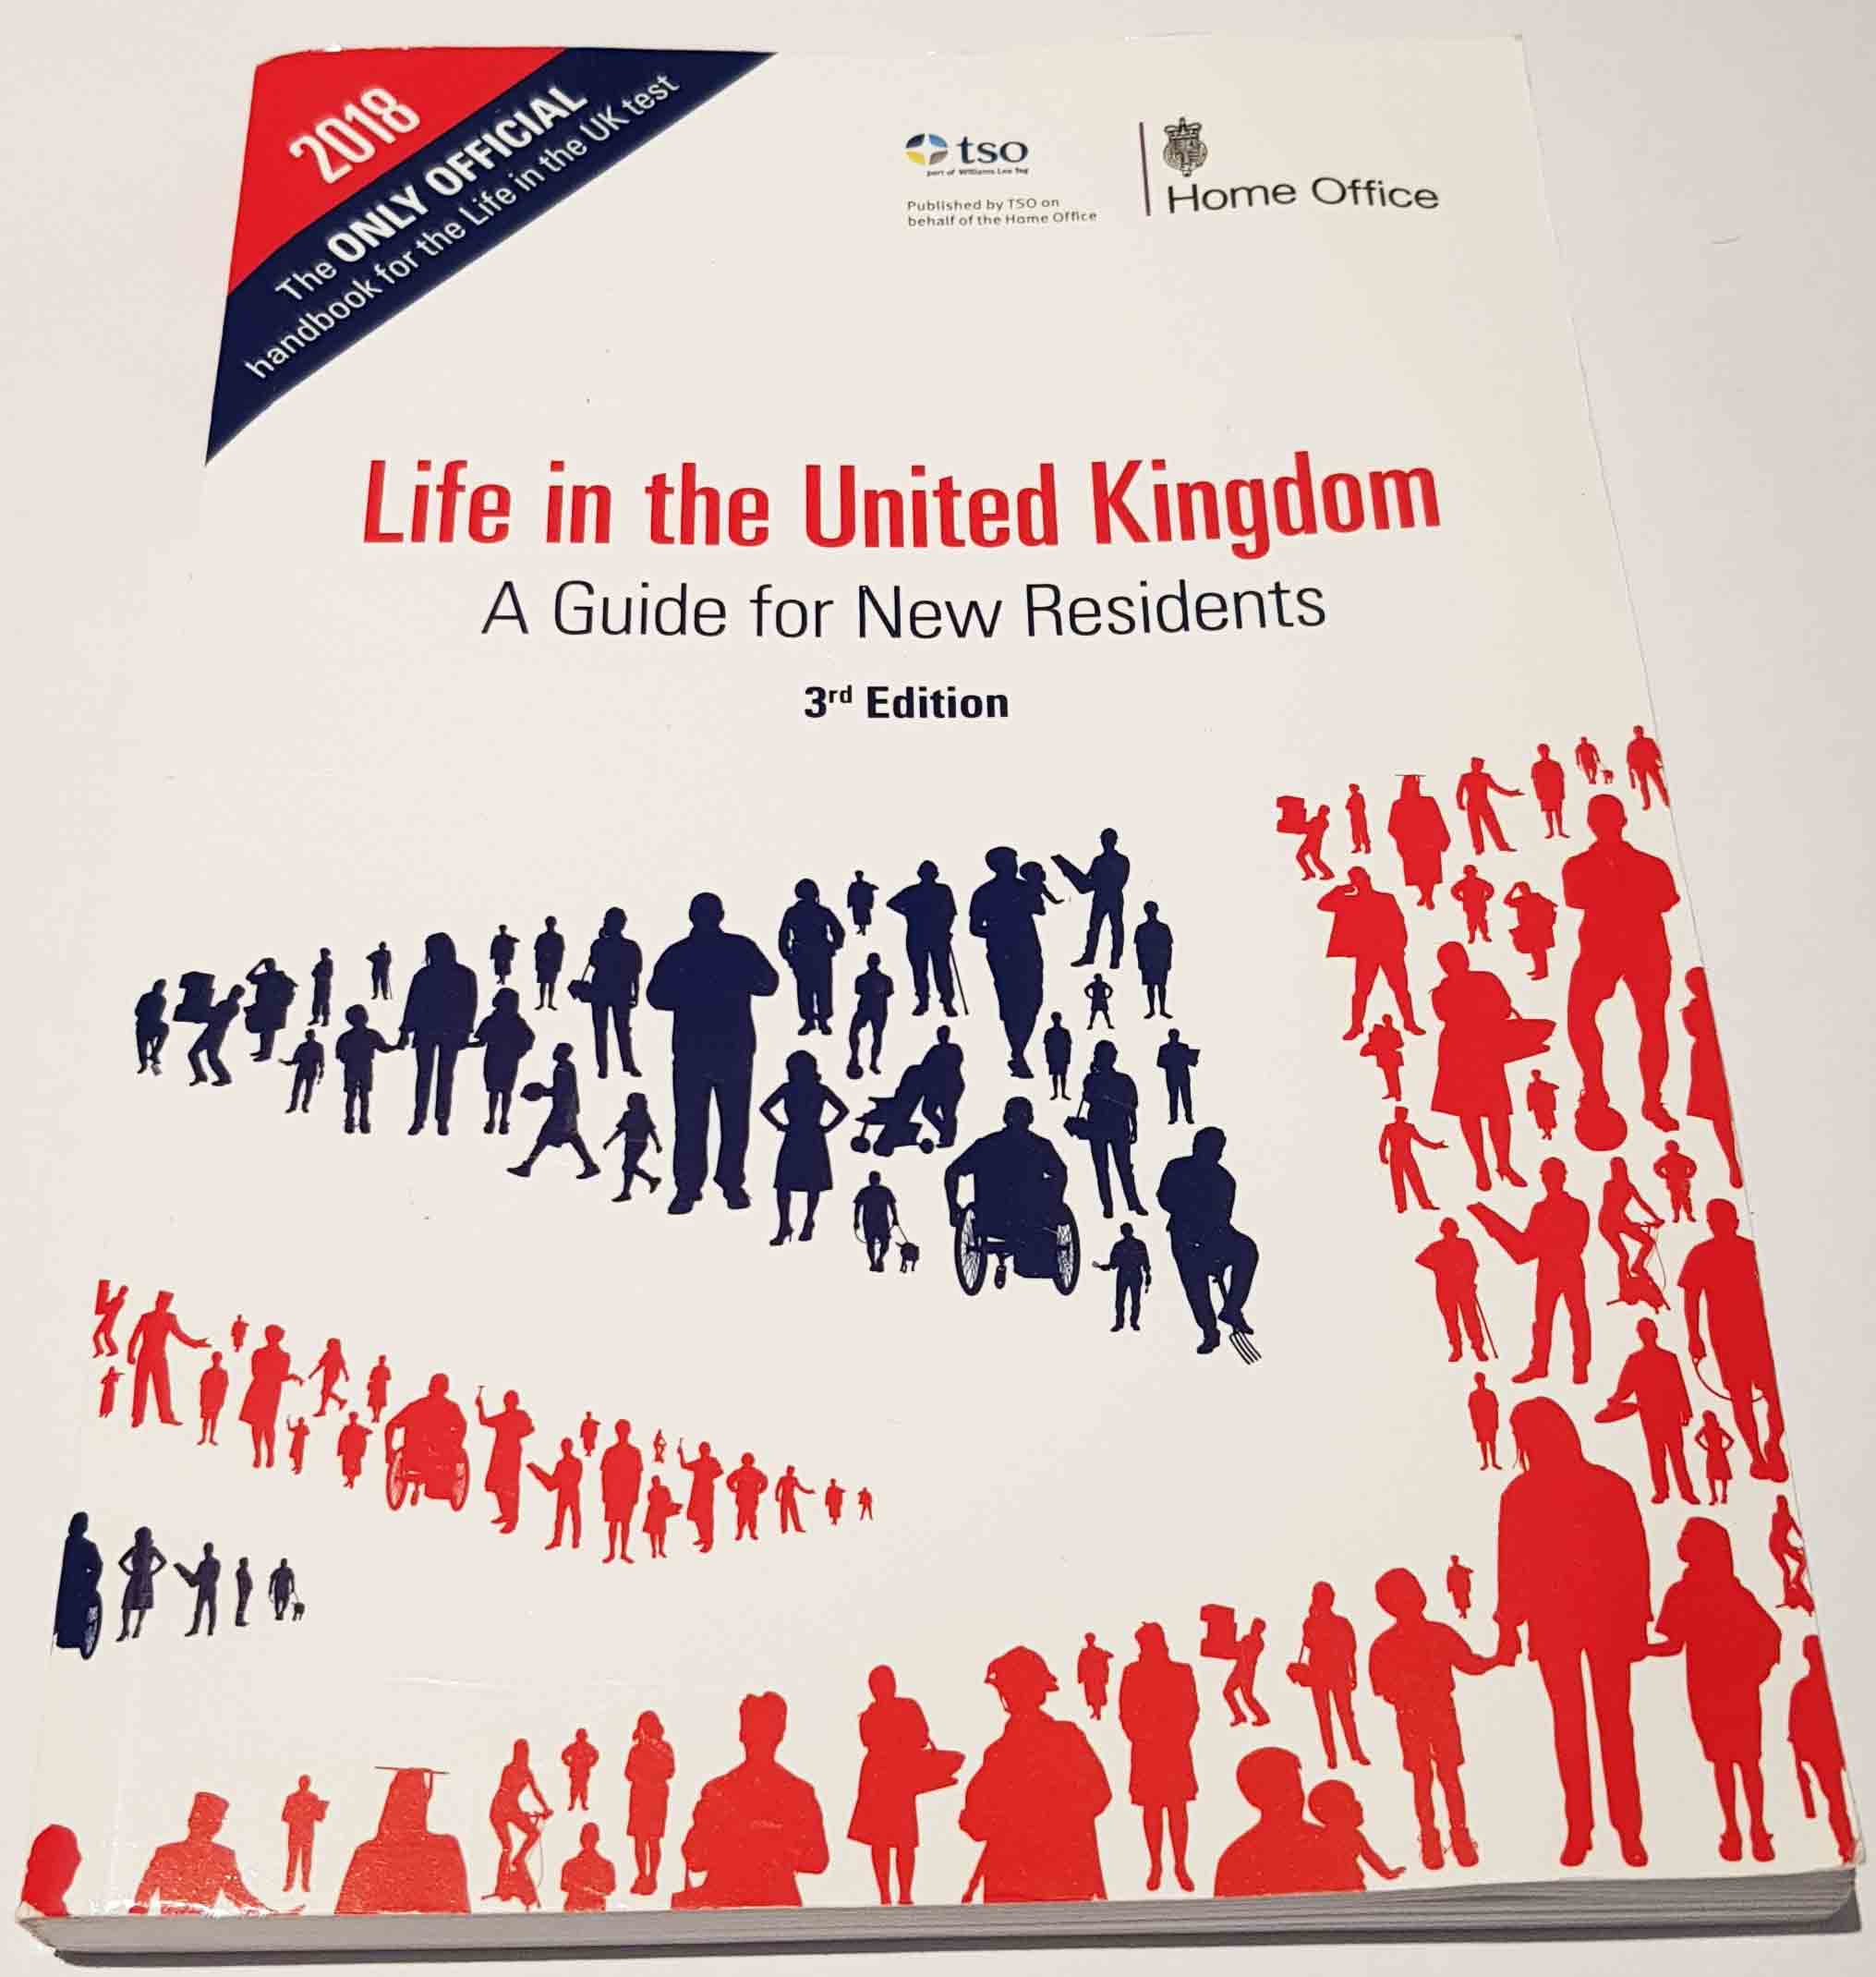
    What to buy. One book and the online tests. That’s it.

    I bought three books: the handbook, the official practice questions and a study guide. Two of them sat on the shelf. Buy the handbook and pay for the tests.

    Worth it

    The online practice tests. About £6 for the year. Question, answer, repeat until you know them. That’s what got me through and it got my sister through too.

    Not worth it

    All three books. I bought the handbook, the practice questions and a study guide. One book was plenty.

    Not worth it

    Cramming. I’m saying that as someone who did it and passed. Those three days weren’t fun.

    The Life in the United Kingdom handbook, A Guide for New Residents, the one book Kat used for the test.

    The day itself

    Mine was 10am on a Tuesday, 3 July 2018, at the learndirect centre in Croydon. I got there 15 minutes early.

    • The door. A security guard took my name and asked if I wanted the bathroom first. I was confused until he explained: once you’ve checked in at the desk you can’t go, presumably so no one’s hiding in there with the answers. Go before you check in.
    • The sheet. I was handed a laminated sheet telling me to allow an hour and a half to two hours. It was nothing like that. About 45 minutes door to door, unless you need help, say if English isn’t your first language. They let me in at my slot and not before. Someone walked me through the rules first.
    • Check-in. After about five minutes the receptionist called me up and checked my first and last name, birthplace and nationality against my passport. This is the moment the name rule bites.
    • The locker. Everything went in a locker except my passport.
    • The room. The supervisor checked my ID again and logged me onto a computer. There was a headset if you wanted the questions read to you.
    • The test. Four practice questions first, which don’t count, then the 24 and the 45-minute clock. My screen froze a few times and I had to hit F5 each time, convinced I was about to lose my answers. I didn’t. Without the freezing I’d have been done in ten minutes.
    • The wait. Back to the waiting room, bag out of the locker, sit. Tapping my foot, waiting for my name, the way you wait for an exam result or at the doctor’s. The most stressful ten minutes of the whole application.
    • The result. The receptionist called my name and handed me a pass letter to sign. The woman next to me didn’t pass. She was bawling her eyes out in the lift and I’ve never forgotten it.

    What’s different now, from my sister’s sitting in 2020: they take your photo on the day and the result comes by email, within about ten to twenty minutes of finishing. No receptionist, no waiting room theatre. You can rip the Band-Aid off sooner, which is kinder. I’d still have been tapping my foot, though.

    What the pass is and how you use it twice

    Pass today and you get a reference number, not a certificate to lose. It goes into your ILR form and later your citizenship one. The Home Office checks it against the test provider’s records.

    Mine was a paper letter, signed on the day, because I sat it before the switch to reference numbers in December 2019. Here’s mine.

    Kat's Life in the UK test pass notification letter from 3 July 2018, Croydon centre, personal details blanked. The same pass was used again for citizenship in 2019.

    I put that letter in with my ILR application a couple of weeks later and attached it again for citizenship in August 2019. No one has asked to see it since. It lives with my ILR evidence and I’d keep yours the same way, number or paper.

    If you don’t pass. You can rebook as many times as you need and you pay £50 each time. There’s no waiting period between goes any more, but you’re still looking at the three-day booking lead and whatever slot the centre has.

    Learning it by going out

    Honestly, most of what I knew walking into that room came from weekends, not the three days.

    The Monument, by the Tube station of the same name, is the Great Fire, 1666. The daffodil is Wales and the thistle is Scotland, which you pick up on a walking tour without trying. In Cambridge I learnt how Henry VIII came to found Trinity College. The Crystal Palace museum is a small place in south London and it answered one of my 24 questions.

    I’d been everywhere from Northern Ireland to Scotland to Wales by the time I sat it. The castles and the museums are the handbook with the walls still standing. If you’ve got a spare Saturday before your test, Stonehenge and the British Museum’s Roman rooms are where a lot of the early chapters happened.

    Worth it

    Getting out and seeing the country. Two of the three questions I remember, I knew from places I’d been, not from the book.

    Stonehenge on a grey day, one of Kat's weekend visits that covered the early chapters of the Life in the UK handbook.
    Urquhart Castle on the shore of Loch Ness, from Kat's Scotland trip, part of how she learnt the history behind the test.

    The Pivot

    Worth it

    Passed. A couple of weeks later the pass went in with my settlement application. That page is here: indefinite leave to remain.

    Where this sits

    The pass from this test goes in with indefinite leave to remain and comes up again a year later on applying for British citizenship, which is the order mine went. Get it done and both of those pages get easier.

    If you’re further back than that, start at moving to the UK from Australia: the visa, the money before you’ve earned a pound here and the Australian admin. The test is a long way down that road, but it’s the one bit of it you can get out of the way years early.

    FAQ

    Do I need proof of address for the Life in the UK test?

    No. The gov.uk list is the original ID you booked with, nothing else. I took my passport and that was the whole check.

    How long does a Life in the UK pass last?

    It doesn’t run out. Having passed before is listed as an exemption from sitting it again. Mine was sat in 2018 for ILR and used again for citizenship in 2019.

    Do you get told your score?

    No. It’s a pass or a fail. Mine came from a receptionist calling my name in 2018. My sister’s came by email in 2020, about ten to twenty minutes after she finished.

    Can I resit the Life in the UK test if I fail?

    Yes, as many times as you need, at £50 a time, booked at least three days ahead.

    Do Australians have to sit the Life in the UK test?

    Yes. Australians are exempt from the English test, not from this one. I sat it and so did my sister.

    What happens if the name on my booking doesn’t match my ID?

    You don’t sit the test and you don’t get the £50 back. Type your name exactly as your ID shows it, middle names included.

    The whole process, on video

    Watch

    Life in the UK Test – The Whole Process
  • How Much Money Should I Save to Move to the UK? With a Cost Breakdown

    How Much Money Should I Save to Move to the UK? With a Cost Breakdown

    Now that you have made the big decision to move to the UK (congratulations!) you are probably thinking how much money should I save to move to the UK?

    I recommend saving over £8,000 as a single person. A budget like this will help you cover:

    • Tier 5 Youth Mobility visa (adjust to whether you need a visa and type, this could be as little as £75 if you have a British passport or as high £3,600 with a UK Ancestry)
    • Initial travel cost
    • One month of accommodation in a hostel
    • UK transportation
    • Food
    • Initial monhtly rent and deposit
    • Being without a job
    • and some money for fun activities.

    Holy (add swear word) right? Is it really going to cost me that much money to move to the UK? Just translating it in Aussie terms that’s $16,000 which is a lot of money!

    At the end of the day it is about your planning, risk factor and deals you can get. My sister only spent $5,000 of the $10,000 that she brought over but had me to support her. She spent her first 6 weeks rent free which you can imagine immensely helped the pocket. 

    The savvier you are with your accommodation, travel and food or happy to take the first job you are offered, the more room you have for being able to save less money. 

    Initial Costs

    There are numerous costs associated with moving across the world. These costs will all be one-offs to you moving to the UK budget, however, they may make a dent in your budget.

    Visa Cost (if required)

    Visa costs can quickly add up! You have the initial visa prices and then the immigration health surcharge (IHS).

    The table below is the most popular visas and the current costs as of Jan 2020. I’ve added examples of the potential costs you could expect, however, these vary depending on visa length, type and other variables. Always check the Gov website for the latest costs.

    Visa Type
    Cost (Applications Outside the UK)
    Example of Potential Cost
    Standard fee ranges from £610 to £1,408 depending on your circumstances
    Example cost of 5 year Skilled Worker visa: £3,730 to £4,528
    £516
    £3,636 for 5 year visa
    £244
    £1,184 for 2 year visa
    £1,523
    £3038 for 2.5 year visa
    £348
    £1,288 for 2 year visa
    Source: Gov UK Jan 2020 Costs

    Immigration Health Surcharge Fee (IHS)

    This fee gives you access to the UK National Health Service (NHS). The fees vary depending on the type of visa you’re applying for, here’s a summary:

    • £470 per year for a student or Youth Mobility Scheme visa, for example, £940 for a 2-year visa
    • £470 per year for visa and immigration applicants who are under the age of 18 at time of application
    • £624 per year for all other visa and immigration applications, for example £3,120 for a 5-year visa

    Not everyone likes filling out visa applications so I recommend Britbound to help. Just to give you an extra bonus to start your adventure, Sarah at Britbound is giving you 10% off visa package (Youth Mobility and UK Ancestry only)! Just use the code KATSGONEGLOBAL.

    Travel to the UK

    Flight to the UK

    You must get to the UK somehow! You’ll need to factor in flights, bus, train or however you plan to get here in your budget. The cost can be anything from £50 to £1,000 depending on your current location. The most I’ve had to pay for a one-way flight from Perth Australia was £500 so this is an area you can definitely reduce my estimated costs.

    Able to be flexible on the dates you can travel? Then head to Google Flights or Skyscanner and use their handy calendar tool to find the best travel dates for your route, by locating the dates with the lowest fares.

    Travel Insurance

    For travel insurance purposes you are only considered a resident in the UK after you live here for 6 months and this means you will need to get one way insurance for moving to the UK.

    One way travel insurance does end up costing more but I feel that it’s better to pay a few dollars for the peace of mind. If you are like me, sold all your belongings and only travelling with what you have left then it will be sad if you lost or had anything stolen!

    World Nomads offer one-way travel insurances which will cover you whilst you’re settling here.

    After 6 months you will be able to access cheaper insurance. Most banks will offer travel insurance with current accounts. This is the best place to check before looking at insurance packages. Normally it is a monthly recurring fee and will include other things.

    Otherwise use places like “Compare the Market” and “Money Supermarket” to find the best deals.

    Costs of Getting To/From Airport

    Costs of getting to from airport
    The classic black cab will be more expensive to get to and from the airport, whereas a pre-booked minicab will be cheaper and at a set price. Photo by Biel Morro on Unsplash

    Hopefully, this won’t be a massive expense, especially if a friend or a family member has a car and can drop you at the airport before you leave! Otherwise, it is another cost to factor in.

    Then it is figuring out how to get from the airport to your accommodation. If you plan on getting a taxi this will cost more, however, you can get pre-paid taxi service instead of metres which will be cheaper. Public transport or bus will be the cheapest option.

    For example, a taxi from Heathrow to Crystal Palace (Southeast London) costs between £40 and £60. The same route by public transport costs £8.40 although there are barely any lifts.

    Luggage

    Airlines will have baggage rules and it’s so easy to take the kitchen sink with you! It’s always cheaper to buy extra baggage up front than getting a shock at the airport. Alternatively, you can use shipping companies or the post to get those last items over.

    I’ve not included what it costs to ship furniture, household items and anything else over as I just bought everything I needed over here. This is where the cost of moving can significantly increase and depending on how long you plan on being here it may not be worth it if you are only here for two years.

    Costs When You Arrive in the UK

    The best practice is of course to have more savings than you need to cover the costs of any worst-case scenario. As we’ve seen with 2020 you just never know what surprises are around the corner.

    I suggest that you allow 3 months worth of padding into your budget, however, I understand this is not always achievable. As this varies from person to person you will be able to adapt the budget to suit your needs.

    The Office for National Statistics says that in 2019 the average family spent £585.60 per week which includes transport, housing and recreation, and culture. For a 3 month budget, this would be £7,027.20.

    If you are interested in the average cost of living in London check out this article. 

    Accommodation on Arrival

    Finding accommodation on arrival in the UK

    Firstly, you will need to factor in the cost of temporary housing, hotel or hostel while you are looking for a flat. I mention this in things you should organise before you move to the UK that I highly recommend you find accommodation that has a kitchen and allows you to cook your own food.

    Average Accommodation Cost

    I’ve gathered the average cost for hostel, hotel and Airbnb rooms to help establish potential costs for a month’s worth of accommodation.

    If you have friends or family to stay with this will add some major savings to your budget! You could also look into couch surfing or pet sitting as another option to save money. Think about staying outside of the city or tourist areas to make your money go a bit further. 

    I’d recommend joining Facebook groups as some people might be renting out their rooms whilst they are on holiday.

    Hostel Dorm Room

    Country
    Daily Average
    Example Cost for 1 Month
    England
    £24.57
    £736.99
    Northern Ireland
    £17.99
    £539.81
    Scotland
    £21.13
    £633.79
    Wales
    £21.71
    £651.39
    Source: HostelWorld

    Hotel Room

    Country
    Average Achieved Room Rate
    Example Cost for 1 Month
    London (included as it’s significantly higher)
    £158.39
    £4,751.70
    England
    £64.75
    £1,942.50
    Scotland 
    £60.35
    £1,810.50
    Wales
    £67.42
    £2,022.60
    Source: BDO Hotel Britain Lite 2020

    Airbnb

    Country
    Daily Average
    Example Cost for 1 Month
    England
    £70.10
    £2,103.00
    Northern Ireland
    £72.50
    £2,175.00
    Scotland
    £76.20
    £2,286.00
    Wales
    £134.95
    £4,048.50
    Source: Witter Blog

    Food

    Kat and friend at Duck and Waffle

    As mentioned a kitchen is something that really helps the budget go for longer in the UK and food is an expense that can add up quickly!

    Just as an example, if I grabbed a coffee and croissant at Pret that would be £4 to £5, Lunch would set me back around £7 then dinner anything from £10 upwards for a dish then add drinks at £5 to £10.

    Versus a weeks’ worth of food and cooking. Personally, I spend between £15 to £30 per week on food shopping and this is about 5 breakfast, lunches and dinners.

    Transport

    Catching the tube in London
    All aboard the bustling tube! Don’t let this photo fool you, peak times on the tube are intense! Super crowed platforms, everyone squeezing themselves on and occasionally smelling your neighbour’s armpit.

    According to the Office of National Statistics, the average family in the UK spends £80.20 per week on transport, including buying and maintaining a car and public transport.

    Using three months as a basic guide this means you will need between £960 for transport. However, this can easily be cut down if you use public transport. Even in London, you can get a travel card for £131 (zone 1 to 2 travel card) to £340 (zone 1 to zone 9 travel card) per month depending on zoning.

    There are ways that you can save on transport costs like staying walking distance to shopping centres, high streets and other amenities that you may need. That way you are only paying for transport to an interview, sightseeing or a day trip.

    Basic Needs

    One thing to note is it is very common to find furnished apartments or you can request that you landlord furnishes the apartment (this will be their choice).

    With a pre-furnished rental, you can expect the place to have bed frames/mattresses, tables, couches, fridge, washing machine etc. You will need to bring your owning bedding, towels, clothing and anything else you wish to make your place homely.

    I went to places like TK Maxx to buy quality products at a cheaper price like bedding, plates, ironing board, sheets, pots & pans.

    Phone sim card

    Most phone companies will offer low range prepaid sim cards for £10 and upwards. You’ll need to have an unlocked phone otherwise you will be locked into your current home provider. Below are just a few examples of the kind of deals you can get for £10 on a sim only contract:

    • Tesco’s £10 top-up gets you 3GB of data, 500 minutes and 5000 texts.
    • Giffgaff  £10 top-up gets you 3GB of data, unlimited minutes and unlimited texts.
    • Virgin Media £10 top-up gets you 2GB of data, 500 minutes and 500 texts.

    Spending Money

    Being new in the UK is understandably exciting and you most likely will want to explore your new city or town. In the UK there are a lot of free things to do which is super handy and of course some paid activities. Or trying out the latest coffee shop or restaurant.

    Rent And Deposits

    You will need to save the up-front costs such as rental deposit and first month’s rent. The rental deposit is typically four to five weeks’ rent.

    London will be the most expensive destination to move to in the UK so if you plan to move to a cheaper city like Liverpool, Glasgow, Cardiff, Nottingham Belfast or Birmingham cost can decrease.

    I’ve split the example costs into two sections, one if you rent a share house in a city and the other the average median prices for private rentals. Additionally an example of the initial costs to save towards. As these are averages you will need to adjust based on your circumstances.

    Share House

    Here are the average rent prices per city in a share housed.

    City
    Average Room Rent 2019
    Example of Initial Costs (with 1st months rent and deposit)
    Brighton 
    £647
    £1,294
    London 
    £728
    £1,456
    Glasgow 
    £558
    £1,116
    Leicester 
    £437
    £874
    Manchester 
    £491
    £982
    Nottingham 
    £436
    £872
    Bristol 
    £543
    £1,086
    Edinburgh 
    £563
    £1,126
    Aberdeen 
    £528
    £1,056
    Cardiff 
    £516
    £1,032
    Southampton 
    £459
    £918
    Oxford 
    £577
    £1,154
    Portsmouth 
    £467
    £934
    Cambridge 
    £564
    £1,128
    Leeds 
    £459
    £918
    Bournemouth 
    £473
    £946
    Birmingham 
    £438
    £876
    Newcastle 
    £418
    £836
    Liverpool 
    £406
    £812
    Sheffield 
    £420
    £840
    GB 
    £566
    £1,132
    Source: Hamptons Lettings Index

    Spareroom and Ideal Flatmate is where you can find listings for share houses.

    Private Rental

    Here is the median monthly rent across the UK in 2020.

    Location
    Median Monthly Rent
    Example of Initial Costs (with 1st months rent and deposit)
    £700
    £1,400
    £1,425
    £2,850
    £651
    £1,302
    £687
    £1,374
    £679
    £1,358
    Sources linked in the table.

    Zoopla or Rightmove are the best websites to get an idea of the price of renting a whole property.

    Just moving to England can make renting in London harder especially if you are fresh off the boat! The more time you spend in London working, the easier it will get over time. Here are some things to consider:

    • Not having a credit history will impact your ability to be accepted through estate agents. Some landlords will request that you provide 3 to 6 months rent in advance to ensure the landlord has security.
    • If you wish to go down the guarantor route to avoid paying so much rent up front you would need a person that is a UK homeowner who is willing to act as your guarantor so this can be a challenge.
    • You need to prove that you can legally be in the UK so British Passport, EU Passport or working visa. The paperwork can’t be started until you can prove this.

    More Renting Articles
    10 Things you need to know before you rent in London
    A Helpful Guide on How to Find a Flat in London

    Finding A Job

    Just to give an indication of how long it took me to find a job, each time I have searched for a permanent job in the UK as a Project Manager it has taken about a month. Whereas my mum struggled as her career is a bit more niche and needed more time to find a job that suited her.

    Summary of Total Costs

    Let’s summarise the costs so we can get a rough indication of the start-up budget. The following figures are based on a single person and as I mentioned above budgeting for 3 months of living costs. Some careers may be quick to find a job and others will take a bit longer so it’s good to factor in how long you could be unemployed.

    Initial Travel Costs

    Skilled Worker Visa (max example cost of 5 years) 
    UK Ancestry Visa (5 years)
    Youth Mobility Scheme Visa (T5) (2 years)
    Family Visas: Spouse, Children etc. (2.5 years)
    Student Visa (2 years)
    Visa and IHS
    £4,528
    £3,636
    £1,184
    £3,038
    £1,288
    Transport
    £500
    £500
    £500
    £500
    £500
    Travel Insurance
    £100
    £100
    £100
    £100
    £100
    Transport
    £60
    £60
    £60
    £60
    £60
    Total
    £5,188
    £4,296
    £1,844
    £3,698
    £1,948
    Disclaimer: these are estimations and not actual figures. Excludes shipping belongings to the UK.

    Estimated Living Costs (3 Months)

    England
    Northern Ireland
    Scotland
    Wales
    Hostel 1 Month
    £737
    £540
    £634
    £651
    Average Rent + Desposit
    £1,400
    £1,302
    £1,374
    £1,358
    Average Transport Cost
    £962
    £962
    £962
    £962
    Average Food Cost
    £743
    £743
    £743
    £743
    Average Recreation and Culture
    £923
    £923
    £923
    £923
    Average House Hold Bills
    £318
    £318
    £318
    £318
    Average Eating Out
    £488
    £488
    £488
    £488
    Basic Needs (bedding, household items, etc)
    £500
    £500
    £500
    £500
    Sim Card
    £30
    £30
    £30
    £30
    Estimated 3 Month Cost
    £6,101
    £5,806
    £5,972
    £5,973
    Disclaimer: these are not actual figures. Costs will vary country to country and what options you choose. The information is based off various sources linked throughout the article.

    Be sure to download the savings tracking checklist (it can be opened with Google Sheets) which covers all the items I mentioned in the article.

    Let me know in the comments below in the comments how your savings are going!

    More Moving to the UK Articles

  • How Do I Get A National Insurance Number (Everything You Need to Know)

    How Do I Get A National Insurance Number (Everything You Need to Know)

    National Insurance is simply a type of tax which employers, employees, and those who are self-employed pay money into the Her Majesty’s Revenue and Customs (HMRC). It is used to fund state benefits, such as the State Pension and Maternity Allowance.

    For those coming from Australia think of a National Insurance Number like a Tax File Number, for Kiwis it is similar to an Inland Revenue Department (IRD number) or for Canadians it is similar to your Social Insurance Number (SIN).

    What is a National Insurance Number?

    This is the unique number provided to you once your application has been successful. You will receive a letter that will include the National Insurance number which will be two letters, six numbers and another letter, for example, SR 123456 A.

    The number will be used by the HRMC use to track the amount you have contributed and therefore what you are entitled to.

    You can find your National Insurance number:

    • on your payslip
    • on your P60 (end of year tax summary)
    • on letters about your tax, pension or benefits
    •  in the National Insurance section of your personal tax account.

    Applying for National Insurance

    Where do I get a National Insurance Number From?

    To get a National Insurance number you will need to apply by phone. The line is open Monday to Friday from 8am to 6pm, the phone number is 0345 600 0643.

    Just to note that numbers that start with 0345 can be charged at a higher rate depending on whether it is a mobile, landline and the phone company you are using. Here are some approximate costs you can expect, for a landline phone for approximately one minute are 9p and a mobile phone for approximately one minute are between 3p to 55p.

    Alternatively, you can pay a company to organise this for you. Companies will offer starter kits, for example, 1st Contact and Britbound offer these. It will take the stress out if setting up a bank account and national insurance.

    I recommend the package called ‘The Social One’ with Britbound which will set you back £75. I am not affiliated with Britbound, they were just awesome when I moved to the UK.

    What Happens When You Apply for a National Insurance Number?

    Jobcentre Plus will advise whether you need to attend an ‘Evidence of Identity’ interview or send you a postal application.

    If you require an interview confirm the date, time and location of your interview and what information/documentation you need to support your application.

     A post application will require you to fill out the form and attach the relevant information. For example, mine I attached a copy of my passport and visa with in the application.  

    As I mentioned above I used a company to apply for my National Insurance number and it was the simple post application.

    National Insurance Number Interview

    The Jobcentre may ask you to attend an interview during the application process. If you are requested to attend a national Insurance number interview, you will be asked about your circumstances and why you need a National Insurance number so nothing to scary. You will also need to bring the supporting documents to bring to prove your identity, such as:

    • passport or identity card
    • residence permit
    • birth or adoption certificate
    • marriage or civil partnership certificate
    • driving licence

    Can I apply for a National Insurance Number Before I Move to the UK?

    You need to be in the UK to apply for your National Insurance Number (NIN) so this cannot be done before you arrive.

    There is one exception to the rule which is on some types of visa, you may have a National Insurance (NI) number printed on the back of your biometric residence permit (BRP). If this is the case you will not need to apply for a National Insurance Number.

    Do I Need to Have a Secure Address to Apply?

    Yes, you do need a secure address and cannot be a hotel, hostel or B &B. This is the part I struggled with when I first moved here! I was going around in circles without having a secure address and this was the main reason why I ended up using Britbound. They provide a secure address that I could use which just made the whole start-up process easier. To find out more about the getting an address here.

    The important thing to remember is that the address used for your NI application is going to become the default mailing address for any correspondence from the HMRC. If you do use a temporary address make sure you add this to your change of address checklist.

    National Insurance Payments

    How Much Will I Pay?

    National Insurance is based on your gross earnings so if you earn more than £162 a week (this is the figure for the tax year 2018 to 2019) then you will have to pay NICs. Just like any tax this will vary depending on how much you earn will reflect how much you pay.

    For 2018 to 2019 tax year you will pay:

    • £162 to £892 a week (£702 to £3,863 a month) 12%
    • Over £892 a week (£3,863 a month) 2%

    As an employee, the money you earn (your salary or hourly wage) is called your gross pay. When deductions from your gross pay such as tax and National Insurance have been taken off, the amount left (and what is paid into your bank account) is called your net pay. You can see what your gross pay was and how much has been deducted on your payslip.

    When do I Pay National Insurance?

    National Insurance contribution is taken from your gross pay (your salary or hourly wage). When you receive your payslip, it will state the amounts that have been deducted for National Insurance and Income tax. You won’t pay this if you do not meet the tax threshold.

    If you are self-employed then you will need to set up a regular payment to the HMRC to cover this requirement.

    Will I have to pay National Insurance? And Is National Insurance essentially another tax?

    Yes, anyone working in the UK will have to National Insurance. You will always see two tax lines on your payslips so Income tax and National Insurance number.

    What do National Insurance payments pay for?

    Your National Insurance contributions will go towards various state benefits and services, including:

    • The NHS
    • The State Pension
    • Unemployment benefits
    • Sickness and disability allowances

    Other Handy National Insurance Information!

    Who Needs to Know My National Insurance Number?

    Once you get your National Insurance there are a couple of people that will need to know about your National Insurance number will be companies that have an input or output for tax, so:

    • HM Revenue & Customs (‘HMRC’)
    • Employers and pension providers
    • Department for Work and Pensions
    • the Student Loans Company
    • Banks and building societies if you want to open an ISA.

    What Do I Do If I Lose or Forget My National Insurance Number?

    If you have lost or forgotten your National Insurance number you can either contract the HM Revenue and Customs, complete the online form on the HMRC website or call the National Insurance enquiries helpline on 0300 200 3500 (lines are open 8am to 5pm, Monday to Friday).

    Can I Start Work Without a National Insurance Number?

    Yes, you can start work without a National Insurance number. Employers should understand that organising a NI number for the first time is a process and will take a few weeks.

    Smaller companies may not be familiar with employing someone who has headed here from overseas to work and could expect you to have one when you start.  If you are met with any employer who tells you they cannot employ you without an NI number, this is incorrect and you can refer to the HRMC which states that you can start without a NI Number.

    Can My Employer Pay Me Without a National Insurance Number?

    Yes, your employer can pay you without a National Insurance Number and you will be generally be taxed with an emergency tax code until you have been issued with an NI number from HMRC. Emergency tax is at a higher rate.

    Is National Insurance a Replacement for Travel Insurance?

    National Insurance is not a replacement for travel insurance as it is just another form of tax. Some of the tax contributions does go towards funding the National Health Service (NHS) which is where the confusion comes from.

    Being covered by the NHS (for EU passport holder or visa that allows you to work or study here for a period of more than six months) means you do not pay to see a doctor or visit a hospital. You can additionally pay for private health insurance as well, this is down to personal choice and whether you want to.

    Do I Still Need to Get Travel Insurance?

    Yes! National Insurance is not the same as travel insurance. It won’t cover you for cancelled flights, lost luggage and all of those added extras that travel insurance comes with. I recommend that you get travel insurance for the first few months whilst you establish yourself in the UK.

    I Have Paid an Immigration Health Surcharge (IHS) Fee – Do I Still Have to Pay National Insurance?

    Yes, you will need to pay both. It is one of those “unfair” things that the government has added to those coming to the UK on visas.

    More Moving to the UK Articles

  • Things to Organise Before Moving to the UK

    Things to Organise Before Moving to the UK

    So you’re moving to the UK. Massive, also, you’ve just signed yourself up for a five-month admin project disguised as the best decision you’ll ever make. I’ve done this move (badly, the first time, more on that in a minute), so here’s the checklist I wish someone had handed me: month by month, no fluff, so your last few weeks at home go to people you love instead of a spreadsheet.

    Download the free checklist it’s a Google Sheet, tick things off as you go, it can take the chaos so your brain doesn’t have to.

    5 Months Out: Paperwork o’clock

    Sort Your Visa Situation First

    Everything else on this list is scenery until this box is ticked. If you’re not a UK or Irish citizen, your visa is the whole game: start here, not last.

    You can only apply around 3 months before you travel, but “prepare” starts now. Work out which visa you actually need on GOV.UK’s visa overview, because the requirements are genuinely different route to route. As a baseline you’re looking at:

    • A valid passport
    • Proof you meet the financial requirement for your visa (usually needs to sit in your account for a set stretch of time before you apply; check the current figure on GOV.UK, it moves)
    • The visa fee plus the Immigration Health Surcharge (this funds your NHS access, it’s not optional)

    Worth knowing if you’re on a Youth Mobility Scheme visa (this used to be called “Tier 5”; if you’re seeing that name anywhere, you’re on an old page): some nationalities now go through a ballot before they’re even invited to apply, so build that extra step into your timeline. Everything runs through GOV.UK directly now, there’s no separate third-party portal.

    Coming to the UK on the Ancestry visa route instead? Here’s exactly how I applied for mine. And if you’re worried about needing a job lined up before you can move at all, here’s how I did it without one.

    The Pivot: work out your visa route today, even if you can’t apply yet. Everything downstream of this (job hunting, flights, accommodation) gets easier once you know your timeline.

    Check Your Passport is Valid

    Check Your Passport is Valid​

    Your passport needs more than a year’s validity from your UK arrival date. If it doesn’t clear that bar, renew it before you touch the visa application; a visa tied to an expiring passport is a problem you don’t want to discover at the airport.

    Most countries run an embassy or consulate in the UK that can renew your passport once you’re here too, so it’s not the end of the world if you land and realise.

    Purchase Your Flights! (Optional)

    Book Your Flights

    The fun part. The main UK airports for long-haul arrivals are Heathrow and Gatwick. If you’re coming from Australia, Canada, the US or South Africa, you’ll almost certainly land at one of the two.

    You don’t have to book before your visa’s approved; some people wait, some people don’t, it’s genuinely a vibes call. What’s not optional: there’s no physical card to collect anymore. The old “pick up your BRP within a month of arrival” step is gone. The UK moved to a fully digital eVisa system. Your status lives online, in a UKVI account, linked to your passport. Set that account up as soon as your visa’s approved, not after you land; it’s one less thing to think about jet-lagged.

    Worth It / Not Worth It, booking early: Worth it if you’re travelling over Christmas, Easter or peak summer, when fares climb fast. Not worth it if your visa timeline is still shaky; a flexible or fully refundable fare costs more up front but saves you a rebooking headache if your dates move.

    4 Months Out: The Great Unpacking

    Organise Your Belongings

    While 4 months may seem like a long time away it can take a while to organise your belongings especially when you need to sell a car or decided what to do with your furniture so it’s good to start having a plan on what you are doing with your belongings.

    Then make a list of what you are taking with you, keeping (storage, at your parents etc), selling, donating and throwing away.

    I was lucky enough to store my belongings at my parents’ house and I just ended up donating the rest as I left it so last minute to sell anything.

    Check If You Require Any Qualifications or Permits to Work in the UK

    Check if you have restrictions, permits or qualifications required for your job in the UK, the lead time, supporting information and process.

    As I am sure you are aware each country will have its own standards for each industry. Some professions will require you to be certified in the UK or have restrictions/permits around certain jobs. For example, health professionals can check what license you require on the Health & Care Professional Council, here.

    Not all international qualifications can be transferred and be able to do the same job. My friend couldn’t work as a pharmacist on her New Zealand qualification, so she’s had to work as pharmacist’s assistant.

    If you are unclear of what qualifications or permits are required I suggest speaking to a UK recruiter in your field. They should be able to recommend what companies are looking for in terms of qualifications or permits.

    Sometimes permits are referred to as a UK Visa which is unhelpful when you are trying to find job-specific permits so make sure you are specific when explaining.

    3 Months Out: Go-Time

    Apply For Your Visa

    This is the mark. Get your visa application in the second you’ve got your supporting documents together, applying via GOV.UK directly for whichever route applies to you (Youth Mobility Scheme, Ancestry, family, skilled worker, etc.). Decisions typically land within a few weeks, though timing varies by country and route; check current processing times on GOV.UK before you plan around a date.

    Start Job Hunting, Tentatively

    The stressful bit. Job markets don’t translate 1:1 country to country. Do your homework on realistic UK salary expectations for your role before you start applying. While you’re browsing job ads, note the keywords and phrases that keep coming up and work them into your CV, because ATS systems and recruiters both respond to them.

    Receipts: most UK recruiters won’t seriously engage until you’re already in the country. This happened to my mum when she moved over, and it happened to me too. Tentative applications now, real traction once you land.

    Update Your CV and LinkedIn

    You need an updated CV for the visa application anyway. Kill two birds: refresh it with the keywords from your job-hunting research, update your LinkedIn to match, and get a current profile photo up while you’re at it.

    List Your Car, If You’ve Got One

    High-value items take longer to sell. Get it listed now so it’s not still sitting on the driveway the week you fly.

    2 Months Out: The Unglamorous Middle

    OrSort Medical and Dental Check-Ups

    Get everything done before you leave (check-ups, specialists, dentist) and get copies of your medical records plus a doctor’s letter for any medication you’re bringing, since rules vary hugely by country.

    Here’s the part that trips people up: you can’t get an NHS number until you’re physically in the UK and registered with a GP, and that registration takes time. Until then you’ve only got emergency NHS access. Bring enough medication to cover your first couple of months while you get sorted.

    Sort Travel Insurance

    Cover yourself for the first few months while everything else is in motion: lost bags, cancelled flights, getting sick before you’re NHS-registered. Boring admin, genuinely worth it.

    Book Somewhere to Land

    Hostel Dorm Room in London
    Hostel Dorm Room in London

    UK accommodation ranges from farm stays to castles to five-star everything, but for your first few weeks you want something that gets you settled fast, not something Instagrammable.

    Worth It / Not Worth It, hostel vs. private room: Worth it (hostel) if you want to meet people fast and don’t mind shared space while you flat-hunt; it buys you a ready-made social circle in week one. Worth it (private room / Airbnb) if you’re moving as a couple or family, or just need your own space to decompress after a long-haul flight. Either way, book something short-term and flexible; don’t lock into 6 months somewhere you haven’t seen.

    Facebook groups like Kiwis in London or Aussies in London (or your country’s equivalent) are also a solid source of short-term room listings from people who are travelling. I used both when I landed and they were genuinely useful.

    Sort a Bank Account and National Insurance Prep

    A few relocation companies package up bank account and National Insurance setup into a “starter kit.” Check what’s currently operating before you commit, since this space changes, but it can be worth it if you’d rather pay to skip the admin.

    You can set up a UK-facing bank account before you arrive with some banks (HSBC’s overseas account route, or a non-traditional option like Starling, Wise or Monzo, country availability varies), or check whether you can open one before you move at all. Otherwise it’s free to set up once you land, just a bit slower for appointments and verification.

    Your National Insurance number, though, you genuinely cannot apply for until you’re in the UK: it’s tied to proving you’re here with the right to work. Good news: the process is mostly online now. Apply on GOV.UK, prove your identity (often via an app rather than an in-person appointment), and it typically takes around 4 weeks from there. You can start working before your NI number arrives, as long as you can prove your right to work another way; don’t let an employer tell you otherwise. Everything else you need to know about your NI number is here.

    The Pivot: don’t panic-chase your NI number the second you land. Apply as soon as you’re settled with a UK address, keep your confirmation email as proof you’ve applied, and get on with everything else.

    Sell What’s Left and Sort Your Car

    The stuff you didn’t get to at the 4-month mark: friends, a car boot sale, or the usual resale sites. You’ll be surprised how little you miss most of it (mine was fine, apart from my Kitchenaid, which I still think about). What you will notice is not having to think about insurance, maintenance or storage for any of it, at least for the first few months, before the accumulating starts all over again.

    Handle Your Lease or Property

    Renting? Give your landlord notice now. Own it? Start organising a letting agent if you’re renting it out while you’re gone.

    Switch to Email-Only Everywhere You Can

    Tedious. Do it now while you’ve still got the mental bandwidth. Switch every account you can to paperless, and for anything that won’t budge, arrange a mail redirect to someone who can hold it for you.

    1 Month Out: The Final Push

    Hand In Your Notice (or Lock In a Sabbatical)

    The nerve-racking one. Check if a sabbatical’s on the table before you resign outright; some employers will hold your job for a year or two unpaid, and it’s a genuinely useful safety net. I took nine months off before I actually resigned, and having that “it’s not fully closed” option made the whole leap feel less permanent.

    Cancel or Notify Utilities and Subscriptions

    Tell your utility providers (water, gas, electricity, council) you’re leaving so your final bills are accurate. Cancel or pause everything else: broadband, streaming, car insurance, breakdown cover, mobile, gym. Check for exit fees before you cancel, especially on mobile contracts; that’s where they hide.

    Scan and Back Up Every Important Document

    Passport, visa, driver’s licence, medical records: scan the lot and store copies in at least two places (cloud drive, email to yourself, email to a parent). Print one physical copy and keep it separate from the original. You’ll need copies of your visa and passport for your NI application, and if you ever lose the originals abroad, having scans makes replacing them dramatically less painful.

    Find Your People Before You Land

    Join an online community for wherever you’re headed before you arrive: Meetup, Facebook groups, whatever’s active for your city. It’s the fastest way into a social circle and a good place to crowdsource the small stuff, like which phone provider or which neighbourhood. I joined both Kiwis in London and Aussies in London the day I landed and they carried me through the first few months.

    13 tips on making friends in London, mostly transferable to the rest of the UK too.

    Tidy Up Your Bank Accounts

    Check with your bank whether you can switch to a fee-free account for the move, and if you’re keeping a fee-paying one open, make sure there’s enough in it to cover the charges. Close anything you won’t use, and cancel any credit cards with annual fees you don’t need anymore.

    Tell your bank you’re travelling: where, and for how long. Unflagged foreign transactions can get your account frozen for security, which isn’t ideal when you’re trying to access your money abroad. And if you’ll have a UK number, make sure your bank can reach you on it, especially for security codes.

    Plan How You’ll Access Money

    Bring at least two ways to pay, because cards break or get lost more often than you’d think. A friend of mine lost one card and had two others fail on a Europe trip, not a situation you want with zero backup. Options worth mixing:

    • A small amount of local currency, enough that you’re not carrying (or short of) large cash sums
    • A prepaid travel card; check the withdrawal and purchase fees before committing
    • Your existing debit card, being mindful of foreign transaction and ATM fees on both ends
    • A credit card with low or no foreign fees
    • Keep your home account open and transfer money over as needed once you’re set up locally. I use and recommend Wise for this, still haven’t found better rates

    Unlock Your Phone and Sort a SIM

    If your phone’s locked to your home network, get it unlocked before you fly so it’ll take a UK SIM. Confirm it’s compatible with UK SIM cards while you’re at it.

    You can arrange a UK SIM before you leave (giffgaff ships internationally) or just grab one on arrival: airports, phone shops and some supermarkets all sell them. Honestly, doing it on arrival is the easier call. You can compare providers (EE, O2, Three, Vodafone, Tesco Mobile, giffgaff, iD Mobile and others) once you actually know what coverage you need.

    Sort Your Airport-to-Accommodation Plan

    How to Travel by Train in the UK

    Every UK airport has train, bus, taxi and private transfer options, and the “best” one depends entirely on which airport you’re landing at.

    By train: booking ahead usually saves money via National Rail Enquiries; most UK train company websites let you book from abroad with no card fee. Selecting station collection over postal delivery avoids the postage charge (just bring the card you paid with).

    Tip if you’re landing at Heathrow: most people now just tap in with a contactless bank card or phone rather than buying an Oyster card. The fares and daily caps are identical, and you skip the Oyster card’s fee entirely. If you do want a physical Oyster card, it’s now a flat, non-refundable fee rather than a deposit you get back, worth factoring in.

    By bus: National Express covers most UK airports with direct coach routes; a few smaller operators run airport-specific routes for the likes of Luton and Stansted.

    Taxi or private transfer: a private transfer gets you a fixed price agreed up front, versus a taxi’s metered mileage-and-time fare. Worth comparing options through a transfer comparison site before you land.

    Worth It / Not Worth It, Oyster vs. contactless: Not worth it, for most people. Contactless gets you the same fares and caps with zero card fee and nothing to remember to top up or reclaim. Worth it only if you don’t have a contactless-capable card, or you specifically want a physical backup card in your wallet.

    Download the checklist again if you’ve lost it in seventeen browser tabs by now; track your progress, tick it off, breathe.

    Let me know in the comments how the admin’s going, and if you’ve got a horror story from your own move, send it my way. I collect those.

    More Moving to the UK Articles

  • Cost of Living in London 2021 (by a local)

    Cost of Living in London 2021 (by a local)

    Thought about moving to London? Then you’ve probably been trying to understand how much it will cost to live here and no doubt you would have stumbled across articles about how expensive the cost of living is in London.

    I will breakdown what my monthly expenses are living in London and show you examples of the past few years. Plus anything else you should consider when budgeting for when you move.

    Even though the city can be expensive there are savings to be had as well! Always negotiate where you can or try some of the free activities London has to offer for entertainment.

    Cost of Housing in London

    London flat block in Peckham.
    London flat block in Peckham.

    A high percentage of your salary in London will go on renting or paying a mortgage for a property. To give you an idea of the percentage of salary you might be putting towards rent:

    • Hamptons survey in 2020 said that the average 21-29 year old spent 34% of their pre-tax income on renting a room.
    • Trust for London has said that the average one-bedroom property is equivalent to 46.5% of gross-median pay

    In 2021 there may be some savings on rent as rental prices have been dropping, especially in central London. SpareRoom has said that renting a room is 8% lower in Q4 of 2020 compared to 2019. 

    According to Zoopla, in October 2020, the average cost of rent in London fell by 6.9 per cent.

    When starting your property search, I recommend using a tool like the London Mayor website heat map as it will give you the median prices for the area.

    Renting a Whole Property 

    The average rental price in London in 2021 for new tenancies, according to Homelet.co.uk, is £1,572 a month. 

    As the flat I live in is owned by my boyfriend the cost of living here is different. If it was on the market as a rental it would rent out between £1,600 to £1,700 for a two-bedroom flat in zone 3. 

    When looking for a flat to rent I would start with Zoopla or Rightmove, these sites are where estate agencies will list properties. 

    Psst. Don’t forget to read my guide on How to Find a Flat in London where I cover everything you need to know.

    Renting A Room 

    It’s very common in London to live in shared accommodation where you rent a room within a flat or house. According to the Hamptons survey the average Londoner rented a room for £728 which is up 2.8% from 2019. 

    Renting rooms will generally be excluding utilities so this cost is something you should check with your potential roommates. 

    When I was renting from 2013 to 2016 I paid from £650 to £740 for a double room in zone 2 living with 3 other people and these prices are not including utilities. 

    Spareroom will help provide prices on rooms, especially those looking to keep costs down and live with other people. You can check this document on the average of room prices across London. 

    They have a handy tool for helping you find where to live, try it out. If you are a couple expect to pay more for a room than a single person but split between the two of you it will be cheaper.

    Psst. Don’t forget to read my guide on How to Find a Flat in London where I cover everything you need to know.

    Renter’s Insurance

    Renter’s insurance is formally referred to as tenant’s insurance and this is designed for people who are renting properties. 

    There are two types of insurances:

    • Tenants Liability Insurance insures you in the event of any accidental damage to items that belong to or are provided by your landlord in the property. As it is common to have furnished accommodation in the UK, this can protect you from accidentally damaged items and deposit deductions. 
    • Tenants Contents Insurance is to protect your contents if there are any issues like fire, theft, accidental damage or other insured risks. 

    You can opt to have both insurances within your policy. 

    Your landlord will not insure your personal possessions in their property, they may have building insurance to cover the property but if there was a fire it would be your responsibility for your contents. 

    Prices for insurance can start as little as £10 a month so it is an affordable cost for peace of mind. 

    Do I need Tenants Liability or Tenants Contents Insurance?

    No, they are not mandatory requirements to rent a property in the UK. It depends on how much risk you want to take on whether you get the insurance. 

    Utilities in London

    The common utilities and household bill for London include council tax, electricity, gas, water, internet and TV licnese. I will breakdown what each one is and how much to expect.

    For the utilities you are allowed to choose your own supplier you can use comparison tools like Money Super MarketGo Compareor U-Switch to find the best supplier for you.

    Council Tax 

    Council tax is an annual fee that is paid to the local council to fund local services like rubbish collection, police and fire services. 

    You can choose whether you pay over 10 or 12 monthly instalments or annually. When you receive your bill contact your local council to set-up the payment plan. I currently pay mine in 12 monthly instalments. 

    The amount of council tax you pay will vary on where you live and how much the property costs. There are also reductions available, for example:

    • Live alone (25% discount) 
    • Student 
    • Low income 

    You can read more about exemptions and reduction here. 

    Here’s a summary of my monthly payments: 

    2018 Costs
    2019 Costs
    2020 Costs
    2021 Costs
    £130.30
    £137.00
    £141.41
    £142.00

    Electric and Gas 

    For electric and gas suppliers you can choose your own supplier. These are the big suppliers for electricity and gas in London E. ON, British Gas, EDF Energy, Npower, Scottish Power and SSE. 

    Although there are more than 20 suppliers providing electricity and gas. Using websites like Money Super MarketGo Compare or U-Switch will help you narrow which provider you should choose.

    There are two types of energy tariffs that will be offered: 

    • Fixed-rate tariffs mean you pay for each unit of electricity or gas you use. 
    • Variable-rate tariffs mean you will have a varied rate in the price which can go up or down at any time. 

    All the other tariffs will be a variation of the two mentioned above. 

    Many providers will offer discounts if you choose them as the electric and gas supplier. It’s important when choosing that you check the deals at the time. 

    Here are my electricity and gas costs over the years: 

     
    2018 Costs
    2019 Costs
    2020 Costs
    2021 Costs
    Electricity
    £ 30.74 
    £38.06
    £38.06
    £85.61
    Gas
    £30.38
    £36.21
    £36.21

    In 2021 I’ve changed to a dual supplier for my energy bills. I’m now with Octopus Energy on their Supergreen Octopus which is 100% renewable electricity & the gas is fully carbon offset.

    The cost of energy has gone up due to the fact there are three of us now working from home and I paid a few extra pounds to support green energy. 

    Water 

    Thames Water is the main supplier for water and sewerage services to London and a large proportion of central Southern England. Unfortunately, there is no shopping around for this! 

    You can find out more details about how your bill will work with Thames water here

    There are options for paying your water bill, it can be from weekly to annual payments. I personally pay monthly and here are water costs over the years:

    2018 Costs
    2019 Costs
    2020 Costs
    2021 Costs
    £31.21
    £32.70
    £33.46
    £33.46

    Internet 

    Broadband is a fixed price in the monthly bills so it’s easy to budget for. Simply choose the speed that you need for your household and a provider that is offered in your area. As there is competition in this space you will be able to bargain for the best price. 

    You can also get combination packages like tv and broadband, mobile and broadband or all three combined. 

    I pay quite high prices for my internet as I wanted a fast fibre connection. It actually ended up being cheaper in recent years to get tv and broadband bundles. I highly recommend negotiating as I saved £21 a month on my latest renewal. 

    My internet breakdown over the years

    2018 Costs
    2019 Costs
    2020 Costs
    2021 Costs
    £41.23 – Fibre only
    £49 – Fibre only
    £49 – Fibre with TV
    £53 – Fibre with TV

    TV License (optional)

    TV license is required if you plan on watching free view TV or apps like the BBC iplayer. You can check if you need one on their website

    I do pay for a TV license as we watch free view TV. Over the cost of a year it’s only a couple of pounds a month. You can pay for this either monthly or yearly. 

    Here is how much I paid in TV license costs over the years:

    2018 Costs
    2019 Costs
    2020 Costs
    2021 Costs
    £150.50 (yearly)
    £150.50 (yearly)
    £157.50 (yearly)
    £157.50 (yearly)

     Monthly Price for Utilities in London

    The total cost for the household is £327.20 for 2021 which covers Council Tax, electricity, gas, water, internet and TV license.

    2018 Costs
    2019 Costs
    2020 Costs
    2021 Costs
    £276.40
    £305.51
    £311.27
    £327.20

    Individual Monthly Costs

    As an individual you will have varying costs in your budget. This will include mobile phone, groceries, personal care, healthcare and any other line item you consider a monthly cost.

    Mobile Phone 

    Mobile phone costs will vary based on what type of contract you plan on getting or have. I personally buy my phones out right now so I have a sim only contract and went for a more data driven package.

    For £10 I get 5,000 minutes and 10GB of data. 

    Since 2019 the cost of my sim only contract hasn’t changed and has been a predicable cost.  

    2018 Costs
    2019 Costs
    2020 Costs
    2021 Costs
    £50 (phone & sim contract)
    £10 (SIM Only) 
    £10 (SIM Only)
    £10 (SIM Only)

    What’s the Monthly Transport Cost in London

    To London Underground
    To London Underground

    The most popular way to get around London is using public transport by either using an Oyster Card or contactless. Having a travel card will allow you to travel freely using multiple modes of transport, bus, tube and national rail.

    Depending on how you like to budget you can either opt for contactless or pay for an oyster card for a set period, weekly, monthly or yearly. 

    Contactless will charge you per journey until you reach the daily cap and then automatically apply the weekly cap when you hit this spend. 

    A popular choice is to get a weekly or monthly travel card. This does really help with budgeting as you can just top up your oyster on payday and not have to worry about travel until your next pay.

    Monthly Travelcards 2021
    Zones 1–2£142.10
    Zones 1–3£167.10
    Zones 1–4£204.30
    Zones 1–5£243.10
    Zones 1–6£260.00
    Zones 1–7£283.10
    Zones 1–8£334.10
    Zones 1–9£370.60

    Just to note: Weekly travel cards will charge you more admin fees. The longer you buy a travel card the cheaper it is. You can also get a yearly travel card which can save you £300 per year and comes with an Annual Gold Card. The Gold Card gives you 1/3 off certain National Rail Routes.

    Instead of buying a travel card I opt for paying as you go. I used to work from home two days a week and don’t always use transport on the weekend. I used to roughly spend about £120 to 150 on travel around London.

    However now I work full time from home and now spend nothing on travel. When London starts to open up I see this cost increasing. 

    Tip: Considering buying a Railcard as you can save a 1/3 off rail fares. This is great if you plan on weekend trips around the UK, heading to the airport and much more. Make sure you read the terms and conditions before purchasing.

    Owning a Car 

    Having a car in London you need to consider paying for the following: 

    • road tax
    • congestion charges
    • car insurance
    • parking permits
    • MOTs – this stands for the Ministry of Transport and the purpose of this is to check the safety, roadworthiness, and exhaust emissions of the vehicles on UK roads.
    • fuel

    When we had a Ford KA (small two-door hatchback) and paid about £150 for road tax, insurance around £350 and an MOT a year is around £60. 

    Alternatively, if you only require a car every so often there are plenty of car rental companies across London. You could consider hiring Zipcar. Zipcar is an American car-sharing company and a subsidiary of Avis Budget Group. Zipcar provides automobile reservations to its members, billable by the minute, hour or day; members may have to pay a monthly or annual membership fee in addition to car reservations charges.

    Psst… If you are thinking about getting a car in London here are things to consider.

    How Much Do Groceries Cost?

    Grocery shopping will vary depending on your tastes, you can be thrifty or highend shopping at organic independents. Shopping at stores like Lidl, Aldi and Iceland will be the cheapest places to buy groceries from. Mid-range stores are Tesco and Sainsbury. The high-end stores are Marks & Spencer and Waitrose.

    I generally shop at Tesco’s, Sainsbury and Good Club for my groceries but I have been trying to swap to more local suppliers when I can. 

    My weekly food shops have increased due to being home for a year. I tend to spend £100 a week on food shops now as we don’t go out.

    The food covers 3 people eating vegetarian with household products (i.e. cleaning products and toilet paper). All my meals included both a lunch and dinner portion which is 14 portions of food a week. 

    For monthly budgeting, I would start at £200 a month for a single person and £400 for a couple. This would be shopping at a midrange supermarket covering 2 meals a day and household products. 

    Personal Care 

    This cost is purely dependent on what your routine is and how much you want to spend. I would add up your current personal care costs and convert this into pounds so you can see roughly how much this will cost you. 

    Overall I spend £44.32 per month on general personal care items. 

    The biggest cost comes in when we start talking about my hair. Since I switched to having pink hair this has come with a lot of additional costs and I could easily spend £200 a month on this. Yes I know it is a crazy amount to spend but I do really love my hair and I can afford it. 

    Healthcare (Prescriptions, Dentist, etc.)  

    Even though we pay for the NHS through our taxes there can be some costs associated with healthcare. For example, going to the dentist will have an associated cost for a check-up, teeth clean and other work you may need. If this something you do regularly (which you should) then it is something to factor into your budget. 

    Make sure you register with an NHS dentist and not a private dentist as you won’t get the NHS caps otherwise. 

    I generally try to go to the dentist every 6 – 12 months for a clean and once a year for a check-up. Teeth cleaning isn’t subsidised so this cost in my experience is from £60 to £100 depending on the clean you opt for. 

    For a check-up with an NHS dentist, I pay £23.80. You can see what each NHS dentist band costs here. 

    If you have any health conditions, wear glasses or anything else in this bracket then I would add this to your budget. 

    As I have migraines I have a set of medication I pay for every 2 months. Prescription costs are capped as well, I currently pay £9.15 for each item. Contraception is free in the UK so there will be no cost associated with this. 

    As a minimum, I would budget £100 for dentist visits a year and then add on any prescriptions, eye care or other items you need. 

    Entertainment

    Entertainment is where all the spare cash can go! Most people I surveyed in 2019 spent between £60 to £100 a week on entertainment (eating out, activities, events etc.). There were a few that were savvy and spent between £40 to £60.

    For me, it really depends on the week and what I am doing. I generally allow myself a £200 to £250 spending budget a week depending on what I am doing. I could save money in this area but I do pay for a lot of items that I need to run this website and give you all the information you need when out and about in London.

    How Much Does A Meal Cost In London?

    Incredible Waffles at Duck and Waffle
    I just had a show a picture of the waffles at Duck and Waffle. Not only are they pretty but they are so tasty!!!

    Meals can range in price depending on how much you like to eat or drink and whether it is a cheap eats place or Micheline star restaurant in Mayfair. Eating out tends to be where the money goes the fastest.

    Here is a rough guide to what to expect:

    • Brunch will be around £15 to £20 including coffee.
    • Bottomless Brunch will be around £35 to £50.
    • Lunch will be around £10 to £20 at a restaurant or Café.
    • Dinner can be from £15 to £50.

    If you are just picking up a quick bit during your lunch break at work then you can get a cheap Tesco meal deal for £3 or something a bit fancier like Pilpel (falafel) or Barburrito will be around £6.

    How Much Does Alcohol Cost In London?

    Drinks out in London
    Drinks out in London

    Just like meals, alcohol will range depending on where you decide to go out. To make a night out cheaper make sure you make the most of the happy hours or drink beforehand.

    Alternatively, you can find some BYO (bring your own booze) restaurants as well like Tayyab’s but they aren’t as common in London.

    Here is a rough guide to what to expect:

    • A bottle of average wine in a restaurant will be between £12 to £25.
    • A beer in a restaurant will be between £4.00 and £6.00 for a pint. Craft beer will be more expensive than your general lager. If you really love craft beer make sure you check out the Bermondsey Beer Mile.
    • Cocktails will be around £8 – £18 depending on where you head out to. As mentioned above bars in London will offer happy hour for example you can get 2 for1 at Be at One for £8-9 or All Bar One half-price cocktails for £4.50.
    • Our favourite store wine is a Toro Loco from Aldi for £3.89. Otherwise, around £6 to £8 will get you a good wine in Sainsbury and Tesco. Places like Marks & Spencer will cost upwards of £8.
    • Craft Beer at a grocery store is around £1.50 to £3 per bottle or can.

    Drinking alcohol in parks and on the street is allowed in London. When the sun comes out or the temperature goes up you will see Londoners flocking to the park with picnics and drinks, it’s truly the way to experience London like a local. It’s a great way of having a cheap day out with friends or family.

    Cost For Activities In London

    View from One New Change is St. Paul’s Cathedral
    View from One New Change is St. Paul’s Cathedral

    London has a great range of free and paid activities which is perfect as you will always have something available to do no matter what your budget is. Here is a rough guide to what to expect:

    • Cinema tickets – £10 to £20 per person. The cinema is not a place I visit very often and tend to stick to Netflix with some wine at home. If you are a movie lover you can get monthly passes for £17.90 making it cheaper to see movies.
    • Theatre tickets – £20 to £100 per person. There are some good deals around for Theatre tickets especially if you are not phased where you sit. I have previously scored tickets for £17 to see Wicked and Charlie and the Chocolate Factory. If you are happy to stand for 3 hours you can get £5 tickets to the Globe.
    • Museums – mostly free! well at least all my favourite museums are! Here are 9 museums you must visit.
    • Sight Seeing – Free to £30 per person plus travel. For example, Sky Gardens is free (find out the local tips with this video), whereas the London Eye would be from £23. Exploring Windsor Castle would require you to buy train and attraction tickets making the day more like £40 to £50 without food included.

    Find out all the tips on how to book London attractions and how to save money with this article.

    Other Costs 

    Don’t forget to add any additional costs you might have like enjoying a good cup of coffee, a monthly Netflix subscription or clothing.

    Summary of London Monthly Living Expenses 

    To summarise the costs, the core household bills with groceries for 3 people comes to £727.20 and our estimated rent being £1,600 for a 2 bedroom flat then the cost would be £2327.20 a month.

    I spend about £117.55 a month on things like personal care, healthcare and mobile phone. 

    A grand total of £893.28 as an individual living in a shared flat with 2 other people.

    As I am no longer travelling to work that does save me £150 a month and my going out expenses are 0 at the moment. This will go up when more things open up in 2021. 

    Here Are Two Hypothetical Examples Of Potential Cost For London

    Renting a room in a flat with 2 other people: 

    Room Rent*
    £728
    Core Bills
    £109
    Groceries
    £200
    Mobile
    £10
    Personal Care
    £20
    Healthcare*
    £8
    Transport*
    £142
    Total
    £1,217

    Renting a property as a couple: 

    Rent
    £1,572
    Core Bills
    £327
    Groceries
    £400
    Mobile
    £20
    Personal Care
    £80
    Healthcare
    £17
    Transport
    £284
    Total
    £2,700
    Per person
    £1,350

    All costs are based on what I spend or the averages I have included in this article. It’s just to help guide you on what to think about. *Property rent is based on average spend, healthcare is based on you going to the dentist once a year and transport is based on zone 1-2 monthly travel card. 

    More Living in the UK Articles

  • 5 Ideas to Getting a UK Address Before Moving Here

    5 Ideas to Getting a UK Address Before Moving Here

    Everything you need to do to set up your life in the UK requires a secure UK address for official documentation to be sent to. For example, bank accounts and National Insurance Number (NINO) require a UK address. Neither the banks or HMRC (Her Majesty’s Revenue and Customs) will send out the official documentation to an unsecured address like a hostel or a hotel.

    It is possible to get proof of address and there are a variety of ways to achieve this. However, it’s not possible to get an address before you move to the UK without the help of a company, family, friends or having a place you’ve rented or bought beforehand. 

    I moved to the UK solo and found out first hand what challenges there are in getting a UK address. It can seem like a catch 22 situation. How do I get a bank account without an address? How do I get a NINO without an address? On the other hand, how do I get an address without a bank account?

    Options for Getting Proof of a UK Address

    Here are a few options you can try to get proof of a UK Address:

  • Using family or friends address to get an NI Number (NINO)
  • Engineered way
  • Register to Vote
  • Using a company to set-up a UK Address
  • Use BritBound to set-up your address
  • Depending on what your requirement is for a proof of address, some of the options provided will be more successful evidence than others, so please keep this in mind.

    How Do I get UK Address Using Family or Friends?

    As I mentioned above this can make the process easier! There are a couple of ways you can get documents to prove you have a UK address with family or friends. From using them as a reference to get your NINO, to sending your bank statement to them and registering to vote in their area.

    1. Using a Family or Friends Address to Get an NI Number (NINO)

    Using a family or friends address to get an NI Number (NINO)

    A NINO letter can be used as a proof of address, however, some banks don’t allow this as proof so double check beforehand which ones do.

    So how do I use my family or friends to get a NINO? I have not tried this method as I didn’t have this option available but you can get your family member or friend to write a letter confirming that you are staying at their address. This letter must be supported by a tenancy or rental agreement, utility bill or bank statement in the name of the person who issued the letter.

    I have put together a template you can use for the letter (just copy and paste, fill/delete the sections that apply to you and there you go! You have a letter from your family or friends).

    The Manager

    <insert address>

    <insert date>

    RE: <insert name>

    I <insert friends or relative name (as name stated on the utility bill or bank statement)> confirm that <your passport name>, date of birth <insert date of birth>, is my tenant/friend/relative (delete as appropriate) and has known me <insert year> year. She/He is currently residing with me at <insert address that is on a utility bill or bank statement> and has been here since <insert date>.

    She/He currently pays me a rental amount of £ <insert amount> per week/month.

    Or

    She/He is staying with me rent free.

    Should you require any further information, please contact me on the following number.

    Kind Regards,

    <signature>

    <insert friends or relative name (as name stated on the utility bill or bank statement)>

    Just take the above letter with the evidence and hopefully you will be one step closer to getting your NINO. As I mentioned I have not tried this method so if in doubt just give them a call beforehand to confirm.

    2. Evidence of Address via the Engineered Way

    This approach is generally referred to as the Engineered Way and is basically getting your home country bank to send you a bank statement with your friends or family address. It’s super simple, just use the following steps:

    • Adjust the address on your file on your non-UK bank account to a UK address.
    • Once the change in address had gone through apply for a for your non-UK bank to send a statement.
    • The statement will now be delivered to your UK address providing a proof of address.

    It’s been a successful and unsuccessful route for people who have used this so keep this in mind. You may wait a month and then find a bank doesn’t accept this as proof (for example).

    3. Register to Vote

    Another way you can get a proof of address is to register to vote with your local council. Search for your local council and get added to the “electoral roll” and then they will send you a letter confirming your registration which is an “official letter from the council”. This is only applicable if your nationality allows you to be eligible to vote. For example; EEA citizen and Commonwealth countries like Australia, New Zealand and Canada.

    Once you get this letter you can then use this as proof of address to get your NINO. Once you get your NINO then you would have two letters that can be used for proof of address to show the bank. Although be mindful that using NI as proof of address could take up to 6-8 weeks to get a letter delaying you getting an account.

    P.S. Registering to vote is a good idea anyway as it helps build your credit score.

    4. Using a Company to Set-up a UK Address

    Before I moved over I paid for a Quick Start Pack with Visa First to assist me in the process. This provides a mail holding service which I made an assumption could be my way around this whole address palaver but unfortunately they don’t provide a service that can be used by HRMC. Quick Start Packs no longer exist with Visa First, however, they still offer packages to get things like your NINO.

    There are a couple of companies that provide this service like 1st Contact and Britbound. Although personally, I used BritBound to set up my accounts.

    5. Use BritBound to Set-up Your Address

    You can sign up with BritBound who will provide you with a UK address and help you set up your bank account and NINO. They will contact you when you have mail. You can either collect your mail in person or ask them to forward it (tracked) to an address of your choice.

    Whoo! BritBound was the company that got me out of this Catch 22 situation. It’s so stressful being stuck in the loop of not getting a job, bank account, NINO or flat all due to not having an address.

    The package is called ‘The Social One’ which will set you back £85 but will cover all the essentials you need. (I am not affiliated with Britbound, they were just awesome when I moved to the UK.)

    Why Can’t I Get a Virtual UK Address?

    An option I looked into was getting a virtual address but virtual address companies also need a UK address to be able to set one up (I know right! Frustrating). The reason is to prevent potential fraud and money laundering via these services so the government put in regulations like the London Local Authorities Act 2012 and the Money Laundering Regulations Act 2017.

    This meant that these services have to put you through what’s called the Identity Verification Process (KYC). When you fill in the registration forms your personal details will be run through an identity verification system which checks your name, UK address and date of birth. If you pass this check then you will have a virtual address.

    Comment below and let me know your experience on getting a UK Address! And any other processes that worked for you.

    More Moving to the UK Articles