Author: Kat

  • How To Get Internet And Wi-Fi In London

    How To Get Internet And Wi-Fi In London

    We are living in a digital age and constantly in need of staying connected via the internet. Regardless of where we are, we all have one thing in common, we all want a good Internet connection. If you don’t want to spend time looking for constant, uninterrupted Internet and WI-FI in London, this article is just for you!

    How to Get Internet and WI-FI in London? There are several options available to people who want a good internet and WI-FI connection in London. These options include but are not limited to buying a local sim card with a data plan, searching for public Wi-Fi or using hotel Wi-Fi, getting a Travel Wi-Fi Hotspot, and lastly roaming your sim.

    For more on information on what your internet and Wi-Fi options in London are, continue below.

    Staying Connected in London: Internet & WI-FI Options

    Staying connected with your loved ones and the world at large is important. Depending on your plan and budget, below are some internet and WI-FI options to help you stay connected when in London.

    Buying a SIM Card

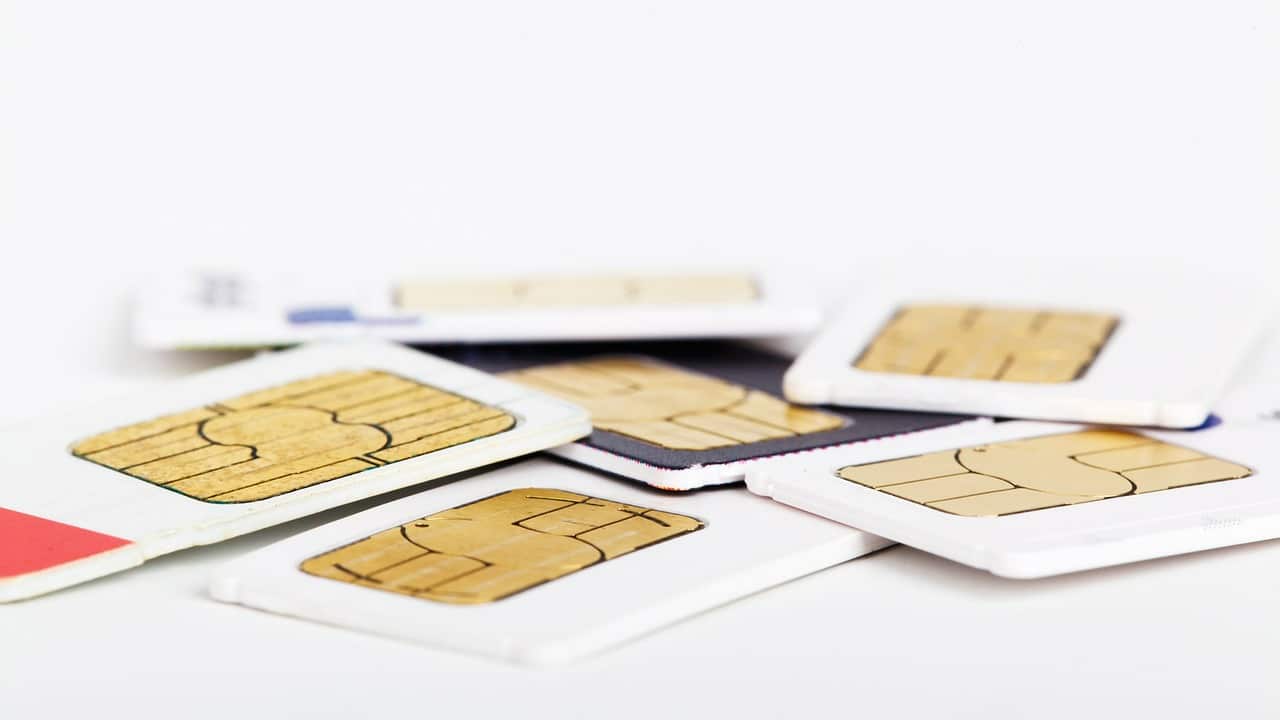
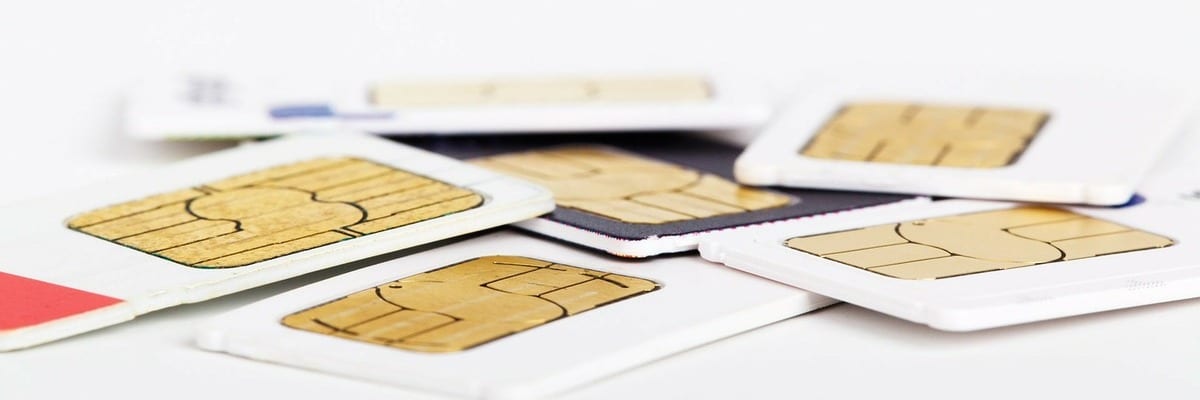
    The local sim cards will have etched cut-outs for three sizes so you will have no issues finding a provider that fits with your phone.
    The local sim cards will have etched cut-outs for three sizes so you will have no issues finding a provider that fits with your phone.

    One of the options available to you is to buy a local sim card. A local Sim card will give you the advantage of texting and making calls. You can also access the internet by buying a local data plan. Getting a sim card can be the best options if you don’t plan on needing big amounts of data.

    However, you should know that your device will need to be unlocked before you can use data on the phone. If you are not sure whether your device is unlocked or not, you can check with the place you got the phone from.

    With a local sim card, you should be able to access the internet with the highest speed possible. In addition, you will also be able to use a phone as a hot spot to connect your other gadgets that might require internet access.

    Read this before purchasing a SIM card: Do all Phones Work with UK Sim Cards? What to Know Before Visiting.

    Advantages of buying a local SIM card

    • Cost-effective when compared to hefty roaming charges
    • The added advantage of calling and texting
    • Good for people planning for an extended visit or stay in London
    • Offers the fastest local speed possible

     Disadvantages of buying a local SIM card

    • You will have to first find, buy, and then insert the sim card before you can be connected. This may prove stressful, especially if you are not familiar with your surroundings.
    • Though a local sim card is cost-effective to the owner, loved ones trying to call or text you may incur heavy charges.
    • You may have to wait till you can get a sim card before you can contact your loved ones.
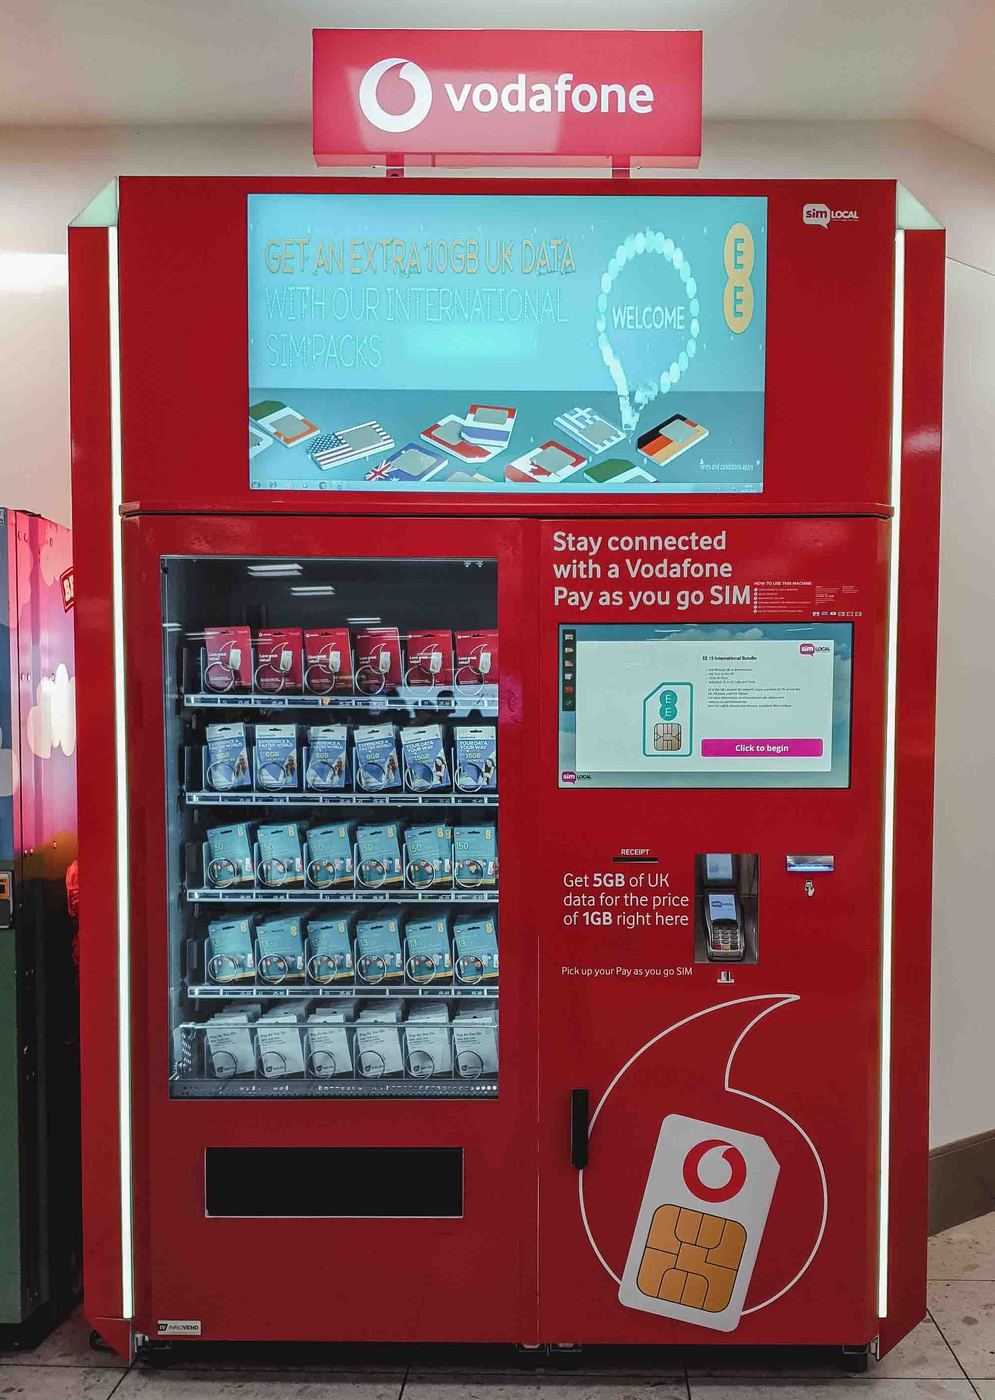
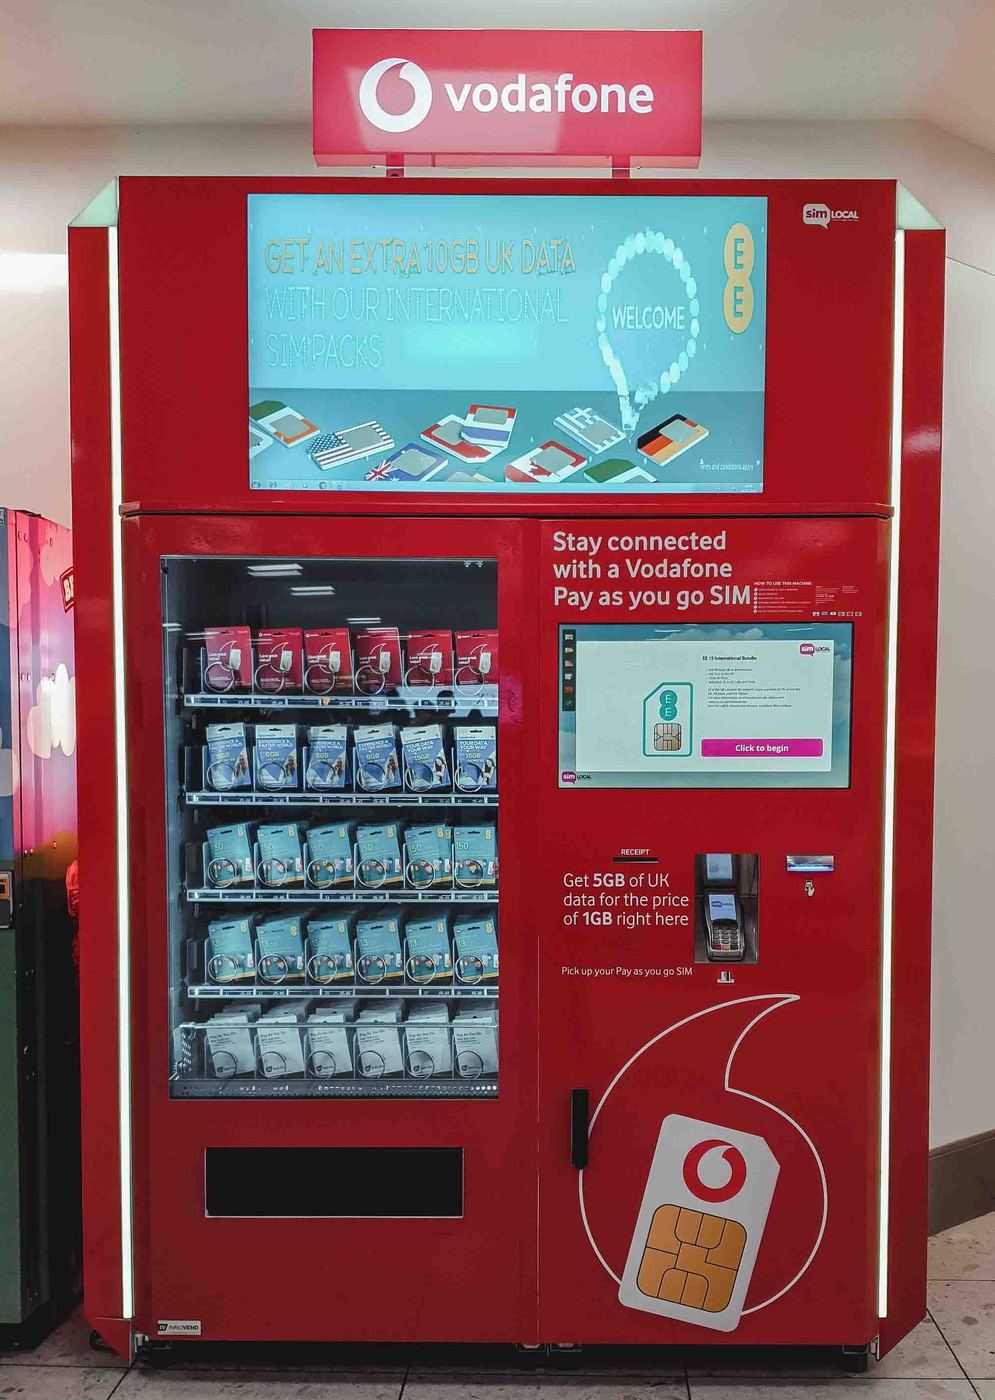
    Vodaphone vending machine at Heathrow Airport in the baggage reclaim area.
    Vodaphone vending machine at Heathrow Airport in the baggage reclaim area.

    Get an International or Europe Only Sim Card

    The only difference between the two is that a Europe only sim card is limited to Europe and cheaper than an international sim card. With an international sim card, you don’t need to always buy a new sim when you are visiting another country. Hence, it will be a good option for people who are always travelling- it is simple and very convenient.

    Advantages of Getting an International or Europe only Sim Card

    •  Having one sim card to use for almost every country is really a very convenient way of traveling.
    • Reduces the cost of your loved ones calling or texting you. Compared to a local sim or roaming fees, this is certainly the best to keep in touch with your loved ones.
    • International data plans work with locked phones. You don’t need to worry whether your device is locked or unlocked.
    • The hassle of a language barrier is eliminated. You can manage and top your accounts in your language.
    • Gives you the advantage of contacting your loved ones immediately after touching down.
    • Your loved ones can reach you anywhere you are, since it is the same sim.

    Disadvantages of International or Europe only Sim Card.

    • Europe only sim cards are limited to only countries within the European Union.
    • An International Sim card and data plan might be very expensive in the long run. So, it won’t be advisable if you are on an extended stay or visit.
    • Some countries don’t make provisions for international sims. However, London has provisions for international sim cards.

    Searching for Public WI-FI or Using Hotel WI-FI

    WI-FI is one of the cheapest options available for internet users. What is more, you need to unlock your phone to use WI-FI or access the internet.

    It’s possible to find free WI-FI hotspots in many places in London. In fact, you can access free WI-FI in places such as Starbucks, McDonald’s, Cafés, Underground (if you have a local sim), etc. though you may have to buy something if it is a restaurant in order to gain access.

    However, the downside is that you would have to stay in one place to stay connected, instead of exploring the city. Using WI-FI can also be inconvenient, especially if you are travelling. You may not be able to search for directions if you get lost. More so, public WI-FI is not your best option if you want uninterrupted network connection.

    Using your Mobile Data

    It is also possible to use your mobile data to access the internet if you are not scared of the charges that it will attract. By using your mobile data, you will be attracting hefty charges unless you have international data coverage.

    If you want to avoid this, there are better options to explore, such as WI-FI, Local Sim, etc. when accessing the internet in London.

    Getting Travel Mobile Wi-Fi Hotspot

    This will be a great choice if you are travelling in a group to London. Although it is also a good choice for a solo traveller. A travel WI-FI Hotspot provides you with your own 4G unlimited network. In London, this can be up to 5GB daily.

    One of the obvious advantages of a Travel WI-FI Hotspot is that you can your share hotspot with others. You can connect up to 10 devices at once and still be able to access the internet at high speeds.  

    This means you can connect your laptop and other gadgets to the WI-FI Hotspot if you are a solo traveller or share among the group if you are travelling in a group.

    Advantages of Using a WI-FI Hotspot

    • Ability to connect up to 10 devices
    • Convenient and easy to carry while travelling
    • A good option for a group of travellers or a family
    • Can connect anywhere, once it is in range.

    Disadvantages of using WI-FI hotspot

    • There is a risk of it getting lost or stolen
    • You will always have to carry the mobile WI-FI Hotspot around
    • You have to keep the mobile WI-FI Hotspot charged always
    • It can be inconvenient for a group once splitting occurs
    • Running costs might be expensive on the long run.

    Get a Customized Roaming SIM

    Roaming your ordinary or local sim may be too expensive and getting a local sim every time, your travel might be too stressful. Alternatively, you can get a customized roaming sim.

    For instance, KnowRoaming offers a SIM sticker that involves you applying a sticker to your existing SIM card. This sticker basically turns your sim into a super dual SIM card that you can use when you travel without replacing your sim.

     There are various options and data packages depending on your choice and preference.

    Internet Access Options

    Internet service is widely available in London. Most time you will find them added to cable and satellites service. There are various types of connection, depending on what you want. Some of these include ADSL, Cable, etc. The speed and cost also vary from one provider to the other.

    Some of the Internet Providers in London include:

    Sky – offer speeds of up to 24 Mb, BT Broadband, TalkTalk, Virgin Media,  Orange, Vodafone, Calico UK Internet Service, Abel Internet, and Plusnet.

    Installation

    After deciding the type of connection, you want, you will need to contact your chosen service provider for installation. Usually, you won’t need to have the engineers over, though it might be necessary if you are just installing for the first time.

    What Does Installation Involve?

    Basically, installation involves setting up the modem or router and filter. After setting up, you will then configure the internet access on a computer, and after that, you are ready to access the internet.

    Note: You will need some documents to successfully install your internet access.

    Documents Required for Installation includes proof of identity (Valid full EU passport or Valid non- EU passport, Current and Valid UK Driving License), Utility bill or lease agreement, as the case may be.

    What is WI-FI?

    The term ‘WI-FI’ is used to describe the technology through which the internet is distributed wirelessly into our devices. The keyword here is ‘wirelessly,’ meaning it does not require a cable to work, and you can connect your device remotely once your device is in range. For Wi-Fi to work, you will need to buy broadband.

    Note: Broadband is generally what brings the WI-FI to your home. Broadband is the technology responsible for connecting your personal internet to the global one. It specifically brings the internet to you with the help of wires, cables, and exchanges.

    While broadband brings the internet to you specifically, you still need a wireless router before you can access and use the internet. Once you have your broadband deal, the next step is to plug your wireless router into your broadband connection.

    The wireless router will dispense the WI-FI connection to a specific band range. As a result, you will be able to connect your devices anywhere within that range without needing cables and the like.

    Wi-Fi Options in London

    O2 WI-FI

    O2 WI-FI offers free service. The most amazing part is that you don’t have to be an O2 customer to use O2 WI-FI. All you have to do to use it is sign up, and that is all!  

    Places you can find O2 WI-FI in London include McDonald’s, Debenhams, Costa Coffee, House of Fraser, Café Rouge, etc. O2 WI-FI gives you quick access. It requires no password or username to connect.  To connect to O2’s Free WI-FI service, you can use an app on your Apple and Android device. For more info go to O2 Wi-Fi.

    Starbucks UK

    If you are looking for free WI-FI, then you can visit any Starbucks. Starbucks usually offers a two-hour free session. Though the WI-FI only lasts for two hours, this doesn’t mean you are limited to those two hours per day. You can have as many sessions as you want per day, all you need to be to reconnect after your 2 hours elapse. For more information on how to use this, visit Starbucks UK.

    The Cloud

    The Cloud is another free WI-FI service that you can use in London. The advantage of this option is that it serves thousand of hotspots in the UK. This means it is easier to find a place to connect as you go.

    However, before you can use the Cloud, you will need to create a Cloud account. This is not difficult at all. All you need to do is to create a username and password, and then log in through your device’s browser when you get to a place that has a Cloud WI-FI hotspot. You can visit The Cloud for more information and help.

    Virgin Media

    Virgin Media is a Pay-for-Service Wi-Fi network in London. It provides full, speedy WI-FI internet access by connecting customers to Virgin Media Hotspots all across the city. This way you can connect to the internet from almost anywhere, even underground!

    They also provide WI-FI access to home users via broadband and routers. There are different packages on offer, depending on your preference. Some of these include Virgin Media Hub, Virgin Media Broadband, Virgin Mobile Pay Monthly among others

    Virgin Media service is not free. You will need to pay a certain amount to get broadband and a router set up. You also don’t need a phone line to set up and connect, which is an added advantage.

    However, if you don’t want to totally switch to Virgin Media WI-FI Service permanently, you can always use their services by buying a WI-FI Pass for a temporary period- this could be for a day, week or a month, your choice! For more information, visit Virgin Media

    BT WI-FI

    British Telecom (BT WI-FI) is one of the fastest and most widely used WI-FI services in London and the UK generally. It offers a broadband service that is connected to most of the hotspots in public places. This means you can use this service when you are mobile or up and about.

    Boingo

    Boingo is unique in the sense that they are not just limited to London and the UK. They provide different international packages and data plans, which means you can also use it when you are in London. The Boingo Mobile service costs $7.95 USD per month for UNLIMITED Wi-Fi access worldwide at 600,000+ Wi-Fi hotspots –a good deal if you ask me.

    You can download their Boingo Mobile Wi-Fi app to your device and sign-up before you leave on your trip.   For more info go to Boingo.

    Pros and Cons of WI-FI Internet Access

    Pros

    • Easy to find: You can find WI-FI hotspots almost everywhere in London, making a convenient choice for data users.
    • Convenient for heavy data users: If you are a heavy data user, using a mobile data plan or roaming your sim might get too expensive and cumbersome in the long run. With a speedy WI-FI such as Virgin Media, heavy data users can surf and download without hassles.
    • Able to Connect almost any device: Once your device is able to access the internet, then rest assured, you can use WI-FI for it, and what is more, you won’t need a cable or wire to connect to the internet!
    • Automatic connection: Once you put your WI-FI password into your device, connection henceforth will be automatic. No hassles, just a simple, quick connection.
    • You can connect from anywhere within range:  Your router distributes the WI-FI over a band range in your home. Once you plug in your router to your broadband, you can connect from anywhere once you are in range.
    • You can deploy your Wi-Fi internet access to your other devices by using a hot spot.

    Cons

    • You may experience low speeds, especially if you are not using reliable broadband.
    • WI-FI is susceptible to interference, and this may affect speed and even workability.
    • The range of a typical WI-FI router is still very limited. Ideally, the range will encompass your entire home, but when you walk about the streets, you will need to continually jump from one WI-FI Hotspot to another.
    • Security risks: Security may be a problem, especially when using public WI-FI.

    Who is Wi-Fi for?

    The beauty of Wi-Fi is that it is for almost everyone, except maybe you don’t use or have smartphones and computers, a reality that is almost impossible in this age. Wi-Fi will be highly beneficial to the following group of people.

    • Household and families: A family, especially a large one, will need WI-FI for their numerous internet needs. Doing a data plan for each member of the family will not only be stressful but also expensive.
    • Rented apartments: As neighbours, you can share the same WI-FI connection. The costs can be shared between the neighbours. This could be a cheaper option compared to individual data plans.
    • Student Hostels or Apartments: Like rented apartments, student hostels could also share the same WI-FI and manage the cost for better internet access.
    • Heavy data users: Heavy data users such as gamers, tech nerds, and the likes will want a broadband WI-FI connection. It is relatively cheaper and more convenient.
    •  Practically anyone: Do you have a device? Do you need internet access? If Yes, then WI-FI can be for you. Though you may have a mobile data plan, the beauty of WI-FI is that you can connect from anywhere in your house.

    How do I Setup WI-FI?

    If you want Wi-Fi personally at home, you only need to follow a few simple steps below.

    • Choose a broadband deal – You’re going to need to choose a broadband company to supply your WI-FI.
    • Wait for router or engineer to arrive – Once ordered, one of two things will happen. Most broadband providers will send your broadband Wi-Fi router through the post, and then you just plug it in as directed.

    However, some broadbands suppliers such as Virgin Media may require a visit from an engineer to set up the broadband.

    • After setting up the broadband, the next step is to plug the router and switch it on.  This isn’t difficult at all; you can just follow the manual instruction on how to do it. If you still encounter any problems, then maybe it is time to contact your service provider.
    • After plugging in the router, you are now connected to the WI-FI. To secure your connection, you will need to set a password or preferably change your password from what came with it to your chosen password. It is advisable to set a password that is strong, and at the same time, you can easily recollect.
    • All you need to do now is to connect devices and browse away. To connect your device, go to WI-FI settings on your device, click on your router, and enter your password. Voila! You are connected!

    Places You Can Find Free WI-FI In London

    Most hotels and B&B’s have Wi-Fi service for their guests. This means internet access in your accommodation is already sorted out. For your daily outing, however, finding internet access may not be as easy. To save you the stress, we have gathered some ideas on how you can stay connected using free WI-FI.

    Note: Most of these options are free, except for a few exceptions.

    • Get Wi-Fi on Tours: If you are visiting London on vacation, one of the easiest ways to access the internet is to get Wi-Fi from the Tour company you signed up. Most tours guides offer some sort of data plans and can share their hotspot with you so that you could quickly use Wi-Fi. 
    • Sign up to O2 Wi-Fi:  As earlier mentioned, O2 WI-FI is one of the few free WI-FI that gives you quick internet access. You can download the O2 Wi-Fi App, so you can find the nearest hotspot to you, even when you are offline. The O2 App is available on both Apple and Android platforms.
    • Bus Tours are one of the easiest ways to gain access to free WI-FI in London. Most tour bus these days have free WI-FI for ticket holders, you can just try your luck!
    • Sign up to the Cloud: Places you can find Cloud WI-FI hotspot include Pizza Express, Wagamama, shopping centres among others.

    All you need to do to gain access to cloud WI-FI is to create a Cloud account and then use username and password to login through one of their hotspots.

    • Apart from WI-FI service companies, most major, airport, train stations, restaurants, and shopping malls offer free WI-FI to their customers.
    • Starbuck offers free WI-FI, all you need to do is simply get a coffee and enjoy the two-hour session they provide freely. If you are not satisfied with your two hours session, you can reconnect once the two hours are over.
    •  You may able to access free WI-FI in some streets in London such as Oxford St, Trafalgar Sq., Piccadilly Circus, Islington’s Upper St. and the City of London. Though using in these streets is free of charge, nevertheless, you have to register before using
    • You might also get free Wi-Fi in McDonald’s, where free 24-hour period Wi-Fi are offered to customers. Though you will have to at least buy something.
    • If you are looking for temporary solutions, you can opt for buying Virgin Media’s WI-FI Pass.
    • Use internet cafés: old? Yes, but internet cafes still work, and you might be surprised at how cheap they are. So why limit yourself, when you can access the internet in the comfort of a Café?
    • Online-4-Free.com offers a Free WI-FI coverage that covers the banks of River and some surrounding streets. All the site wants in return is for you to watch a short advertisement every thirty minutes — a small price to pay considering.
    • Some public libraries, such as the British Library offers free internet access for members that are registered.

    FREE WI-FI TIPS

    • Always take permission or ask before logging in to a WI-FI network in public spaces. You may be violating a law by logging in without permission.
    • There is always a security risk when using a public WI-FI, so make sure that there are good security measures in place before logging in. You also need to be careful of your passwords and login data when logging in a public space

    More London Articles

    If you are visiting London you may want to get a SIM card, here’s everything you need to know about phones working with UK SIM cards. If you run out of battery while exploring the city make sure you read where can you charge your phone in London.

    Here are some more inspiration and frequently asked questions.

  • This is Why English Homes Have Two Taps (& How to Adapt)

    This is Why English Homes Have Two Taps (& How to Adapt)

    One of the first things I noticed when I moved to the UK, is that the bathrooms have two taps. It’s an odd thing to pick up on but I guess when you are used to having mixed taps in your home country its something you need to get used to.

    This is why English homes have two taps – In the UK, there’s a law that prohibits mixing cold water and hot water from their separate boilers, one for cold water in the attic for drinking and one for hot water downstairs which is not drinkable. 

    Using London as an example, and with a little detective work, we can create a picture of how London’s water system was developed, along with major issues involved, in the last few hundred years. This will answer the question of how they ended up with two faucets.

    Why do UK Houses Have Water Tanks?

    The reason for the two water tanks is to prevent any used cleaning water from the house (possibly contaminated) flowing back into the cold drinking water.

    How to use British taps

    There are really only two simple methods:

    1. Plug the sink, fill it with both hot and cold water to get to your preferred temperature, and then wash in this water.
    2. Open both taps at the same time, move your hands really fast between both of them and, if you do it quickly enough, you can sort of get the water mixed.

    Why are Cold Taps on the Right?

    The simple answer to this question is that most people are righthanded, and the cold tap is used the most. So, therefore, the hot tap is on the left.

    Where does London’s Drinking Water Come From?

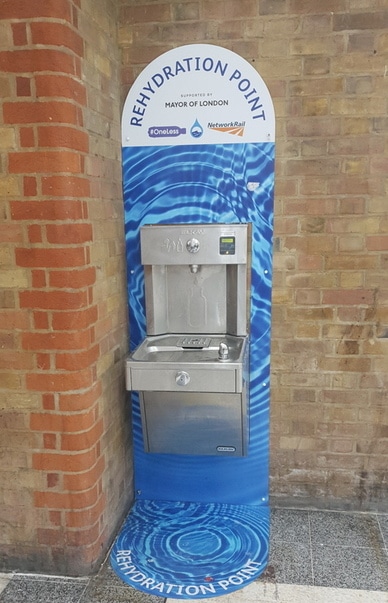
    Water-Fountain-at-National-Rail-Station-in-the-UK

    The majority of London’s drinking water, almost 70% in total, is retrieved from reservoirs outside the city, which have collected water directly from the Thames River.

    After being treated at facilities to ensure removal of any harmful elements, it is transported through one mammoth feeder pipe to smaller reservoirs around the city’s perimeter, after which it is fed through a web of piping directly to residential homes and building throughout London.

    So, what about the remaining 30% of drinking water? This is the other percentage of drinking water which is retrieved from boreholes that access groundwater directly and pump it to the surface.  It then goes through the same treatment and pipe system and combines to reach the city.

    On a typical day in London, this water system provides over 2,100 million litres of drinking water, which doubles during hot spells.

    How is London’s Sewer Water Treated?

    When you flush a toilet or drain your sink, the used water goes down a drainpipe and travels out into the larger system of sewer pipes under the roads of London.

    Local sewers then join a larger web of sewer pipes and wastewater finally reaches to a sewage treatment facility – sometimes by drainage and sometimes by pumping.

    Then the first stage of purifying wastewater involves removing large objects that could damage equipment or present pollution to local waterways.

    After this separation, wastewater still contains organic solid matter, meaning human waste. The following stage separates this solid waste from the remaining water. This is done by pumping the water into large settlement tanks, where it settles for a determined amount of time. Separation occurs during this process, which causes the solids to sink to the bottom of the tank.

    At this stage, even though the visible bits of sludge and solid waste have been removed, it is still most important to ensure that the smaller and sometimes invisible nasty bugs are also taken out.

    After that second treatment, the final wastewater is then passed through the last settlement tank, where the good bacteria sink to the bottom. In the end, the final clean water is pumped over a separation wall near the top of the tank and out into the waterways.

    Residential Plumbing Design in London

    England has had a long and rich history with all things related to the bathroom. There are still unused sewers from the Romans underground, as well as visible remnants of Roman walls above ground.

    Bathhouses used to be in operation along the Thames River until the fifteenth century, then individual bathrooms began as early as the 1700s and evolved into elaborate bathrooms by the Victorian Period in the late 1800s.

    Another all-important device was invented in England at this time by Thomas Crapper, which represented another function of water use that needed to be addressed.

    It’s obvious that, by the 1800s, Londoners required both hot and cold water daily in their own homes. Plumbing pipes, water heaters, and fixtures accommodated this starting then and continuing to the present.

    However, with London’s unhealthy past related to drinking water and wastewater, a case could be made that Brits prefer two taps and separate water tanks to ensure they will never have to deal with water-related illnesses again.

    Short History of UK Residential Water

    The real boom of innovative water companies providing water to London’s residential districts took place in the 1700s and 1800s. There was a boom in modernization as homeowners demanded clean and ultra-convenient water for their families and the upgrade efforts were led by the New River Water Company, the London Bridge Waterworks, and others.

    Borough by borough, this transformation occurred, with some of the last areas like Kensington and Chelsea added to the system during the nineteenth century. However, in parallel with the push for convenient drinking water, major problems had developed with the sewage system.

    London is well-known for having water sewage issues a mere century earlier in the 1600s, with the black plague being traced to the water system and killed an estimated 100,000 people. So, it was incredibly important to determine the current causes of foul-smelling sewage water that gave such a bad reputation to the city and the River Thames around which it is built.

    Joseph Bazalgette, a civil engineer and expert with water systems, was engaged to take on the huge task of planning and building a new sewer system for the city of London. Constructed during the mid-1800s, the new sewer system pulled used water from London’s homes and buildings and fed them out through major waterways.

    This building project was truly on a mammoth scale and almost equal to a “world wonder.” To understand the scope of this building effort, here are some statistics:

    • Six interceptor sewers needed building, covering 100 miles
    • These were fed by 450 miles of main sewers
    • These were fed by 13,000 miles of local street sewers
    • 318 million bricks were used in the building process
    • 670,000 cubic meters of concrete was used to build
    • 2.7 million cubic meters of land were excavated

    The entire sewer system was designed and built in such and practical manner, that it left hundreds of miles underground for the eventual construction of London’s famous and highly efficient Underground train system, similar to New York’s subways but cleaner.

  • How to Drive a Foreign Car in the UK: Complete Requirements

    How to Drive a Foreign Car in the UK: Complete Requirements

    Planning a trip to the UK can be fun and daunting, especially when it comes to transportation. Driving in the UK has its own quirks, just like driving in any country. If you’re staying in the UK for any length of time, you may want to consider using your own car, especially if you live within driving distance of the UK.

    But how to drive a foreign car in the UK? If you are not a resident of the United Kingdom, you can drive a foreign car without registering it in the UK for up to 6 months. If you are a resident of the UK, you are not allowed to drive any car that is not registered in the UK with only a few exceptions.

    Whether you are a UK resident looking to import your dream car or a non-UK resident planning the trip of a lifetime, I have all the information you need to know about how to drive a foreign car in the UK.

    How to Use a Foreign Car in the UK If You Are Visiting

    If you are simply planning a short visit to the United Kingdom, then you are in luck because the UK makes it easy for visitors to use their own cars on UK roads. There is very little you will have to do to be able to travel to the UK with your foreign registered car.

    The United Kingdom allows all non-residents to use their foreign cars in the United Kingdom for up to six months as long as that car is registered and legal in the country where you are a resident, and the car is covered by insurance. (source)

    It is important to note that the six-month allowance does not need to be consecutive. If you are driving your car in the UK for six months total, no matter how many times you leave the UK, you must go through the process of registering the car, paying associated taxes, and getting insurance in the UK.

    This can pose a problem for people who travel to the United Kingdom frequently for business or to visit family. To drive legally in the UK, you will need to keep track of how many days you spend there throughout the year.

    So, if you are planning a trip to the United Kingdom, then you will probably be fine to drive your foreign registered car, but here are some requirements your car must meet and some things to consider like how you will get the car to the UK and whether you have enough insurance on it.

    Car Requirements

    There are some requirements that you and your car must meet in order for you to use it in the United Kingdom. In most cases, these requirements will not be difficult to meet and are rather reasonable. (source)

    1. The car must be registered to the driver, or the driver must have proof that they are allowed to use the car. This is to help prevent the theft of foreign vehicles.
    2. The registration number must be displayed on the front and back of the car.
    3. Registration numbers need to be displayed in Latin characters and Arabic numbers so those police officers can read it.
    4. There must be some sign of what country the vehicle is registered in on the rear of the car. This can be added to the car specifically for your trip or be a part of the registration number.
    5. The car must be legal and safe for road use in the country where it is registered.

    Essentially if you are legally driving your car in your country of residence, then you can legally drive it in the UK for a short visit without issue.

    Transporting the Car

    First make sure that you really want to bring your own car with you. If you’re only going to the UK for a short vacation and visiting primarily urban destinations, bringing your own car may just be an added headache.

    If you are committed to bringing your foreign car to the UK, you will need to figure out how you are going to get it there.

    If you’re coming from Europe, you can have your car transported (with you in it) by train on the Channel tunnel. It costs about £49 per vehicle. Not bad considering you can fit your whole family in the car, and the crossing only takes about 35 minutes.

    You can also take a ferry depending on where you are coming from, but this will take much longer than taking the Channel tunnel.

    If you live outside of Europe or you are not travelling across Europe in your car to get to the UK, then you will need to have the car shipped through a shipping company. This would be the case if you were from the United States or Australia, and probably only cost-effective if you are making a permanent move.

    Parking

    Before you get to the UK make sure that you have parking available for your car. This is especially true if you are travelling to a busy urban area like London. Parking comes at a premium in some areas.

    Check with wherever you are staying that there will be a place for your car to park.

    Driving on the Left Side

    An estimated 35% of the world’s population drives on the left side of the road, and the United Kingdom is one of these places. If you’re from a country that drives on the left side of the road, then your transition to driving in the UK will be much easier.

    If you’re used to driving on the right side of the road, then you’re going to experience a learning curve. Most people find driving on the left side a fairly easy transition, but it does take some getting used to. You’ll be surprised at how different it feels!

    You can use your right-hand traffic car, as in a car that is designed to be driving on the right side of the road, in the UK. You can even register a right-hand traffic car in the UK if you need to. However, it can be more difficult to get used to driving on the left side of the road if you’re still using your right-hand traffic car.

    Here are some tips if you’re used to driving on the right-hand side of the road:

    • Place a reminder on your dashboard like a post-it note that says “drive on the left!” It may seem silly, but it can be really helpful.

     Most of us spend enough time behind the wheel that the process of driving becomes second nature. We hardly need to think about it at all, but this can get you into trouble when you are still getting used to driving on the left side.

    • Before your trip, try practising simple manoeuvres like parking and turning in an empty parking lot. This will give you a chance to work out any initial issues you might experience in a safe environment instead of the first time you pull onto a road in the UK.
    • Avoid bringing a manual transmission. This is especially true if you aren’t used to driving a manual transmission vehicle. You don’t need to be thinking about shifting gears when you’re getting used to driving on the opposite side of the road and traffic signs and laws you aren’t used to.
    • If possible, start your trip someplace that does not have heavy traffic so that you can adjust to this different way of driving without the stress of traffic.
    • If you come across any traffic circles, and you probably will as they are very common in the UK, remember that traffic flows counterclockwise. You will need to turn left when entering a traffic circle.
    • Look up the most important traffic laws and what traffic signs mean in the UK so that you don’t unintentionally break any traffic laws. This will allow you to focus on driving on the left side instead of deciphering signs.
    • For your first trip, make sure you have mapped out where you’re going or that you have a GPS so that everything goes as smoothly as possible.

    Check Your Insurance

    To drive any car in the UK, you must have valid car insurance. If you use a rental car, the car will come with at least the minimum amount of insurance required. You can often choose to add extra insurance for an added fee.

    As long as your car is insured in the country where it is registered and that insurance covers you during international trips, you will not need to make any changes to your car insurance. If your insurance does not cover international trips, you will need to add that coverage to your policy.

    You do not need to get the insurance that is authorized to provide insurance in the UK unless you are in the United Kingdom for more than 6 months or if you are a resident of the UK. Essentially, if you need to go through the car registration process, you will need to switch the insurance as well.

    Paperwork when Traveling by a Foreign Car in the United Kingdom

    When you are travelling in the UK with a foreign-registered car, you will need to make sure that you keep proof that you are doing it legally in the car with you at all times to you to prevent your car from being confiscated.

    This will include your driver’s license, registration paperwork, proof of insurance, and any proof you have of the day you entered the UK with your vehicle. If you got an exemption from the HMRC so that you would not have to register your car in the UK, then you should also have that available.

    If you are driving a car that is not your own, you will also need to prove that you have permission to use the car.

    How Long Can I Drive in the UK with a Foreign Driver’s License?

    Registering your car is not the only thing you have to think about when driving in the UK as a non-resident.

    • As the law currently stands, no matter where you are from, you are allowed to drive in the UK for up to 12 months if you have a driver’s license from any country.
    • If you have a license issued by a country that is a member of the EU or EEA, you can use that license in the UK until it expires.
    • If you have an EU license because you exchanged it with a non-EU license, you can only use it for 12 months before getting a UK license.
    • If you have an exchangeable international license, you can use it for up to 12 months before you must exchange it for a UK license without taking a driving test.
    • If you are in the UK for over 12 months and you do not have an EU, EEC, or exchangeable driver’s license, you will need to take a driver’s test to obtain a UK driver’s license and be allowed to continue driving in the UK.

    You do not need to get an International Driving Permit, but if your license is in a language other than English, you may find it useful to have one in the event that you are pulled over for a traffic violation.

    • An International Driving Permit is essentially a translation of your driving credentials into several different languages.

    When Do You Have to Register a Foreign Vehicle?

    As I said above, if you are a resident of the UK, then you will need to register your foreign car right away regardless of how long you expect to use it in the UK. There is no loophole in the law that allows you to get around this.

    Some erroneously think that by leaving the UK every six months, you can avoid having to register the car in the UK, but this is not the case for a number of reasons. (source)

    First of all, the wording of the law is clear. If you are a resident of the UK and import foreign care, you must register your car in the UK and pay all necessary taxes that are associated with that.

    Secondly, for residents, there is not a six-month grace period for registering the car. You have to register an imported car within two weeks of its arrival in the UK, and you are not permitted to drive it before it is registered.

    If you are planning on visiting the UK with your car, but you are not planning to take the car back out of the UK when you leave, then you must register the car in the UK. For example, if you are visiting a vacation home, and you intend to leave your car at the vacation home while you are not there, it must be registered in the UK.

    If you become a resident while you are visiting the UK, you will need to register your vehicle in the UK. For example, if you decide to stay in the UK long term after finishing a course of study.

    Additionally, it is important to note that a UK resident cannot even drive a car that is owned by a non-resident unless it is registered in the UK. Seriously, there are loopholes!

    Who is Considered a Resident of the United Kingdom?

    To be considered a resident of the United Kingdom, you must reside in the UK for 185 days out of a tax year (source). This is just a few days over half a year. This means someone who travels to the UK for one week out of the month through the entire year is not a resident.

    If your residency status changes while you are in the UK, then you will need to go through the process for importing a car into the UK immediately.

    If you are not a resident, but your car is in the UK for more than 6 months out of 12 months, then you need to register it in the UK.

    A police officer may consider you to be a resident if you have a UK driver’s license, bank card, and employment in the UK (source). If you are not a resident, you must be able to prove it. Be sure to keep documentation that supports this claim.

    The Exceptions

    There are some very specific exceptions to these rules that allow a UK resident to drive a foreign car in the UK.

    The most commonly used exception is for rental vehicles. If you drive a rental vehicle from another country in the UK, you will not be violating any laws as a resident of the UK. This allows UK residents to travel freely. Meaning, a UK resident could fly to France, and return to the UK using a rental car registered in France.

    Diplomatic vehicles are also exempt from following the same rules as other vehicles that drive in the UK long term. A diplomatic vehicle is allowed to drive on UK roads with foreign registration without being subjected to the same requirements as other vehicles.

    If you work in a country that is part of the EU, you can temporarily use a company vehicle in the UK that is registered in your employer’s country. You also do not need to worry about breaking the law in this case.

    Students and temporary workers residing in the UK for a fixed period longer than 6 months may also be exempt from needing to register their car in the UK. They will need to apply to the HMRC for an exemption before or upon arrival. (Source)

    How to Register a Foreign Car in the UK

    If you are a resident or become a resident of the UK, then you must register your car in the United Kingdom, and if you plan on staying in the UK for more than 6 months, it is a good idea to register your car sooner rather than later.

    To register a car in the United Kingdom as a resident, you will need to go through the process of importing the car.

    First, you will need to notify HM Revenue and Customs (HMRC). If you import the car from the EU, you will need to notify HMRC using the Notification of Vehicle Arrivals service. If you import the car from outside of the EU, you will need to use form C384. (source)

    After you submit the proper paperwork, the HMRC will tell you if you have to pay a Value Added Tax (VAT) or duty and will notify you when your application has been processed so that you can proceed with the next steps.

    You will not have to pay a VAT if you have already paid a VAT in another EU country, the car has been used for more than 6 months, AND the vehicle has been driven more than 6,000 kilometres or 3,728 miles.

    If you are required to pay a VAT, then you need to pay it to HMRC before you can register the car.

    Next, if the vehicle is less than 10 years old, then you will need to get vehicle approval. This step basically ensures that your vehicle meets safety and environmental standards.

    If the car is registered in the EU, you simply need a European Certificate of Conformity. If it is not an EU registered car you will need to apply for Individual Vehicle Approval (IVA). (source)

    Once you have completed all of these steps, you can order an imported pack from the DVLA to register the vehicle. It can take up to 6 weeks before you receive your registration certificate.

    Why Aren’t UK Residents Allowed to Drive Foreign Registered Cars?

    It seems strange that non-residents are allowed to enter the UK with foreign registered cars, but the residents of the UK cannot have such freedom, but there are good reasons that the government insists upon this.

    The UK government estimated that between 2010 and 2013 an estimated 350,000 cars had been driven in the UK illegally, which costs £60m in unpaid road taxes.

    But the financial hits don’t stop there. An estimated £2.3m in speeding fines were avoided by improperly registered drivers over a two-year period, as well as millions of pounds of parking tickets. (source)

    There is also an association between criminal activity and foreign-registered vehicles. Drivers of foreign-registered vehicles are difficult to track down, and they know it. They are more likely to flee the scene of an accident, and a foreign registered car will allow someone to get away with a crime more easily. (source)

    Of course, most people driving foreign registered cars are a tourist and not criminal masterminds, but using foreign-registered cars is a method used by some criminals to avoid detection.

    If a car is going to be in the UK permanently, the UK government wants to be able to track down who is driving it. It is not just about the money, but about the safety of the roads.

    What’s the Worst that Can Happen?

    What kind of consequences are in place for people driving improperly registered cars? The consequences are not overly severe as driving a car that is not registered the right way is not a criminal offence.

    No one is going to jail because they haven’t registered their car in the UK when they should have.

    The consequences can vary by location, but this is generally what you can expect to happen if you are found to be driving an improperly registered car. If a police officer pulls someone over for driving an improperly registered vehicle, he can confiscate the car on the spot and leave those in the car stranded.

    In order to get your car back, you must pay the pound a set fee, daily charges, and a surety fee. In addition, you must properly register the car in the UK within a certain number of days. Consequences for second-time offenders can be more severe including having their car taken and destroyed.

  • Can You Cash a Foreign Cheque in the UK? (Ideas on How)

    Can You Cash a Foreign Cheque in the UK? (Ideas on How)

    On a rare occasion, you may find yourself in the position of needing to cash a cheque.

    Can you cash a foreign cheque in the UK? Yes, it can be possible to cash a foreign cheque. Some UK banks will allow you to cash the cheque depending on where the cheque comes from, what bank it is drawn on, which currency it’s in – and how long you are willing to wait.

    While it is possible to cash a foreign cheque, an electronic cash transfer is the most efficient way to move funds to your account while you’re in the UK. If you’re a short-term visitor, it will be virtually impossible to make the transaction in time.

    Getting Started. What will Work?

    Cashing any foreign cheque in the UK isn’t easy and take a significant amount of time. If you need the funds relatively quickly, attempting to cash a cheque is not the way to go. Fortunately, access to personal funds electronically is more convenient and efficient than ever.

    According to Barclays bank, if you want to cash a foreign cheque, you’ll need a local account. If you have an account in the UK, you are one step closer to getting your cheque cashed. But the cash won’t be immediately available.

    Instead, at a local bank branch, you will deposit the foreign cheque into your account. Depending on the particulars of your cheque, it will be deposited into your account through either a negotiation or collection process. The transaction will be assessed a fee, depending on the amount of the cheque and/or the bank’s policy.

    Whether it’s negotiation or collection depends on:

    • where the cheque comes from and
    • what currency it’s in

    If a cheque is made out from one country but is in a different currency than the country of a cheque, the cheque will be held through the collection process, which means an additional delay.

    Watch out for high fees. Using banks can incur high fees and you should look into what will be most cost-efficient for you. For lower value cheques this may not be an issue but if you are looking at several thousand dollars then you could lose out on a significant amount of that money.

    Here Is How Each Cheque Cashing Process Works

    Negotiation

    Negotiation lets a bank customer use the funds from a foreign cheque before the cheque has cleared. The amount of the cheque will be credited to your bank account after three or more working days.

    The credit is only temporary – until the cheque clears. If the bank the foreign cheque is drawn on rejects the cheque, the amount is taken from your checking account.

    Collection

    With the cheque collection process, the bank does not credit your account until the cheque is completely cleared through the foreign bank. You will wait until the cheque has been cleared and the funds obtained from the bank before crediting your account. This takes on average about 4-7 weeks. There is also a fee.

    How Long It Takes

    There is no standard timeline for how long it might be until you’ll have your funds. It varies widely, based on the country and currency of the cheque.

    Danske Bank reported a process similar to Barclays, also stating on their website: “We recommend that funds from abroad be sent by bank transfer rather than by cheque. Bank transfers are faster, cheaper and safer.”

    The wait is generally long because the cheque needs to be physically mailed back to the foreign bank for processing. Maybe even to a specific branch. The bank the cheque is sent to will have its own process and timeline for sending funds back to the UK. Between the mailing, exchanging and processing, this method takes time.

    Exchange Rates

    Sometimes it takes so long, that the exchange rate between currencies can change during the process. Whatever happens, you will be paid in the amount that was quoted on the day you presented the cheque to the UK bank. It may be favourable by the time your funds clear.

    Opening a Bank Account in the UK

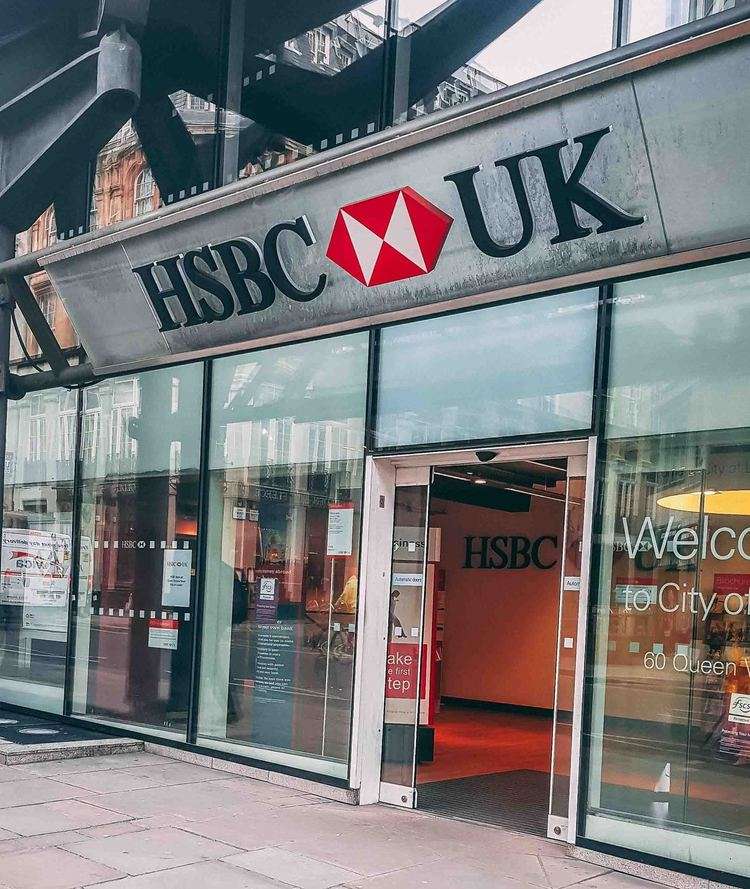
    Setting up a HSBC UK Bank Account

    Traditional banks will require more information to establish an account. They generally require proof of address, that you can work in the UK so visa or passport and potentially require proof of income or a certain amount to be deposited each month into the account. 

    You’ll need the following pieces of information to present to your new bank:

    • Proof of identity
      • Passport, driver’s license, ID card
      • Visa if applicable
    • Proof of address
      • Types and number of pieces varies by bank

    Providing that information can be difficult without a permanent address, although it’s getting easier with new-age banks like Monzo and Starling. You will need a UK mobile number, UK address (so you can be sent your card etc) and proof of identity. Both Monzo and Starling accept cheques GBP, however, unable to accept foreign currencies cheques.

    International Bank Accounts

    Some banks offer international bank accounts, with the option of working in multiple currencies and easing both the process and cost of funds transfer.

    Major UK banks, such as Lloyds Bank, HSBC, Citi Bank and Barclays, offer international accounts. Each bank will have its own policies, procedures and standards of eligibility. Some eligibility areas include:

    • Proof of Identity – Your passport and driver’s license or state ID. Many banks require two forms of ID.
    • Proof of Residency – You may need proof of residency in the United States, proof of an address in the foreign country, or both.
    • Startup Funds – Banks often have minimum startup funds required for deposit.
    • A student or work visa if you need one for the country
    • A university letter or proof of school enrollment
    • A letter of employment or employment contract

    While international accounts can simplify the process of working with money in multiple countries, this is the kind of thing you probably want to get taken care of before you leave home.

    If you plan on opening a bank account in your destination country, you can even begin the account opening process prior to arrival through the international banking centre of your home bank.

    To hold a local account in a foreign currency you’ll probably need to be living or working abroad at least some of the time. It can ease your money transferring woes but at a cost. There are likely to be charges for the account itself.

    Alternatives to Cashing Cheques in the UK

    Cheques are nearly obsolete in your everyday life at home, you can imagine why they’d be difficult to work with overseas. There are so many options that exist to make financial transactions easy while you’re visiting another country.

    Bank Transfers

    Organizing a bank transfer is a much smoother transaction when abroad. While you’ll still encounter some pretty high fees and exchange rates. I don’t generally recommend using your bank to transfer money due to the fees.

    If going this route, first find out how many pounds you’ll receive when all is said and done. You can then check how much your transfer service quote you against the “interbank rate” online.

    The interbank rate is the rate that is used between banks when they transfer and trade money between one another. XE.com is one source for the interbank rate.

    Agencies that can transfer your money:

    • Wise – this is what I use for my business and personal accounts to send money from USD, AUD etc to my UK bank accounts.
    • Currency/Forex brokers like Currencies Direct, TorFX and Money Corp
    • High street/major UK banks – generally the highest fees
    • Services such as Western Union or PayPal

    In short, there is no easy overseas, cross-border cheque clearing system. Your foreign cheque must be physically mailed back to where it came from, processed there and then the funds must be exchanged and entered into your account in the UK.  

    If you have the account and the time, you’ll still encounter significant financial penalties, in the form of high fees, for engaging in this process.

    Advice for Consumers Receiving Payment Abroad

    There are a variety of methods for making payments abroad. From electronic transfers to currency brokers. The UK’s Pay Your Way website offers advice and information to help you understand your options and choose the one that best suits your needs.

    If you have a choice in how you are being paid from home while you’re in the UK, request an automated payment directly to an account you can access in the UK.

    There are certain pieces of information the sender will have to know, such as your International Bank Account Number (IBAN) and your Bank Identifier Code (BAC). These international identifiers ease the transition of funds directly into your account in the UK.

    Speak to your bank before you leave home. This is the best way to ensure you know how to handle and receive any payments while you are in the UK. Figuring these things out before you’re overseas can save you a lot of time and headache.

  • Biometrics Appointment for UK Visas (UKVCAS Process Explained)

    Biometrics Appointment for UK Visas (UKVCAS Process Explained)

    There have been a lot of changes over the past year with the visa process and you may have been wondering – UKVCAS how does it work? I will run through:

    • How to book the biometrics appointment online
    • The biometric appointment locations
    • How to check UKVCAS appointment availability
    • UKVCAS upload documents and categories
    • What to expect when you attend the biometrics appointment.

    Disclaimer: This is based on my experience of going through the process (I’m not a lawyer or immigration advisor). If you have any issues make sure you contact UKVI or UKVCAS.

    As things are changing (due 2020 events) with UKVCAS service please keep up to date with UKVI latest information and UKVAS.

    Difference between UKVI and UKVCAS

    Before we get started on the process, let’s cover the difference between UKVI and UKVCAS.

    UKVI – UK Visa and Immigration

    Here’s a quick summary:

    • UKVI are the ones making a decision on your application
    • If you have any questions about the application they are the department to call
    • Most importantly if you want a quick decision (i.e. super-priority) on your visa and you are eligible for it, this is where you want to spend the money!

    Read more about the service here: UKVI Services and UKVI Information About UKVCAS.

    UKVCAS – UK Visa and Citizenship Application Services

    Here’s a quick summary:

    • It’s a third-party service run by Sopra Steria
    • Their website is where you book to have your biometric information taken
    • Upload your supporting documents for your application
    • Attend your biometric appointment at one of the centres which fingerprints, photo, signature and submitting your application.

    UKVCAS website.

    Choosing Standard or Super Priority Service?

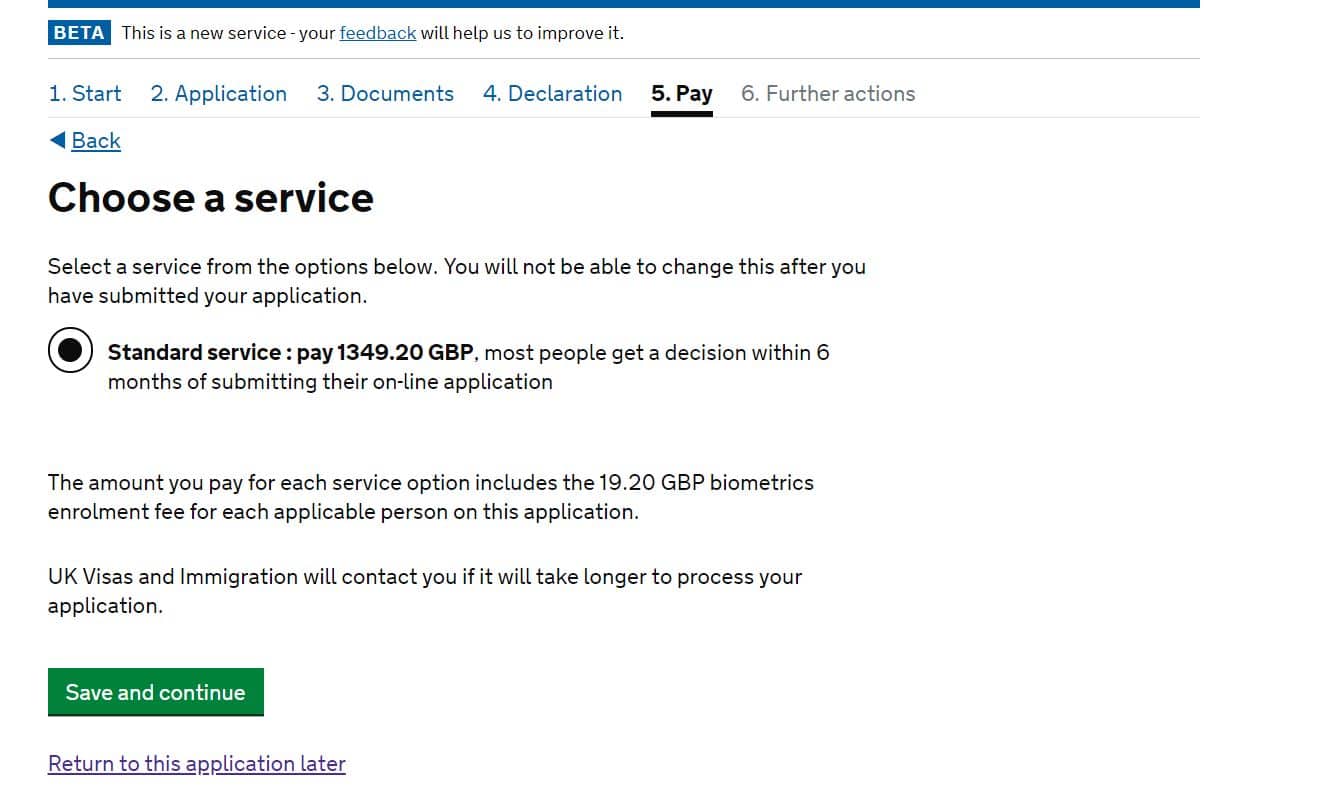
    When you get to the payment screen you will be potentially presented with two options. This is the most critical part of the application, especially if you wish for a faster decision. They are:

    If your visa is eligible for super-priority, then you will have the ability to choose this during the payment screen. This will give you a decision within 24 hours. Just to note this doesn’t give you a faster biometric appointment.

    In this example, you can see there is only one option and unfortunately, UK citizenship is not eligible for super-priority.

    Payment screen on UKVI
    Payment screen on UKVI

    The type of visa’s service is offered to are:

    • Tier 2 or 4 visa
    • Tier 2 or 4 dependant
    • Tier 1 or 5 dependant
    • Remain in the UK with family – applying in the partner, family life as a partner or private life in the UK routes
    • Indefinite Leave to Remain
    • And a few more.

    The price of super-priority is currently £800. Here is the price list from UKVI.

    Step by Step Guide to Biometrics Appointment for UK Visa (UKVCAS)

    To complete your application, you must attend a UKVCAS service point to have:

    • your identity confirmed
    • any required biometric information enrolled
    • any required supporting documentation digitised and checked
    • confirm you are happy to send your application sent to UKVI

    I will show you the steps I completed to create my account, booking an appointment, uploading documents and what to expect during the appointment.

    UKVCAS has no bearing on the decision process, all it does if you choose to pick a premium appointment is to provide you with an appointment quicker, after hours etc. There are a few options. If you want a quick decision, then you need to choose this during the application process as stated above.

    If you prefer watching the step by step process here is a video version.

    UKVCAS Account Setup

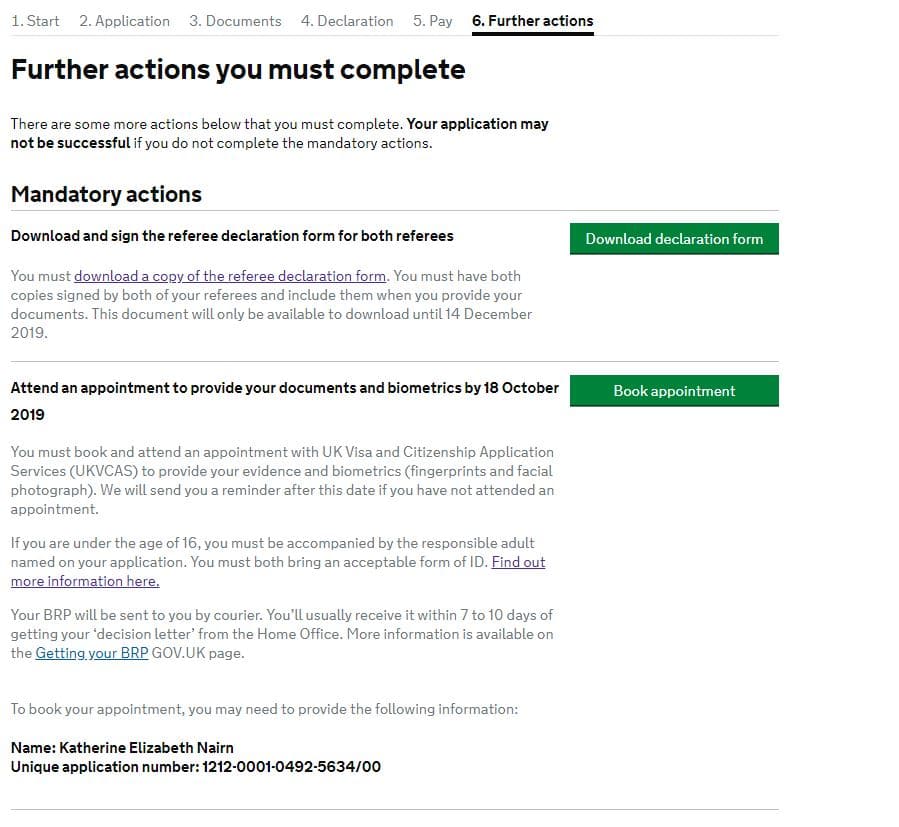
    Once I reached the further actions page on the application I was presented with mandatory actions, one of these will be ‘book appointment’, I clicked this button to commence the set-up for the UKVCAS site.

    Further actions screen on UKVI
    Further actions screen on UKVI

    Please note: if you have any issues with setting up your account you will need to call UKVCAS.

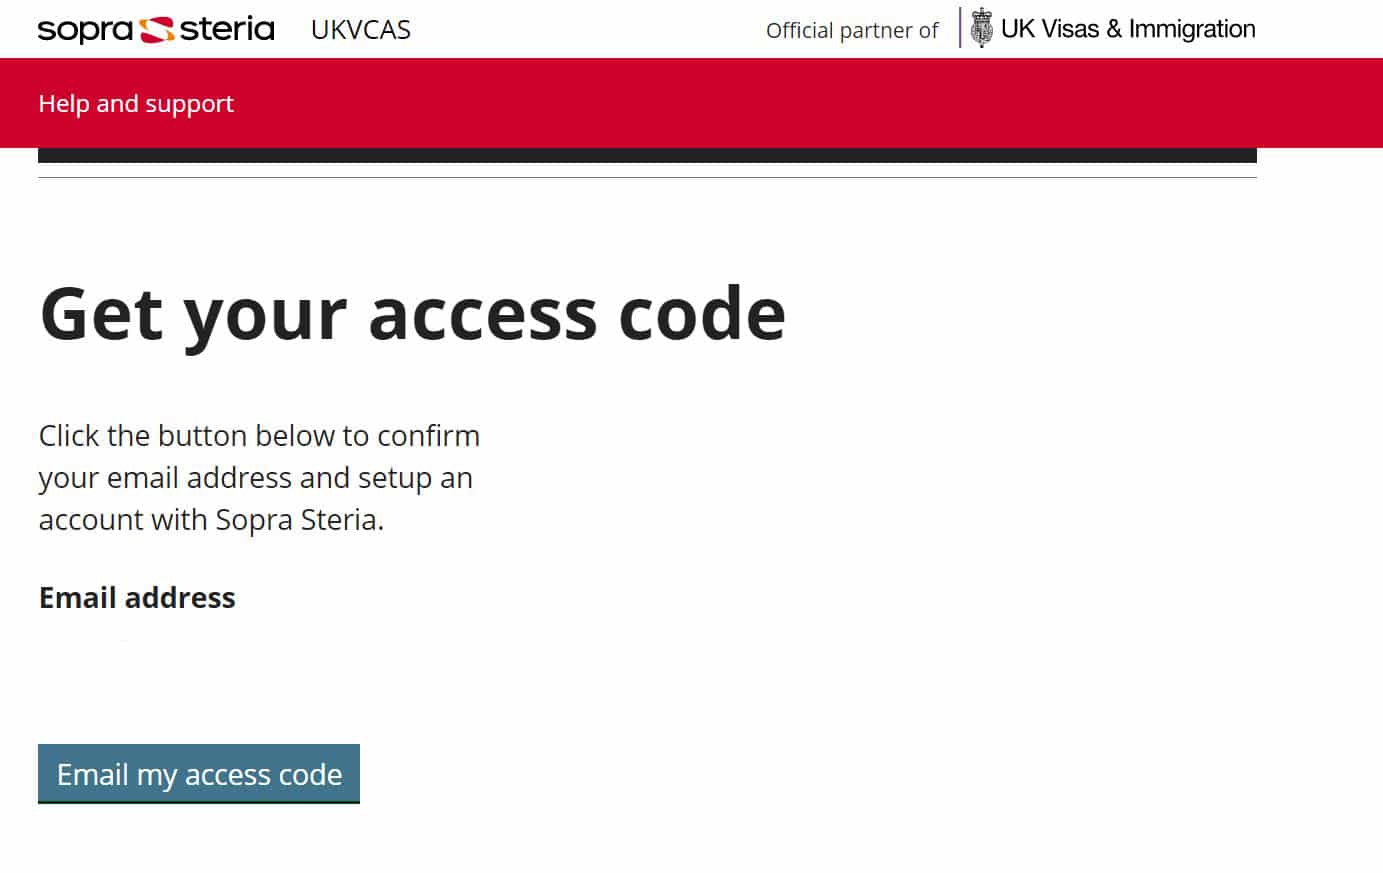
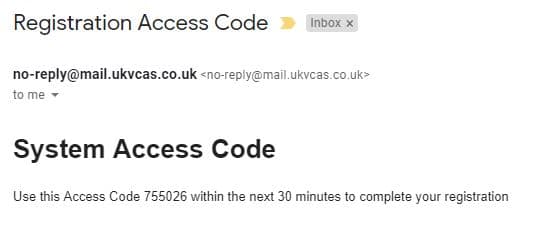
    Next, I was presented with a screen to ‘get your access code’. This will be sent to the email address you registered with UKVI.

    UKVCAS screenshot of access code
    UKVCAS screenshot of access code

    In my inbox I received an email like this with 6 digits, you have 30 minutes to use the code.

    Email from UKVCAS that provides access code
    Email from UKVCAS that provides access code

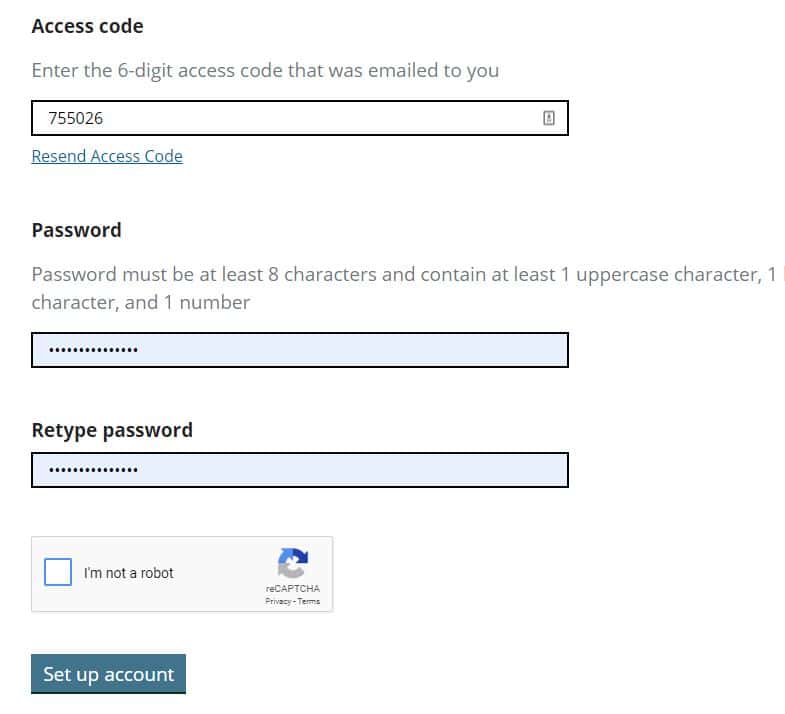
    Finish the sign-up process I added the code and created my own password for the UKVCAS website.

    Setup UKVCAS account with password
    Setup UKVCAS account with password

    That’s it, my account was all set-up with the email I registered my UKVI application with.

    Book Your Biometric Appointment

    You can book an appointment in two ways:

    • On the UKVCAS website
    • by phone by calling the UKVCAS Premium Support Line on 0900 165 6600 (Calls cost £2.50 per minute)

    Personally I did all of this myself via the website.

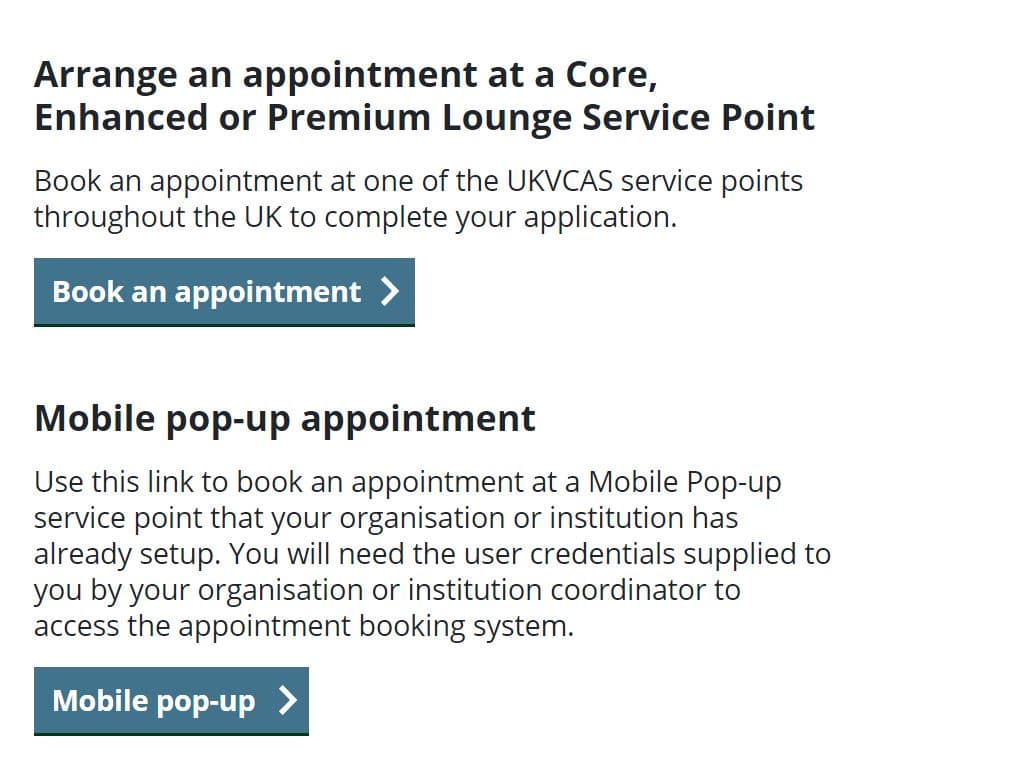
    Once I set-up my account and then logged on, I was taken to a home page which explained the booking of the appointments, the extra services and stuff they offered. I kept scrolling through until I got the book appointment button at the bottom of the page.

    Choose a UKVCAS appointment
    Choose a UKVCAS appointment

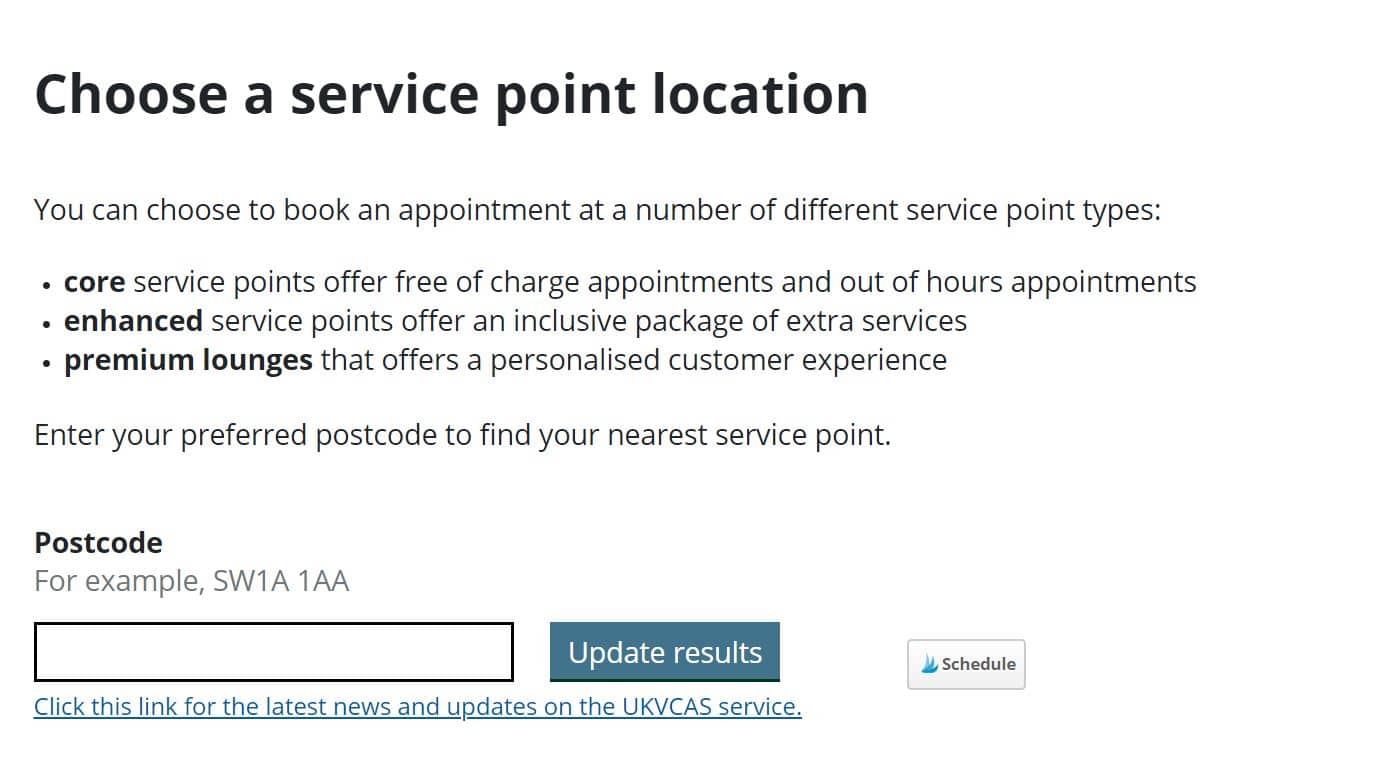
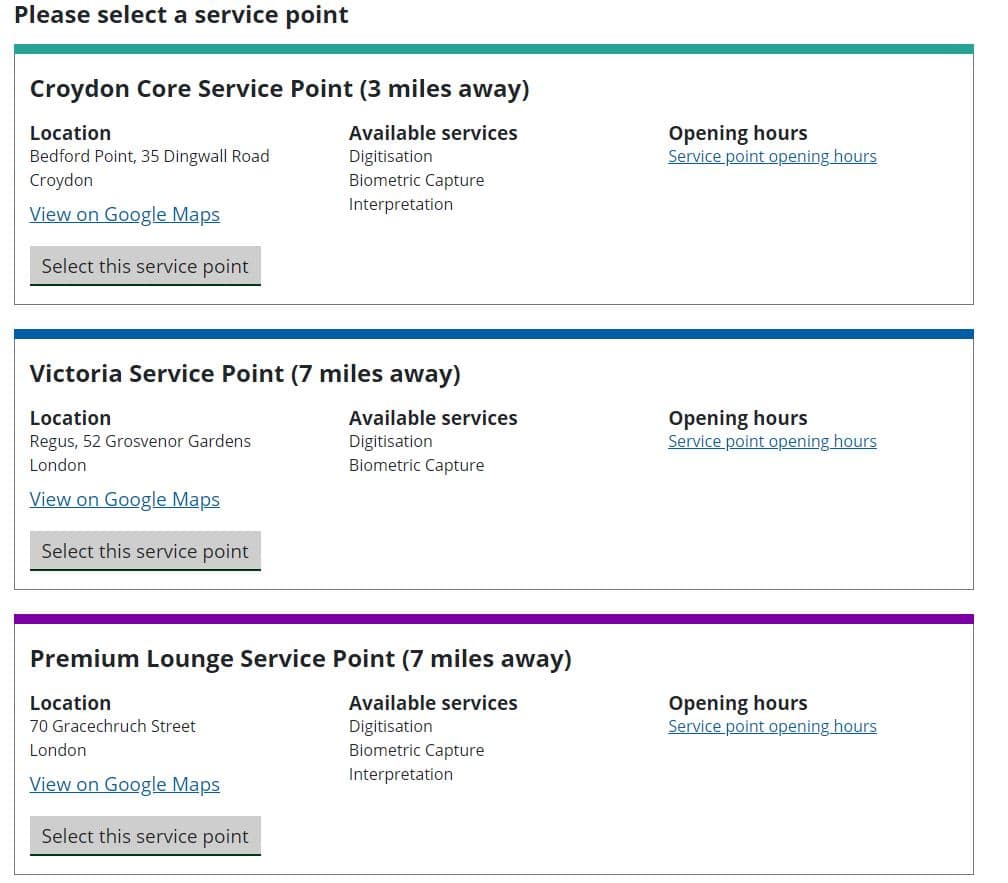
    Next was choosing a service point location. The tool gave me the closest centres near me or I could search by using a postcode.

    Choose a service point location for biometric appointment
    Choose a service point location for biometric appointment

    If you wish to get a free appointment there are 6 core service centres offering free appointments – Manchester, Birmingham, Glasgow, Cardiff, Belfast and Croydon.

    Once I was happy with the location, I clicked on select this service point which gave me the available appointments.

    Example of UKVCAS service points
    Example of UKVCAS service points

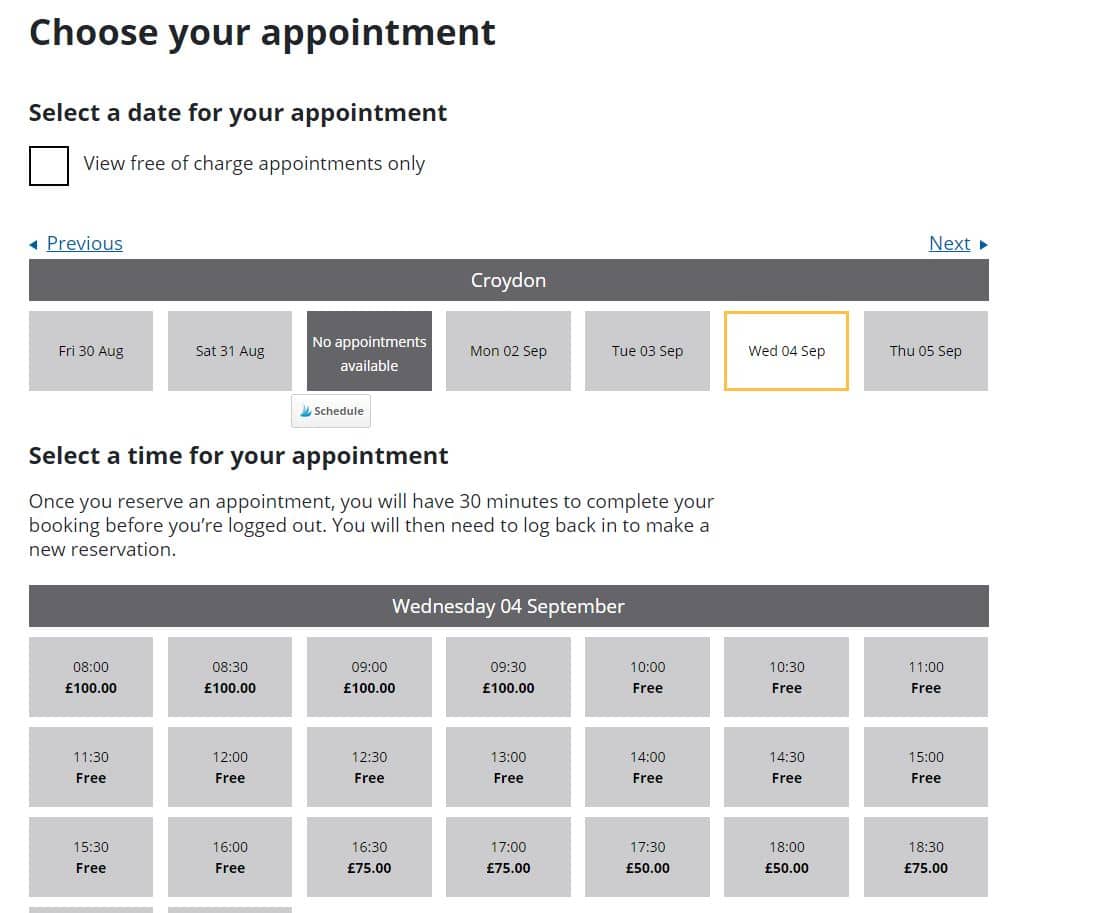
    Next was the choose your appointment screen which showed me the appointments for the first week and you can keep pressing next for further dates. When I clicked on the dates it told me if there are appointments available and the price if it was a paid appointment.

    As you can see below there is a range of free and paid appointment between £50 to £100. Read more about the fees here.

    Choose a UKVCAS appointment
    Choose a UKVCAS appointment

    I was happy to wait for an appointment but it is dependent on what you want to do and how quickly you want to get your application done.

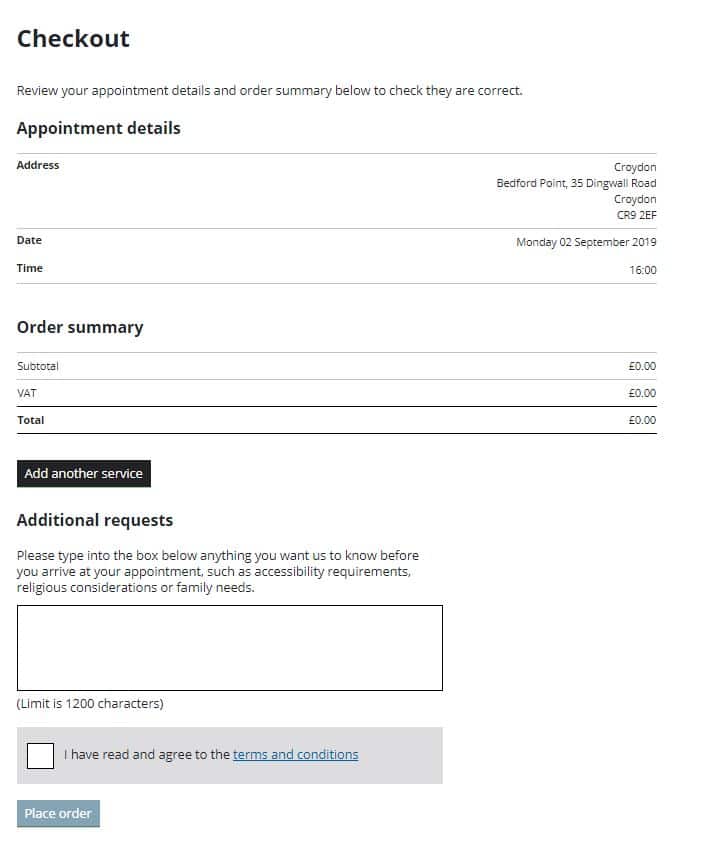
    I selected a time I was able to make and then went to the checkout screen which gave an order summary. As I had a free appointment it states 0 but if you have a paid appointment this is where you would enter the payment flow. You can also add additional services here like document checking.

    UKVCAS checkout screen
    UKVCAS checkout screen

    Once I finished booking the appointment and I received two emails. One was the tax invoice and one was the booking confirmation.

    The booking confirmation is a must to take to your appointment and this will be the thing that will track you through your biometric appointments. It’s really important. You can either print it or you can take it on your phone but you do need to have a copy available.

    It has a QR code and information about me and my appointment and that’s basically it, so nothing too exciting.

    UKVCAS Upload Documents

    Remember that checklist from the application? Well, that’s your guide on what you need to upload document wise! You do have the option of paying UKCVAS to do this for you but I just did it online at home for free.

    You can upload documents in stages right up until you attend your appointment. When uploading your documents, there are a few guidelines.

    1. Document type:  The documents are marked as either mandatory or other documents. A description of the mandatory documents required for each category is provided in the tabs.
    2. Category: Your supporting documents need to be submitted under the categories. Some are easier to determine than others – see categories below.
    3. File Format: PDF is the preferred format, JPG and PNG format. If you don’t have a scanner just search for an app in the Google Play or Apple Store, there will be quite a few available.
    4. File Name: needs to be as simple as possible e.g. bank-statement-Apr-2018.pdf. Do not use filenames having special characters, #,ë, or bank.statement.apr.2018.pdf
    5. File Size: maximum file limit is 6MB. You can separate your documents into parts if your file is too big and there is no limit on the number of documents/files you can upload.
    6. Scan in Greyscale or Black and white: This helps with controlling the size, although I didn’t end up reading this part before I scanned all my documents and they were fine in size. In fairness, there wasn’t as many as my ILR application.
    7. Password: Make sure there are no passwords on the files and they are fully accessible. I know it can be worrying by not protecting your information but it can delay a decision if they are unable to access any of this.

    How to Upload Your Documents on UKVCAS

    Depending on where you are ready to upload documents, you can either do this straight after booking the appointment or whenever you’re ready.

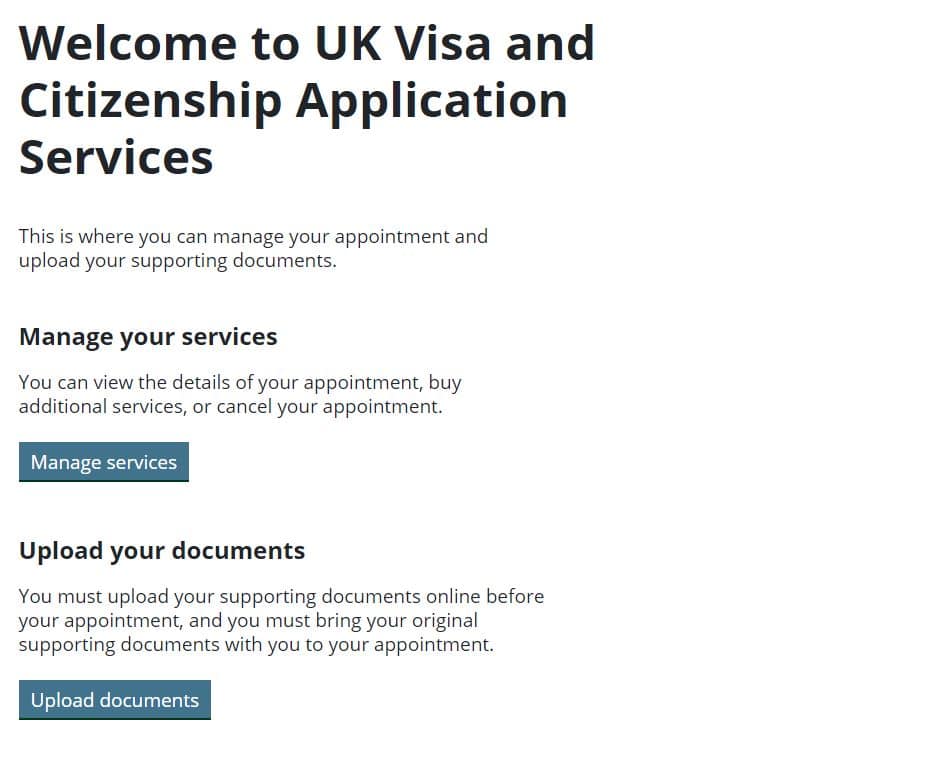
    I did this before my appointment so when I logged in you will be presented with a welcome page that had an upload your documents button.

    UKVCAS Manage your service screen
    UKVCAS Manage your service screen

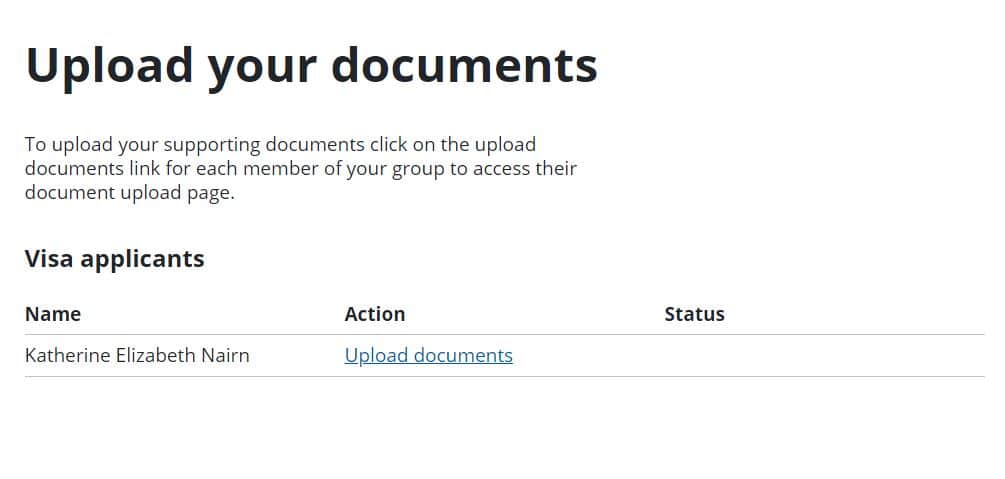
    Once I clicked the button I was presented with visa applicants, as it just me, it’s only my details. I clicked the blue action link which took me to the next page.

    UKVCAS-Upload-your-documents

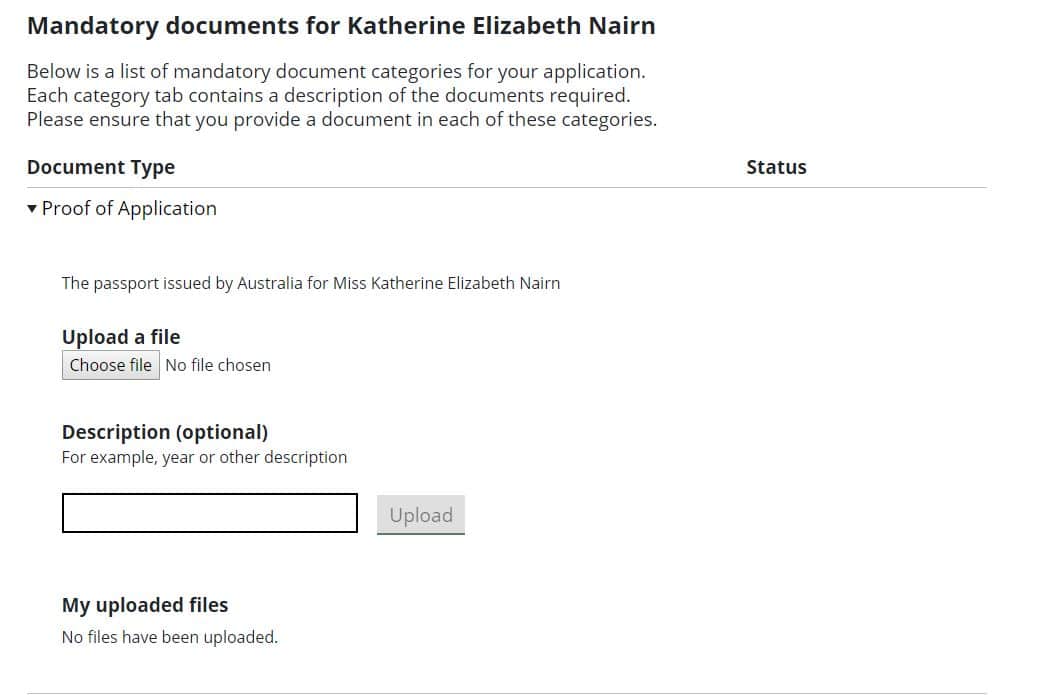
    There is some information about the files and formats which I have summarised above and you will reach the upload section. This example just covers the mandatory document.

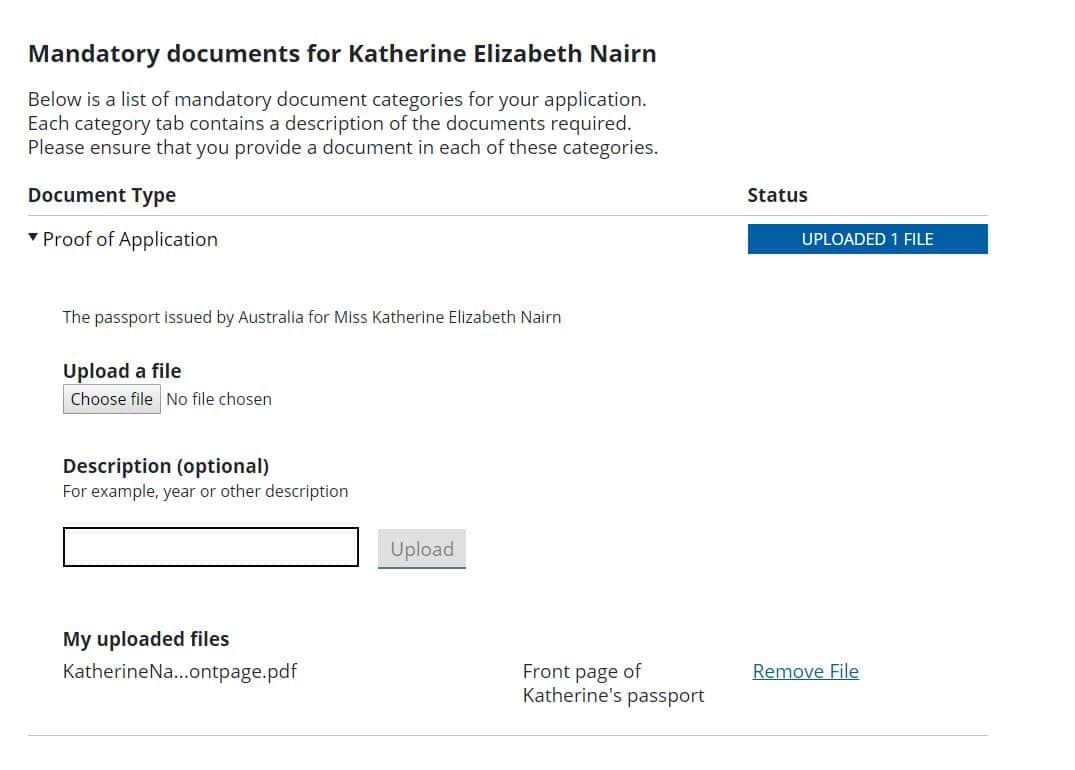
    All I did was upload the named file I had and added a description which basically Katherine’s Front Page of Passport. Just to note I also uploaded a copy that had every page that was stamped in my passport in another section.

    UKVCAS-proof-of-application

    Once uploaded my document there was a status to say how many files were added.

    Uploading files to UKVCAS
    Uploading files to UKVCAS

    That’s it! I kept repeating until all my files were uploaded.

    UKVCAS Document Upload Categories

    One of the biggest things that I found a bit annoying is there is no guidance from the UKVCAS or UKVI on where you’re supposed to put them. I made a few assumptions and added information where I thought it suited best.

    This is all based on UK Citizenship to give you an example, if you are applying for other visas like Spousal Visa then chances are you will have documents such as life events. Just make sure you include all the documents that your checklist states in the visa application.

    Mandatory Documents

    Statement from UKVCAS website in the document upload section: Below is a list of mandatory document categories for your application. Each category tab contains a description of the documents required. Please ensure that you provide a document in each of these categories.

    Proof of Application – I only added my passport here because that’s what it stated I need to put here.

    Optional Documents

    Statement from UKVCAS website in the document upload section: Below is a list of optional document categories. Please ensure you check your Access UK document checklist before including documents in the categories below. For some application routes, ‘Optional’ documents offer you the ability to provide evidence in a number of categories at your discretion to satisfy immigration rules.

    • Other – I included my referees in this section.
    • Residence in the UK – I included my approval letter for my indefinite leave to remain and then I put my BRP card with my indefinite leave to remain there.
    • Finances – I included six P60’s from 2014 to 2019.
    • Proof of Business – I didn’t include any proof of business.
    • Life Events – I didn’t include any Life Event documents.
    • Medical Information – I didn’t include any medical information.
    • Sponsors / Employment – I included two employment letters and also one HMRC letter from 2018 from my indefinite leave to remain application.
    • Proof of Identity / Travel History – I included my Excel Spreadsheet that covers all of the dates I’ve been outside the UK, my current passport and my old passport, which includes all of the pages from the passport. The front page and then all the pages with stamps on them.
    • Educational – I included my life in the UK pass notification.

    What Happens at the Biometrics Appointment?

    When I arrived at the biometric centre, I was greeted by a security guard and he requested that I give my booking confirmation and my passport. The next step was speaking to the receptionist who my booking barcode to confirm what floor I needed to go to.

    Once I arrived at the appropriate floor I was greeted by another staff member who gave me a ticket number which was to be used during the process. They advised me that there will be two parts phase of the appointment.

    Part One: The Biometrics.

    Basically, they have these booths that record your biometrics with a computer system. The only way that I can describe it is like the passport e-gates at an airport. When you go through the e-gate and you scan your passport and takes a photo and then lets you through, that’s basically how these biometric systems were, except they just take your signature as well.

    You will be explained the process before you register your biometrics. The photo process is probably the lengthiest process of all of it. It’s very picky and can take a while to get a photo it likes.

    Once I did that, I walked back out to the waiting room until my number is called again.

    Part Two: Checking of Documents and Submitting Your Application

    Another representative came and collected me. This is the stage that they went through my application, documents and biometrics. The first thing again they ask for is that confirmation sheet with a QR code and your passport. They will scan that in, it’ll bring up all the details of that and your application.

    My biometrics was reviewed which just double-checks your photo, signature and fingerprints are ok. I had to explain any scars or markings on my fingerprints which was recorded against my biometrics.

    The next thing he did was scan my current passport again, I did previously have both my latest and older passport uploaded to my application.

    Next he just quickly scrolled through what I had put in there, for example, you’ve put life in the UK test on here and a few other documents, but he didn’t check a single one of my documents.

    After that, he asked, “Are you happy with the application and the documents you’ve put in your biometrics?” You must state yes and then they will submit the application for you. That will trigger the decision process for your application.

    Next Steps

    The waiting game! There is no ability to track your application through UKVCAS or UKVI, you just have to wait for a decision to arrive. You can call UKVI to discussion your application if you want further confirmation.

    Hopefully, my experience has given you an understanding of what you could potentially expect. Make sure you keep up with the UKVCAS and UKVI websites to see if there are any changes.

  • 6 Options on Where Can You Charge Your Phone in London

    6 Options on Where Can You Charge Your Phone in London

    Travelling can take a toll on your phone’s battery life, you want to be capturing all those London moments and navigating the city. The last thing you want on your trip is not to be able to capture something! So where can you charge your phone in London?

    • ChargedUp
    • Powermat
    • Aircharge
    • Charging at your accommodation
    • John Lewis Charging Station in Oxford Circus
    • Use any public charging outlet available (with your charger & adapter)

    There are plenty of phone charging options in London, even some newer London buses are adapted with USB ports! I’ve never had an issue finding a place to charge my phone when I am out and about. All the cafes, restaurants and tourists’ areas will have options. I always travel with a power bank just in case I run into issues for whatever reasons.

    Your Options for Charging Your Phone in London

    1.    ChargedUp

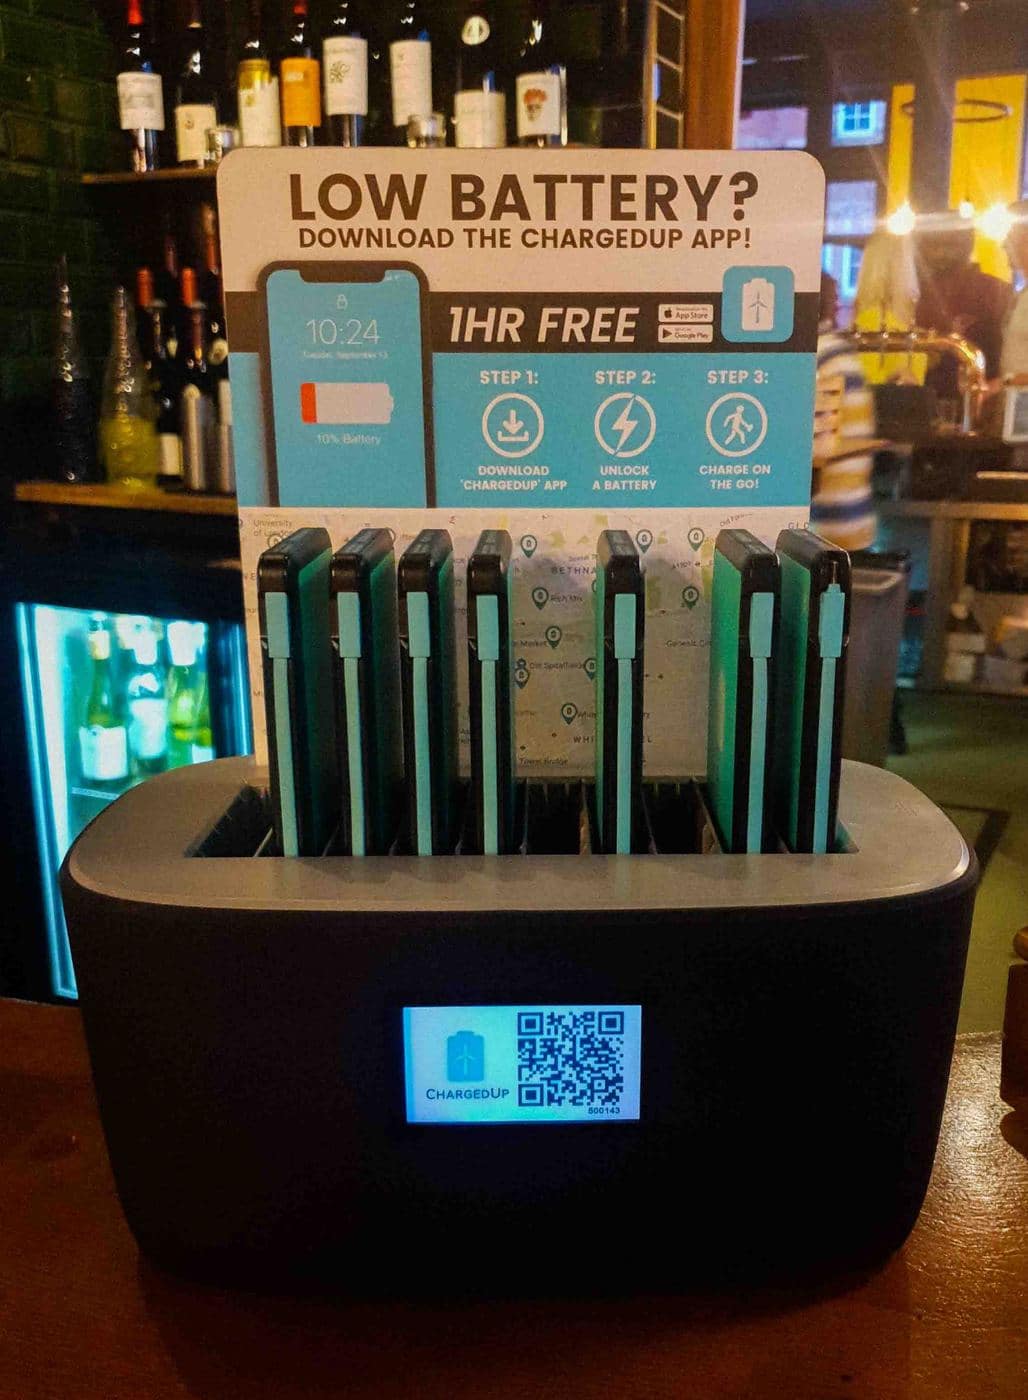
    ChargedUp Station at a pub in London
    ChargedUp Station at a pub in London.

    It is becoming more convenient to get charging equipment in London. ChargedUp is a business that places vending machines in places like:

    • Restaurants
    • Shops
    • Bars
    • Hotels
    • And more

    The only disadvantage with ChargedUp is that they only have an IOS app to find charging points. Brands like DoubleTree by Hilton, wework, Stonegate Pub Company, Selfridges & Co, Pergola, M&S, Laine’s, Brewdog, and Boxpark are partnered with ChargeUp so you will likely find them in one of their venues.

    Simply pay the fee to rent the charging pieces you need for the duration of your stay. When you finish using them, simply return them to any ChargedUp vending machine. This is a great help for those that want to avoid packing too many items.

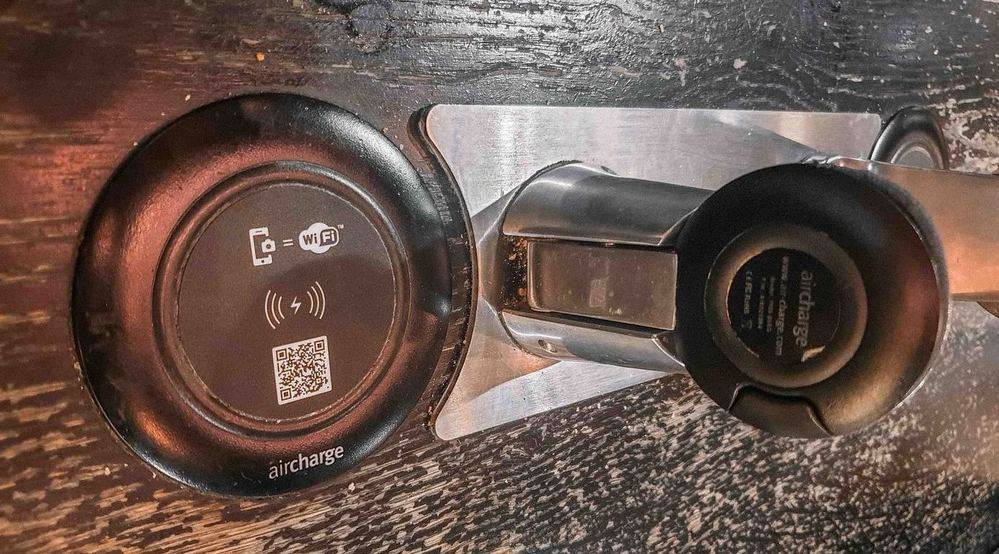
    2.    Aircharge

    AirCharge-in-Starbuck
    You will find these Aircharge stations (or versions of) in all the brands I mention below.

    Aircharge has paired up with brands like McDonald’s, Starbucks, YO! Sushi, Costa Coffee and Vapiano to provide customers with Qi wireless charging stations. McDonald’s is the largest provider to date with more than 400 UK stores offering these facilities.  

    The easiest way of finding the closest charging station is by using Aircharge app. Using your location, it will guide you to the closest station.

    You do need to have a newer phone for Aircharge to work. If your phone is on the list below, then it will work with Qi wireless technology:

    • Apple iPhone: XS Max XS, XR, 8, 8 Plus,
    • Samsung Galaxy: S10 Plus, S10, S10e, Note 9, S9, S9+, Note 8, S8, S8+, S7, S7 Edge (Plus more devices)
    • Sony: Xperia XZ3, Xperia XZ2 Premium, Xperia XZ2 (Plus more devices)
    • LG: G7 ThinQ, V30, G6 (US version only), G4 (optional), G3 (optional) (Plus more devices)
    • Nokia: 9 PureView, 8 Sirocco
    • Huawei: P30 Pro, Mate 20 Pro,
    • Microsoft Lumia: 1520, 1020, 930, 929, 928, 920
    • Google: Pixel 3 XL, Pixel 3,
    • Nexus: Nexus 6, Nexus 5

    For the phones that aren’t compatible will need to get adapter to use Aircharge.

    3.    Powermat

    Powermat is another charging facility that can be found in stores around central London. Places like; All Bar One, LEON, Heathrow Airport and German Doner Kebab are offering Powermat charging stations. As they are using wireless charging technology your phone will need to have these capabilities.

    To use Powermat, simply place your phone on the Powermat spot and it will start charging your phone.

    You can find the location by using the link here.

    4.    John Lewis Charging Station in Oxford Circus

    Oxford Circus is a connection point between Regent Street and Piccadilly. The term “circus” can be confusing if you are not from England. It literally means circle in this case, translated from Latin.  There are many shops present in the circle around this street junction.

    John Lewis is a well-known department store in London and has a Chargebox station inside the store. The best part of the ChargeBox is that the first 30 minutes are free!

    You can find a ChargeBox in the John Lewis store located in Oxford Circus. These are small lockers with charging plugs in them. You can simply put your phone in the locker and use the provided key to keep everything safe.

    If you don’t want to wander too far away from your phone, you should explore the cheese room on the lower ground floor. Honestly, it is a cheese lover heaven! But back to phones…

    After 30 minutes it will disconnect your phone and if you want more charge you will have to reconnect it again.

    Where to find them:

    • On level 5 at Place to Eat entrance
    • Place to Eat – Right.
    • Ground floor next to Customer Collections.

    5.    Charging at Your Accommodation

    Charging your phone at your accommodation it is the easiest way. If you’re like me it’s just habit to charge your phone when you’re asleep. If I find I end up glued to my screen before leaving I will give the phone a quick top-up before heading out the door. That extra 15 minutes can help!

    Hotels/Hostels

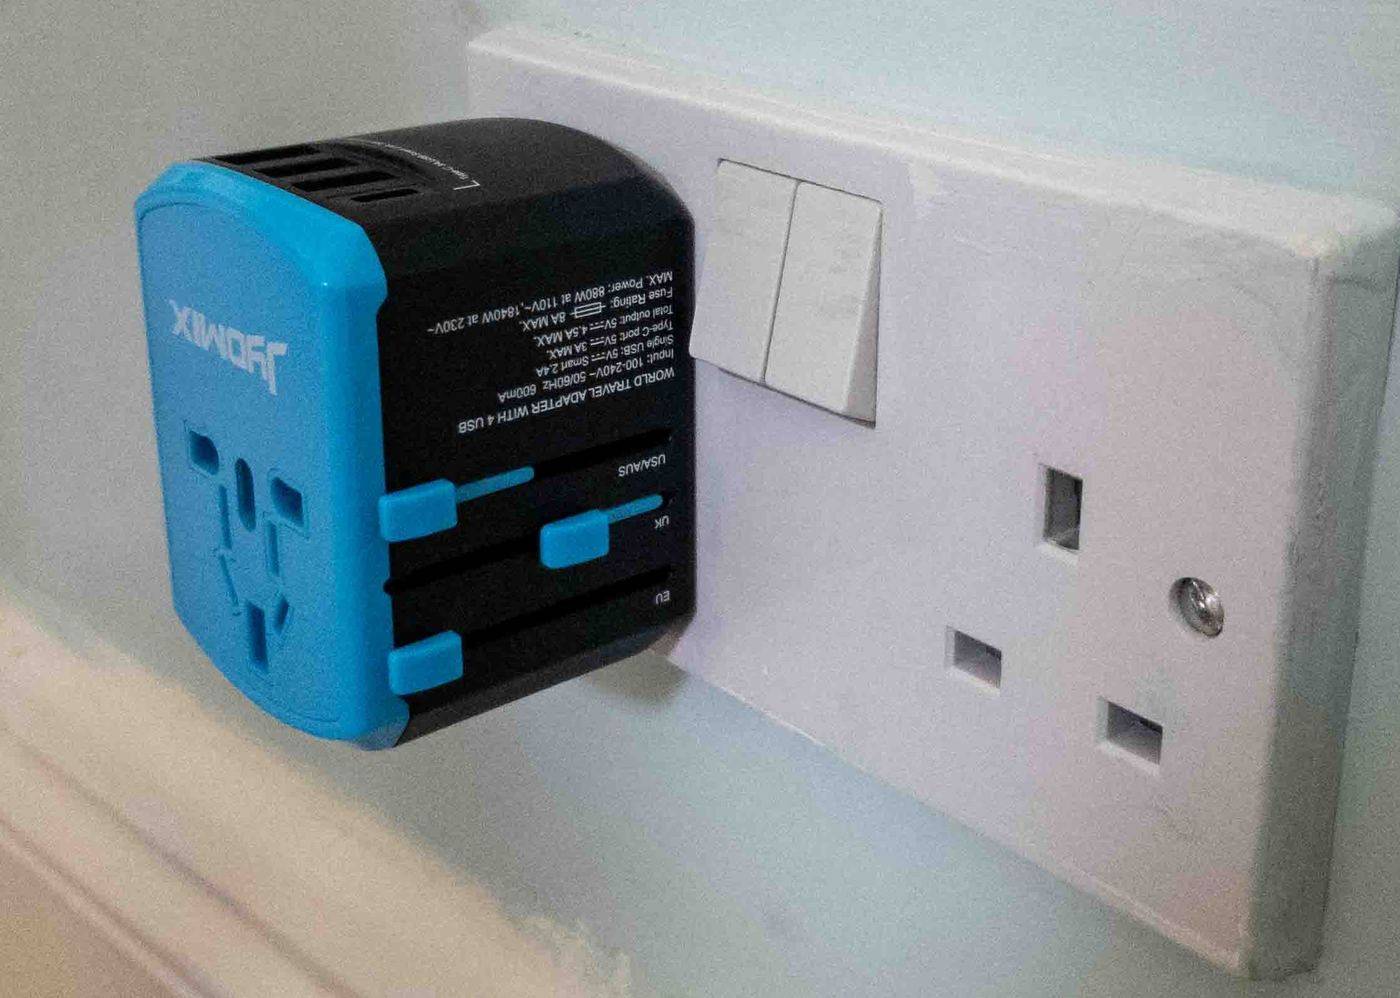
    USB ports are becoming a popular way of charging your phone instead of having the old school plugs. You should bring an adapter and the plug just in case your hotel hasn’t caught up with the latest trend. In most cases when I am travelling in the UK, I find that I don’t need my plug, but you can occasionally get caught out.

    Adapters are necessary because the plugs in the UK have three prongs. Depending on where you are travelling from, your plugs may be completely different. Be sure to get enough adapters to allow everyone in your group to charge as needed.

    Airbnb

    Staying in an Airbnb it is unlikely you will have USB so if you need a power convert then I suggest getting one before travelling.

    6.    Use Any Public Charging Outlet Available (With Your Charger & Adapter)

    Charging your phone while you are shopping for coffee or food is a great way to top up your phone. After all, we must rest our feet sometime after all that sightseeing!

    Cafes, Coffee Shops and Restaurants

    There are generally power points and free internet in cafes, coffee shops and restaurants. If you can’t see the powerpoint straight away, just ask the staff and they will be able to let you know the best seats to get that top-up.

    National Rail

    On some of the National Rail trains, there will be power points available, especially the long-distance trains like Edinburg to London. Having a power adapter and charging equipment means you can easily take advantage. However, you won’t find these on the Underground, unfortunately.

    Other Public Transport / Stations

    I have found some London stations popping up with charging facilities like Shoreditch High Street station. Just through the gates, on the left-hand side, you will find charging facilities that come with the different plug adapters to meet all your charging needs.

    On some newer London buses, I have also discovered USB ports to charge your phone. The route I have seen it the most on is the 521 from London Bridge to Waterloo.

    It’s not a guaranteed way to charge your phone though.

    Do You Need Plug Adapters in London?

    VGUARD-Worldwide-Travel-Adapter-4-USB-Ports
    My favourite travel adapter, save you bringing all the bulky plugs!

    London plugs have three prongs. If you are coming from elsewhere in the UK, you may not need an adapter. Europe includes many countries outside of the UK, and outlets can vary.

    If you are coming from the United States, you need an adapter for London. Most of Europe has two-pronged plugs; however, the prongs are shaped differently than U.S. prongs. Ireland and the UK are the exceptions (with 3 pronged).

    No matter where you are travelling from, you will likely need an adapter if you are traveling in the UK.

    Adapters are inexpensive and I recommend getting one for worldwide use. This enables you to use your adapter for all of your travels and doesn’t lock you down to the UK. Here is my favourite adapter VGUARD Worldwide Travel Adapter, 4 USB Ports (Amazon).

    Do You Need Power Converters in London?

    Power converters are necessary if your devices cannot handle the higher voltage in London. The median voltage in the UK is 230 volts. Check your devices before you go to find out what they run on. You can ruin a phone or laptop that cannot handle the voltage difference.

    Look on the plug for your phone to see what the voltage limits are. Some items, such as iPhone chargers, do fine with the voltage difference. Look on the website for your phone or computer brand to find out if the UK voltage is safe for your product.

    Quality Brands

    It is convenient to replace a broken charging plug or cable with an inexpensive copy. Even in your home country, there are warnings against this, however. You may severely limit the longevity of your device by using off-brand charging equipment.

    If you are travelling overseas, purchase plugs and cables that match the brand of your phone. This ensures that everything is of good quality. This can prevent dying cables and damaged devices.

    Most phones come with a charger and cable. People often buy cheap charging items, so they have extras in the car or around the house. Find the original plug and cable before your trip or buy a new one. Some companies get their products certified for use with common brands like Apple and Samsung. Read the fine print before you purchase these.

    Purchasing Charging Equipment for London

    It is easy to purchase adapters for travel. Most equipment is very affordable. Even if you need several items, you are likely to spend very little. You can find adapters at Boots, WH Smiths, electronics stores, and department stores.

    If you do not want to pack extra items, you can easily purchase adapters in London. This is a common item bought by tourists, so they are easy to find. If you do not plan on using the adapters again soon, be kind and hand them off to another tourist before you head home.

    Why Outlets are Different in London

    The reason for varying outlets around the world is simpler than you may think. There is more global travel now than when electricity was new. Even after the invention of electricity, it was not in use like it is today. Early uses mainly included lights and fans.

    Different people were busy setting up electricity in different parts of the world. They each simply came up with an outlet design that met their needs. Frequency and voltage changed in the UK after World War II. The frequency of 50 hertz matches up with the standard in many other places.

    Britain changed over to a higher voltage during the 1950s. The United States did not change at this time, as most of their homes already had large appliances running on 120 volts. It would have made things difficult for a large part of the population.

    Most electronics and small appliances work with a variety of voltages. This dual voltage ability makes it easier for manufacturers to sell items globally. You can get an idea of whether you need a voltage adapter by learning about voltage in different countries.

    • UK/ Europe- anywhere from 220 to 240 V
    • United States- 110/120 V
    • Japan- 100 V
    • Australia- 230 V
    • Brazil- 127/ 220 V (in the process of changing, some older buildings are still 127 V)

    Other Electrical Items to Consider

    Adapters can be helpful for many items, not just phones and computers. As people often travel with electric razors, hairdryers, and cameras. You should be able to use your adaptor for most items.

    Before travelling make sure you check out the tag to find out if your appliances are dual voltage. This means you can use them anywhere in the world with only an adapter.

    If you have older appliances or some odd brands, you may need to purchase a voltage adapter, as well. You can simplify your trip by using disposable razors purchased in London and use the hair dryers that come with your accommodation.

    More London Articles

    If you are visiting London you may want to get a SIM card, here’s everything you need to know about phones working with UK SIM cards. If want to know more about WiFi and internet in London this article has you covered.

    Here are some more inspiration and frequently asked questions.

  • Do You Need a Car in London? Things to Consider.

    Do You Need a Car in London? Things to Consider.

    For a long time, it was expected that most people would own a car but with cities becoming less car-friendly do you really need a car in London? While some people may feel the need a car, London has great public transport so you can get around London easily without one. Lots of people have even turned in their keys for walking, cycling, train and buses.

    Do you need a car in London? The answer is yes and no. This will be entirely dependent on your situation which may require a car to get far out of town. However, if you are staying within the central heart of London, you most likely will not need a car.

    This guide will help you understand if you do or do not need a car in London. All of this advice will need to be filtered through to your personal circumstance or intention of using the car. Public transportation can be intimidating at first, but this guide will make you a suave pro in no time!

    How to Determine Whether You Need A Car

    The first steps will be understanding your commute, what areas you’ll be hanging around, or if you’re moving heavy things which would be miserable on the underground.

    I moved over from Western Australia where are a car is necessary to get around and public transport only goes in four directions. I went from driving all the time to not owning a car for 6 years in London.  I have always lived in zone 2 to 4 areas of London so that made things easier.

    In order to determine whether you need a car in London you should consider a few things:

    Your Job – Where you work is based and the type of job will play a big part in the decision of getting a car. Driving in central London (zone 1 -2) has a lot of additional charges, harder to park and many other challenges so the train can be an easier option. Alternatively cycling to work in a popular choice.

    Of course, if your job requires you to drive then the company may offer you a car to drive. It’s important that you read about the tax you may be charged using a company car.

    Where You Live in London – Generally, people that live on the outskirts of Greater London think it’s worth buying a car and will have cars. The distances can be far greater to the nearest station, shopping centre and general amenities.

    As someone that has always lived in transport zones between 2 to 4 and I have never found it worthwhile. The more central you live, the more eye-watering the parking prices will be! Unless you earn enough money or have been lucky enough to have affordable parking nearby.

    Personal Choice – If having a car is something truly what you want, then go for it! I have included all the important information below to factor in your decision.

    Parking in London

    Parking in central London is difficult to find and can be very expensive if you plan on staying there all day. Prices can vary significantly with street parking in London, in Westminster, the average price for parking is around £5.40 so quickly adds up to over £40 a day.

    To add to the difficulty in parking in central London, many apartments and houses in central London do not include a parking space. Next, think you of how your parking costs quickly add up to leave your car somewhere.

    It’s not all doom and gloom if you live less central, then parking does get easier, more house does come with parking spaces and the prices slowly go down.

    The most popular questions asked on the subject, and all the answers you’ll need are:

    • Is there free parking in London? Generally, in central London, you will not find free parking but outer London residential street can have no parking restrictions at all. To find free parking look at downloading the app AppyParking which will show you the regulations for every street in London. The app makes it a lot easier to find parking and the restrictions around those spaced.
    • Can you park on single yellow lines in London? In London you can only park where there are single yellow lines. Any areas where there are double yellow lines are it’s prohibited to park.
    • Where can I park in London Apps/Websites? There’s an app called Justpark that has completely changed my life! This will let you know if homeowners are advertising their spare parking space. This may sound crazy but in a busy city like London, we’ll take the spots we can get! This is also a perk to use the ‘Filters’ option and select ‘Driveways’ and ‘Garages’ near the area of town you plan to be in. Check it out here.
    • Do you have to pay to drive in London? For the most part driving in London and the UK is free. As London is extremely congested certain parts of London will require you to pay an £11.50 daily charge for driving in the city. The UK also has 23 tolls roads in the UK which 18 are river crossings.
    • Where is the congestion charge zone London? The congestion charge zone is around the city on and zone one areas of London so, for example, Clerkenwell, Marylebone, Westminster, Lambeth, Southwark, City of London, Covent Garden and Mayfair. You can find an interactive map on TfL’s website here.
    • How do I pay congestion charge in London? The best way to set-up paying for congestion charge is AutoPay. There’s an annual registration charge of £10 for each car you register but it means you pay the charge in time. Late payments will end up with you being sent a fine for £130!
    Day
    Time
    Congestion Charge Fee
    Monday – Friday
    07.00 – 18.00
    £11.50 – pay in advance or before midnight on the day of travel.
    Monday – Friday
    07.00 – 18.00
    £14.00 – If you pay after midnight on the previous days travel.
    Monday – Friday
    0700 – 18.00
    £10.50 – registered with AutoPay
    Monday – Friday
    After 18.00 and before 07.00
    Free
    Saturday – Sunday
    All day
    Free
    Bank Holidays – including Christmas and New Years Day
    All day
    Free
    • What cars are congestion charge exempt? There are a few exceptions to paying congestion charges, in most cases disabled drivers, motorbikes, mopeds, and bicycles are exempt. For more information about exemptions read here.
    • What are the ‘Ultra-Low Emission Zone Charges’ I’ve heard about in London? In April 2019 the Mayor of London introduced the Ultra Low Emission Zone (ULEZ) which is an additional charge on the congestion fees. This is to help improve the air quality and operates 24 hours a day, 7 days a week, every day of the year within the same area of central London as the Congestion Charge. You will avoid this fee if you meet the ULEZ emissions standards. For most types of cars, this will cost £12.50 and for heavier cars, this will be £100.
    • Are there too many cars in London already? Yes. It’s very busy and this is a top reason many don’t bring their car. There’s not enough room and it would be slower getting through traffic than to just hop on the subway or take an Uber. With big cities, there is always going to be traffic and no escaping this factor, but London has brought in some rules and regulations to help minimize the use of cars and improve air quality.

    Contacts and numbers to keep saved on your phone list to make parking easier in London (and your life easier):

    • Council-run car parksThe car parks owned and managed by the City of London Corporation are cheaper than private car parks. If you’re towed, start with the city then here.
    • Private car parksNCP, the UK’s biggest car park operator
    • To find other private car parks in London, try JustPark. Park in someone’s drive The JustPark website lets homeowners advertise their spare parking spaces.
    • Tube station car parks – see what parking spots are offered by your local tube/ underground subway network.

    Costs of a Car in London

    Evo 8 car in a London driveway.
    Evo 8 car in a London driveway.

    The cost of owning a car in London is up for debate and quite dependent on how often you use your car, how expensive the parking is where you go, and how far the travelling distance is you’re commuting daily.

    The average would be around £1500-£2000 a year on your car (outside of the initial cost to purchase the car). This will include everything from MOT, tax, parking permit, insurance, petrol and consumables (types etc) over 5000-6000 miles, etc. This is just an estimation but if you’re living here, you know London isn’t cheap.

    Keeping costs in mind early will prevent you from making an investment you regret. You’ll have many monthly fees and have difficulty parking outside of areas where you haven’t already purchased another permit. To some it can feel like one expense after the other.

    This is why people are so keen on simply travelling by subway, bus, or bike. The public transportation in Europe is far more developed than in the US and is very easy to use. It’s cost-effective and saves you a handful of bills and responsibilities.

    If you don’t absolutely need a car, you probably won’t need it. But if your job is an hour and a half outside of town and there’s no subway for miles or some situation as eccentric as that, a car may be your only option. In this case, buckle down on expenses by utilizing your public transport when convenient.

    According to the RAC we spend on average about 10-27% of our disposable income to buy and maintain our car. It can be a huge saving to avoid this, especially when calculated over many years or a lifetime. This will also reduce fuel pollution and your carbon footprint.

    Saving nature while saving your wallet? Sounds like a win-win to me!

    What You’ll Need to Own a Car in London

    The paperwork you’ll need will be just part of your responsibility in owning a car. This is the same for anywhere but in London specifically you will need:

    • Passport and ID
    • Documents for your car whether coming overseas with it (bring all of these documents as well if so) or if purchased in-country.
    • Valid Drivers license for that country.
    • Insurance as you must have motor insurance to drive on UK roads. Third-party insurance is the legal minimum. Bring your Certificate of International Travel Insurance.

    If you haven’t swapped your licence over yet, make sure you read Exchanging a Foreign Licence for a UK Drivers Licence.

    Alternatives to Owning a Car

    The decision to own a car really comes down to your personal situation and how useful it would be for your lifestyle. You can find more details on London specifically through clicking this link – London Area Reports.

    Some alternatives to owning a car in London are:

    • Zipcar – Consider hiring Zipcar. Zipcar is an American car-sharing company and a subsidiary of Avis Budget Group. Zipcar provides automobile reservations to its members, billable by the minute, hour or day; members may have to pay a monthly or annual membership fee in addition to car reservations charges.

    Joining this car club is perfect if you only need a car sometimes and don’t want all the responsibility and expenses attached to a full-time car. It is also ideal if you don’t have parking in your neighbourhood.

    There are other car clubs in the area so google online for the right brand for your needs.

    • Biking – London is made for bicyclists in a much bigger way than many large cities. The traffic is busy but if you’re a careful rider, you’ll zip right through all of it. Good for heart health and keeping the force off your joints as running would do.

    Many Londoners use public transport and their bikes never even dreaming of getting a car. To the home-grown Londoner, the idea of a car can be downright silly. One Englishmen says, “I cycleway more than I ever drove and haven’t had a car in years. Completely agree that for most Londoners (sans family) not having the burden and hassle of car ownership is probably a plus.”

    • Good ole’ Public Transportation: It’s everywhere, convenient, affordable, and fast. I personally love public transportation and wish I could use it more when living in Western Australia. It’s not as developed there but in London (and most of Europe) it’s truly the easiest way to get around.

    Now, you may simply enjoy the freedom of having a car and being able to get up and go whenever you please. In this case, you should hold onto your ride and keep the ease of control over your commute. Owning a car is just the right fit for some people. The same way not having a car is the right fit for others.

    • Airbnb Experiences and Rentals: You can go search for your dates, budget and town to see experiences all over the world on Airbnb, not just homestays. There are guided walking tours for foodies, drink lovers, and adventure enthusiasts. As far as transportation, there are dozens of hosts that rent you their electric bicycles, scooters, skateboards, and segways as unique ways to get around London town. This is a fun experience for the whole group or just for yourself to see London in a new way. Treat yourself a little and enjoy where you’re at.

    If You’re on the Fence

    If you’re not certain whether you should make the jump for a car or live life without it, here are some tips:

    • Try out both. Experiment with what works for you and challenge yourself to a month without a car. You may notice huge savings in your finances or losing 10 lbs from walking so much. See where you’re at then as you may want to keep the lifestyle change.
    • Know that it is required for you to drive on the right side of the car in the UK. If you’re moving from the US, this can be very challenging to learn and may eliminate the entire debate about having a car. In this case, yay! Decision made easy for you!
    • Read reviews and see what people say who are actually living it. This is the best way to hear from people who either think like you or the exact opposite of you. The answer will be clear.

    Final Thoughts

    A car can mean a great sense of freedom and not having to rely on anyone else for your commute. The need for a car is completely dependent on your situation but the general answer is – no, you don’t need a car in London.

    The options are truly endless, between the underground tube, trains spreading to all cities you can imagine, Uber / taxis, buses and Zipcar, car clubs, rentals, Airbnb experiences for odd rides like electric skateboards, scooters and segways and more!

    London has more versatile and flexible transport options than almost any city I can think of. If nothing else has convinced you in this article of selling your car and opting for the Bohemian lifestyle, I ask you this. Have you seen the traffic?

  • A Helpful Guide to Applying for UK Citizenship by Naturalisation

    A Helpful Guide to Applying for UK Citizenship by Naturalisation

    The time has finally come where I can apply for my UK Citizenship and I thought I would document my process so you know what to expect when applying. The Indefinite Leave to Remain application prepared me for this phase of the process and I used some of the evidence I gathered for that in this application.

    Disclaimer: This is based on my experience (I’m not a lawyer or immigration advisor) and you should seek professional legal advice if you are unsure. Go to GOV UK to check if there have been any changes to the visa rule & fees.

    As things are changing (due 2020 events) with UKVCAS service please keep up to date with UKVI latest information and UKVAS.

    How Long Does It Take to Get British Citizenship?

    As the routes to citizenship vary this can either be a few years to over 10 years. For me to become a British citizen I have spent five years living here on a UK Ancestry Visa and one year living here on Indefinite Leave to Remain before I could apply for citizenship and now I am waiting for my application to be approved. The whole process will be about six and a half years.

    How Can I Apply for UK Citizenship?

    There are several ways to apply for British citizenship, the most common ways are:

    • If you were born in the UK
    • You have a British parent
    • You have indefinite leave to remain (ILR)
    • You have ‘settled status’ under the EU Settlement Scheme
    • You have ‘permanent residence’ status
    • You’re married to or are in a civil partnership with, a British citizen
    • A few other exceptions  

    If you are applying for UK citizenship through indefinite leave to remain (ILR), settled status, permanent residence or married to or in a civil partnership with a British citizen then the information in this article will be applicable.

    Before You Start Applying

    There are a few steps you should complete before starting the application, they are:

    • Pass your ‘Life in the UK Test’ also known as the citizenship test
    • Have two referees – one needs to be on the list of professional standing and can be of any nationality (see document section for more details)
    • Prove your English language ability (unless exempt)

    Make sure that you get the Life in the UK test and English language requirement done as soon as possible, these can take a bit of time to prepare for. I was lucky, I did my Life in the UK Test as a part of my ILR and Australia is exempt from the English language requirement. All I had to do was find two willing people to be my referees and find the confirmation that I have passed the ‘Life in the UK Test’.

    Documents You Should Read

    Here are all the documents I found useful when applying and explaining some of the rules and requirements. They are also linked in the sections where I used them as a guide to apply or meet a certain requirement.

    Applying Yourself or Using a Company For Your UK Citizenship?

    For this application, I applied by myself as it was pretty straight forward. If you feel more comfortable going via a company then definitely do it. If you have a complicated application you should look to getting advice from a lawyer or immigration advisor to help the success of your application.

    If at any point you are unsure do read the documents issued by the Home Office, contact the UKVI or hire an immigration lawyer.

    British Citizenship Application Form

    Prerequisite Information

    Before commencing the application there are several details I suggest you gather ahead of time. This will make the application a lot quicker than digging around that document’s cabinet each time a lengthy question pops up.

    Here is the evidence I gathered before filling out the application form (not in order):

    • Previous addresses for the past 5 years including the dates that you lived there from and to
    • National Insurance Number
    • Passport
    • Parent’s details like DOB and place of birth
    • Referee details which includes full name, addresses for the past 3 years, DOB, job title, phone number, email address and passport number
    • Tax reference which will be on your recent payslip
    • Work History (UK only) – 10 years – including start/end dates and address. This will be different if you run your own company
    • Previous application details – date applied, reference number, date of fingerprints
    • Time outside the UK (that was more than two days) with country, reason, entry and exit dates (holiday or work trips and I needed to provide 5 years)
    • Identity card (if you have one)
    • Degree information (if you have one)
    • English test information (if required)
    • Biometric details

    Filling in the Application

    To fill in the online application here.

    The paper version is for people applying from the Channel Islands, Isle of Man or a British Overseas Territory or you can use this form if you wish to post your application and documents.

    There is digital support for anyone needing help filling out the application (this is not for advice or questions).

    You should also read:

    The form itself is relatively simple to fill out once you have the information to hand. My fingers did get a little sore entering in all my holidays!

    One thing to note; my friend made a mistake when he was filling in his application in that he accidentally put an unrealistic date, say 2035 or similar, meaning the form showed that he had over 4,000 days outside of the country. There is no verification so if I put 1990 it still allows me to enter that date. Just make sure that you check that it’s the right date and year in your application. Otherwise, it will show you that you’ve had way too many days outside, but his application was still approved even though he did that.

    Here Is The Video Guide on Filling Out The Online Form

    In this video, I go into all the questions and answer that pop up in the form.

    Original or Copies?

    Let’s start with a question I get asked a lot! Do you need originals or can they be copies? It states in the application (copied directly from the document section):

    You must provide your documents after you submit your application, these can be originals or copies. Any passports provided must be originals.

    You will be able to upload copies of your documents on our commercial partner’s website, or you can take your documents to your biometrics appointment to be scanned and uploaded by our commercial partner for a fee.

    Your application may be rejected if you do not provide all mandatory documents. If your application is rejected due to documents not being provided, it will not be considered and an administration fee for each person included in the application will be deducted from your refund.

    Documentation Required

    Once you have filled in all the questions you will reach the documentation screen. The checklist will cover all of the information you need to provide based on your answers. For the most part it will be similar to mine, but they may ask you to provide other documents if you’re applying via marriage or civil partnership.

    All the titles and italics in this section of the article are the documents required by the Home Office for my application and what I have provided to meet these.

    On the application it states that you should tick each document to confirm that you have read the requirement, even if you cannot send it. If you are unsure about any of the evidence, read the guidance.

    This AN form guide will also give you information on evidence to provide as a part of your application and super helpful!

    The passport issued by Australia

    Easy, I will provide my passport.

    The Australian passport, identity card or official letter to prove the level of English language required

    Again, I will be providing my passport for this as Australia is exempt.

    Interestingly I have had a few comments from other people saying when they submit their degree information and are from an exempted country it is still prompting them to provide evidence. The advice is to click ‘NO’ to the degree to get around the NARIC prompt on the document list and then write a covering letter with the application to explain why this had been selected (glitch). Please check with UKVI beforehand.

    If you are someone that needs to prove this requirement, then UKVI will only accept English language qualifications from the Home Office approved list of acceptable qualifications.

    You can find more about the information here:

    Proof of freedom from immigration time restrictions

    • Your passport showing permission to remain permanently in the UK
    • The Home Office letter by which you were given permission to remain permanently in the UK

    For this one, I have my passport and Home Office letter when I was granted ILR.

    Just to note, the information in the checklist isn’t updated to reflect the BRP cards, here is a statement from UKVI:

    You’ll usually have applied for indefinite leave to enter or remain. You’ll have a stamp in your passport or a letter from the Home Office. You could also have a ‘vignette’ (sticker) or a biometric residence permit.

    Source: Gov.UK

    Therefore it was really my BRP card that I needed to provide for my application, at least it was included already!

    Life in the UK Test pass notification

    Previously completed as a part of my ILR so thankfully didn’t have to do the test again and just provided my pass notification.

    When you went for the test in the past your were issued with a pass letter, however, they now just issue you with a number that you enter into your application. This should be emailed to you roughly 10 minutes after you have passed the test.

    Current Biometric Residence Permit

    Easy, I have one this time!

    Proof of living in the UK

    • If you are married to, or in a civil partnership with, a British citizen, you must have been in the UK for the past 3 years.
    • If you are not married, or in a civil partnership with, a British citizen, you must have been in the UK for the past 5 years.
    • If you are an EEA National, you need to include letters from employers, educational establishments or other government departments, indicating your presence in the UK during the relevant 3- or 5-year period.
    • If you are a Non-EEA National, you need to include your passport to prove you have lived in the UK for the relevant 3- or 5-year period.
    • If you do not have your passport or it was not stamped when you entered the UK, you need to include letters (for example, from your employer or government department) as proof.
    • Bank statements or household bills are not suitable proof you have been living in the UK. I get asked this a lot and no you cannot provide these as evidence.

    I went a little over re the evidence for this one. I do have both my passports that were mainly stamped on all my entry and exits but I was worried that this wouldn’t be enough, so I included:

    • All my P60’s since living in the UK (6 in total). If you do not pay tax through Pay As You Earn (PAYE) arrangements, then provide your most recent HM Revenue & Customs Self-Assessment Statement of Account.
    • HMRC Letter stating the tax I paid from my ILR application.
    • Two employment letters, one from my ILR and a new one.

    To get an HMRC letter is really easy just 0300 200 3300, ask for 5 years’ worth of employment history to be sent to you in a letter. This is the same letter HMRC will provide you if you have lost your P60’s so if you have any gaps do this as soon as you can. It takes roughly a week to arrive.

    All of these documents prove that I have been living here, paying taxes and working. Plus, they are not bank statements or household bills.

    Two referee declarations

    The part of the application, in my opinion, is more difficult, before we get to the detail, I have two wonderful friends to be referees and they met certain criteria. I provided two signed forms and passport photos with my name/DOB on the back of the photo. 

    Details of Good Character requirement can be found here.

    Who can be a referee for British citizenship?

    At the time of applying the Nationality Policy: general information – all British nationals stated that:

    • One referee should be a person of any nationality who has professional standing.
    • One referee must normally be the holder of a British citizen passport and either a professional person or over the age of 25.
    • Known you for over 3 years. (To read more about the 3-year requirement, read page 10 of this document).
    • Willing to give their information such as passport, three years of addresses etc.

    The referee must also:

    • not be a relative.
    • not be a solicitor or agent representing you on this application.
    • not be related to the other referee.
    • not be employed by the Home Office.
    • not have been convicted of an imprisonable offence during the last 10 years (unless that conviction can be disregarded in line with the table shown in the Guide).
    • advise the Home Office of any reason why the applicant should not be registered.

    British Citizenship Referee Professional Standing

    Here is the Professional Standing list that one of your referees must be.

    British Citizenship Referee Form and Process

    I was searching for this form for ages, turns out even though documents page requests you tick the box the form will only be given to you in the next part of the application. You can also search online as well, here is a copy.

    The form states that you need to put DOB and name on the back of the photo but if you are applying online and uploading to UKVCAS portal then you just need to upload the form with a photo and no need to fill in the back of the photo. Hopefully this will be corrected on the form in the future.

    As a part of the application process, your referee will need to provide you:

    • Full name
    • Address(es) for last 3 years
    • Date of birth
    • Profession
    • Phone number
    • Email address
    • British passport number (if British)
    • How they know you

    These details need to be entered by you in the online application form.

    Frequently Asked Questions on Referees

    On my YouTube channel I get asked a lot of the same questions so I thought I would encorporate my answers into this post to.

    • Who fills in the form: the referee fills in the form.
    • Where do I put my referee details: You add the information in the online application. I show an example somewhere in this video around the 5:40 mark: https://youtu.be/RfIxdedOZJE
    • Why do I need to have 3 years of addresses and passport number of my referee? The online application form asks for this so I provided as requested.
    • Where do I upload my referee form: I uploaded this with my other documents on the UKVCAS portal. You can watch the video here: https://youtu.be/MRIchfmFW64
    • Can xyz professional be included: Contact UKVI if you are unsure if your referee meets the requirements.

    Evidence of identity

    You must include one of the following:

    • your passport
    • your national identity card
    • your Home Office travel document
    • your Home Office entitlement card
    • your Home Office ARC letter
    • your BRP card
    • your birth certificate
    • your driving licence

    You must include evidence you have legally changed your name if it is now different to the one on your supporting document.

    If you took the Life in the UK Test and used one of the above documents as evidence, you should use the same one here.

    I used my old passport as my proof of identity when I took my Life in the UK test, so I included that plus my most recent passport. Additionally, they need my BRP card to support another requirement so that should meet everything.

    Here’s The Video Guide Covering The Documents You Need For Your Application

    Declarations

    The next step of the application is the referee declaration which are the downloadable forms I mention above and confirming the information you provided is correct. Once you are happy, tick the boxes and you will be taken to the payments screen.

    Pay (British Citizenship Application Fee)

    Unlike ILR you will not get the option to speed up the process and it will be the standard service you choose. To become a British citizen by naturalisation will come to a total of £1,349.20 which is £1,330 for the application and £19.20 for the biometrics.

    You will get a warning/ bold statement at this point saying that once you pay there is no going back on the application.

    Next Steps

    The biometric appointment is the next phase of the application process, you can read more about it here. You can watch these videos on Citizenship Ceremony and applying from your British passport.

    Disclaimer: This is based on my experience (I’m not a lawyer or immigration advisor) and you should seek professional legal advice if you are unsure. Go to GOV UK to check if there have been any changes to the visa rule & fees.

    More UK Visa Articles

  • Do all Phones Work with UK Sim Cards? What to Know Before Visiting.

    Do all Phones Work with UK Sim Cards? What to Know Before Visiting.

    When travelling to the United Kingdom, you may consider using a local SIM card from the UK. If you have a phone with an interchangeable SIM card, then you should take advantage of a local SIM card’s benefits.

    Do all phones work with UK Sim cards? Not all phones work with SIM cards from the United Kingdom. Some phones operate on a network called CDMA which will prevent you from being able to use a foreign card. If your phone operates on GSM, then you can use a UK SIM card after you have the phone unlocked.

    What to know before visiting? It is important for travellers to know whether your phone is compatible with using a UK SIM card and where to find them. If you don’t have a compatible phone, it is good to know what other options are available.

    There’s a lot of avenues for you to take to avoid the hassles of using your phone overseas. If you have the right phone for it, travelling the world with your mobile device can be a breeze. Once you know, you’ll be armed with a better understanding of your phone and how to travel with it.

    Taking Your Mobile Phone to the United Kingdom

    You can take your phone with you when you travel to the UK but using your mobile phone while you’re in the UK can be costly from roaming charges. If you don’t want any unexpected bills when you return home, then it might be wise to take advantage of a local SIM card to avoid such fees.

    If your phone is compatible with a different card, then there are SIM cards set up as a pay-as-you-go system. You can buy an initial large sum of data, voice, and text which you plan to use the entire time, or you can add more data as you go.

    If your phone comes from Canada or Australia, then your phone likely runs on GSM, but if you’re from the United States you may have a phone which runs on a different network than those internationally. Some companies out of the US, such as Verizon and Sprint, run their phones on the CDMA network which makes them unable to use a local SIM card.

    CDMA and GSM

    The reason certain phones don’t work with other SIM cards is that they use a system called CDMA which stands for Code Division Multiple Access and they don’t even use SIM cards to operate. Phones which do communicate using SIM cards are working on a system called Global Systems for Mobile Communication or GSM.

    They are both ways to access radio channels and both compress multiple calls into one radio wave. The reasons for using one network or the other was a choice for providers while some companies saw faster speeds and response times on CDMA, the others wanted the wider use by choosing GSM.

    The difference between these two is how they communicate with each other. A CDMA phone communicates with specific coded segments for talking. So, the receiver’s phone only takes out its portion of the coded segments. The benefits for phones on CDMA are:

    • Increased immunity to interference
    • High-speed internet for faster data

    GSM is a time division system, so calls take turns on a radio wave, but the receiver only hears their time slot. There are a lot of claims that GSM isn’t as responsive or as fast as CDMA, because most of them still connect to older 3G networks. Having a GSM phone means:

    • Can be unlocked
    • A higher percentage of the world is running on the network
    • Can easily switch carriers, local or international

    The Challenge of Locked Mobile Phones

    Cell service providers have the ability to lock a phone to their network when the service is shut down. When a phone is locked, many of the features are disabled and the phone cannot use a SIM card from another provider.

    The phone is locked by having a code on it which enables the phone only to use the provided network, but if the phone is unlocked it can accept and use SIM cards for other networks. In 2017, Canada passed a law banning mobile companies from locking phones.

    If you find yourself to be a tech-savvy individual, then there are videos on the internet which guide you through the process to unlock your phone. Some companies will unlock the phones for you, but if not, a third party out of the UK can unlock it, usually at the cost of purchasing their SIM cards.

    United Kingdom’s Wireless Service Providers

    Any SIM card purchased in the United Kingdom will be considered a UK SIM card. This encompasses England, Wales, Scotland, and Northern Ireland.

    There are many popular providers to choose from:

    • EE Limited
    • Vodafone
    • 02
    • Three UK
    • Sky Mobile
    • Giffgaff
    • Virgin Media

    These have been ranked as the best working mobile networks in the UK. Each offers competitive rates and the highest quality in data and voice throughout the United Kingdom, but for precise details, you can learn more.

    Using a local UK card will work in most other countries in Europe, so if you plan to take a trip to France or any nearby countries, you can take your phone with you and not worry about any additional charges. Much of the world runs on GSM, so you always have the option to use the local SIM card of wherever you’re travelling to.

    Vodafone stand in the airport
    Vodafone stand in the airport

    Prepaid Cards and Knowing your Usage

    If you’re only visiting the UK, then you can purchase one of the SIM cards with prepaid data and voice. It is important to know how much data you’re going to need when you’re not planning on using a Wi-Fi connection.

    The Sim cards can be bought with as little a 2GB and many offer unlimited data use for a certain period. Much of these pre-paid plans offer unlimited talk and texts, but each SIM card only lasts for an extensive amount of time such as 30 or 90 days.

    If your planning on travelling outside of the cities and towns of the UK, then it is recommended to go for a high amount of data since you may need it for travel directions or information. For cities, you may not need such a high amount as there are ample times to connect with a business or hotel’s internet.

    What Happens When You Take Out Your SIM Card?

    It is best to take a SIM card out when the phone is turned off to avoid any possible glitches or software malfunctions. When your phone doesn’t have a SIM card in it:

    • You will not be able to make or receive any phone calls
    • You can’t access the internet without Wi-Fi
    • You can still make emergency calls

    Taking your SIM card out will not damage your phone but for these reasons, it’s good to keep your card in your phone until you have another to switch out.

    When Visiting

    UK SIM cards can’t be purchased outside of the country unless you purchase it online. Buying online will save you time and allow you to have already the SIM card ready when you get to your destination. However, if you don’t purchase online, you can find them for sale in airports, some gas stations, and every mobile phone store.

    If your phone isn’t compatible for a local SIM card, then you can rent Wi-Fi packs which create a wireless hotspot. While using local internet you can utilize apps such as WhatsApp or Skype to make any necessary international calls. Many phone shops in the UK also offer disposable phones which work similarly to the pay-as-you-go SIM cards and can be recycled after use.

    More London Articles

    If you are visiting London you may want to how to Get internet and Wi-Fi in London, read this link. If you run out of battery while exploring the city make sure you read where can you charge your phone in London.

    Here are some more inspiration and frequently asked questions.

  • Money Exchange and Paying in London: 13 Tips and Tricks

    Money Exchange and Paying in London: 13 Tips and Tricks

    If you’re planning a trip to London and you have questions about money, you are not alone. With so many options available you will have no trouble finding solutions on how to spend your money and advice for paying for things in London.

    One of the first questions you probably have is, should I exchange money before I go to London?  You should exchange some money before you leave but plan to get the rest in London. When you do, remember that London and the rest of the UK do not use the Euro. Since London is one of the world’s financial capitals, you will be able to access your money and spend it pretty much as you do in the U.S.

    As London is a mecca for tourists, they want you to spend your money.  Here are some things to know and even a few tips and tricks to have up your sleeve before you head across the pond.

    Think Pounds, Not Euro

    When the euro was first proposed as a single currency for the European Union (EU), the UK Prime Minister (Tony Blair) decided that the euro needed to pass five economic tests. The tests didn’t meet the expected outputs so the UK opted to keep the pound (technically the “pound sterling”) as its official currency.

    Therefore, if your stay is only to London or the rest of the UK, then you will only need the British Pound.  If you are planning to travel in the rest of Europe, then you will need Euros or those countries’ currencies.

    Deciding on the amount of each to take will require some planning.  We’ll talk more about that later.  First, let’s decide where to get your pounds sterling.

    Is Exchanging Money Before Traveling a Good Idea?

    You should make a decision based on numerous factors, including:

    • How much time you have before leaving?
    • Whether my travel card will give good rates for the destination
    • If the destination is cash-driven
    • Your comfort level about how much foreign currency you want to have with you

    If you have plenty of time before leaving, then you should consider getting some pounds or find a travel card that suits you.

    The security of having some British pounds as soon as you arrive in London is nice but make sure you always find the best place to exchange your money. Banks will usually give you worse exchange rates and charge additional fees.

    How To Turn Your Money into Pounds?

    British Pounds with a Calculator

    As someone that travels constantly getting the best rates for my money is very important! I always recommend Googling the best travel cards or exchange places in your hometown or city before purchasing pounds.

    You have several options for getting hold of those pounds.

    • Pre-paid travel card
    • Travel Credit Card
    • Money Exchange Places
    • Large National Banks
    • Your local bank or credit union
    • In America you can go to AAA offices (American Automobile Association)
    • Post Office

    Travel Card

    Finding a travel card (debit or credit) that suits your needs and the trip is important. London is slowly becoming more card only so I would recommend travelling with at least one card. Countries like Sweden are already leading the way with becoming card only economies.

    When choosing a card bear in mind a credit card will give you additional support when travelling and debit gives you cheaper withdrawals (in most cases). For this reason, I like to travel with both.

    In the UK you will find the common ones Mastercard and Visa are more widely accepted in the UK but American Express is very easy to use in London and major stores.

    Getting Money from Your Bank

    If you have an account at one of the major banks, such as Bank of America, Wells Fargo, or Citibank (follow the links for more information), then the transaction will be fairly easy.  You can order in person or online, but you will have to wait for several days to receive your pounds. 

    Smaller banks and credit unions will typically also be able to exchange currency.  You might not get the best rates with a smaller bank, but you will avoid the delivery fees that larger banks charge to deliver the bills to you.  Whether you use a credit union or a larger bank, you will have to wait a few days to receive the pounds.

    Why We Got Some Pounds Before Traveling

    Before I lived in London, I travelled to London a few times. Each time I made sure that I went to my local money exchange to get out a £100 before coming to the UK. I also have my 28 Degrees Mastercard (Australian based credit card) and normal banks cards with me.

    It was super easy to get the money I told them how many British Pounds I wanted and next thing I knew I had the cash in my hand.

    I hate having to deal with airport kiosks or currency exchange stores. This way if I need a taxi, a bottle of water or some food I was set. It’s a little comfort blanket when travelling.

    Why Getting Money While on the Way is a Bad Idea

    Don’t. 

    Airport Kiosks will have the highest fees and poor exchange rates, so only use them as a last resort.  Even airport ATM’s will give you poor exchange rates so walk past them as quickly as possible and head into the city before exchanging or using an ATM (if possible).

    Getting Money in London

    There are numerous places to exchange money in London and whenever I need of an exchange place I always tend to end up at ACE-FX (mainly because it’s on my commute). Thomas Exchange Global, Eurochange and UK Post Offices are a good place to start if you don’t have time to research before exchanging.

    To see the best rate use the buyback function of Money Saving Experts, simply put in your home currency and how much you want to exchange, the result will appear with the best exchange place that day.

    If you are trying to find a money exchange on the street look for the bureaux de change signs.

    In tourist areas, you will often see currency exchange kiosks or storefronts.  They will post their rates, which will usually look to be quite favourable.  But read the fine print—there will be fees associated with the transaction. Add in those fees, and that favourable rate isn’t so favourable.

    Banks are another option but generally, require you to have your passport.

    Find a Cash Machines Instead

    Kat getting money out of the ATM
    Kat getting money out of the ATM

    ATMs are everywhere in London. Savvy travellers walk past currency exchange vendors, banks, hotels, or the bureau de change (the French name for British exchange counters) in the post office and head for the nearest ATM. If you have the right travel card this will always be the winner option.

    They will be easy to spot at airports, banks, and other high traffic areas.  However, if you are off the beaten path (you rented a B&B on a quiet street), Link Q provides an online service that will show you nearby ATMs.  You can download the Link app or use their website to locate one near you.

    Things to Keep in Mind When Using the ATM in London

    You can use your credit or debit card to get pounds. Put your card in, enter the pin, and make a withdrawal. You will receive your card back first and then the cash.

    Do not accept the currency conversion by the ATM! This will always give you the worst exchange rate. It will give you an idea of how much you are taking out which is always a good indication to ensure you have enough money to withdraw.

    Some important advice:

    • You may have to pay fees so double-check what fees you will be charged before you leave
    • Visa and Mastercard will work anywhere; American Express sometimes; and Discover won’t
    • Cards with Visa and Mastercard logos are ideal as they are most commonly used
    • If you’re worried that your bank or credit unions card won’t work, consider opening an account a different account or getting a prepaid travel card—at least for the trip
    • It’s a good idea to have a back-up card in case the ATM, for various reason, the ATM is hungry and eats your card, the card gets demagnetized or the card doesn’t work.
    • Contact your bank(s) before you leave so they have the dates and location of your travel. Even if they say you don’t need to, do it anyway, there is nothing worse than being overseas and your card is blocked.

    Debit cards in most cases will have fewer fees associated to them, I say this as I did have a credit card that was specifically for travellers and provided better rates than my debit card. Generally, avoid using your credit card in an ATM, unless it’s an emergency.  Cash advance fees, transaction fees, exchange fees—that’s a lot of fees. On top of that, your bank may charge higher interest rates for cash advances.

    One last thing: A lot of ATMs in London don’t always have letters on their pins, so if you have memorized Always Scramble Your Eggs, memorize 2-7-9-3. 

    Using Money in London

    London is moving towards paying electronically so you want to have at least one card when travelling to the UK but ideally two cards. 

    • Your credit card is good for larger purchases (hotels, shops, car rental agencies) and for ordering online. I also like paying with a credit card for the protection they provide to your purchases, it’s my go-to card in London.
    • Your home countries cash is a good back-up. I like to have a hundred dollars for an emergency. You never know if the ATMs won’t work, all your cards get rejected, and you’ve run out of pounds.  Cash is cash.
    • But keep the cash as a back-up and never use it at places that say they accept foreign currency. You will receive the worst exchange rates.
    • Pounds sterling

    Paying by Card

    Card is widely used in the UK and in London some places are turning card only, so it is essential that you have the ability to pay by card.

    Paying Electronically (Phone, Watches, etc.)

    In London, especially, it is becoming easier to pay for goods or services with your phones.  Although they are not universally used yet, more and merchants are accepting ApplePay or GooglePay, with ApplePay being accepted at more locations.  Both services work with Visa or MasterCard debit or credit cards.

    Having said that, you will still be paying in pounds so having the right card is essential otherwise you will be charged an exchange fee.

    What About Those Euros?

    If you have some Euros, will you be able to spend them in London?  There are two answers: no and maybe

    • No.  Most shops won’t accept euros.  It’s not worth the hassle to them.
    • Maybe.  Large department stores in London will take euros. Harrods, and Selfridges, for example, will.  Marks and Spencer even have bureaux de change in its larger stores.
    • But even if you can get someone to take your euros, you should consider that it is a foreign currency transaction with hidden exchange rates
    • Smaller stores often have clerks not familiar with taking foreign currency, which will mean more time waiting to pay and less time for exploring
    • Euro coins will almost never be taken
    • Your chances of paying with euros outside of London is practically nil unless you’re at the airport.

    If you plan to travel to Europe after leaving London, get Euros once you arrive at your next destination (unless you want to pay for two exchange rate fees—dollars to pounds, then pounds to euros). If you are visiting London after a European visit, plan ahead so you aren’t stuck with euros that you probably won’t be able to use in most of London.

    About coins: coins for larger denominations are quite common in Europe.  You won’t be able to exchange them when you get back home (but you will be able to exchange your pounds sterling!).  Unless you want to add them to your coin collection or have them to show off (British money is quite fascinating), spend them on knick-knacks, exchange them for paper money, or give them away.

    Is British Similar to American Money?

    In concept, yes.  Pounds sterling, or pounds, are divided into 100 units, just as our dollar.  The coins will look different, but the principle is the same.  Anything under a pound is called a penny, as in 50 pence

    • Larger coins are more commonly used.  If you’re changing is under 5 pounds, expect to receive coins.  1 pound and 2-pound coins are common
    • Differences in coins are not based solely on size or colour; there are also differences in shapes
    • There’s a 2 pence coin

    You will usually hear British people say “pee” rather than pence, as in 50p (50 pee). More colloquially, a pound is known as a “quid”, a five-pound note is a “fiver” and a ten-pound note a “tenner.”

    In appearance, no.  Bills larger than a pound—called notes in London—come in the same denominations you are used to. However, the notes have many surprising differences. 

    • Size–Not all notes are the same size
    • Feel–They have a smoother feel than dollars
    • Security features are more obvious
    • Colour—not all notes are the same colour

    At first British notes take some getting used to. You might decide to take some home as a souvenir. They are great conversation starters, especially if you have gathered some friends and want to talk about your trip.

    Money in the Rest of the UK

     Just to add a little more confusion to the mix—money in all of the UK is not the same.  Both the Bank of Scotland and the Bank of Northern Ireland have their own versions of the pound sterling.  They have the same value, but different images for the notes and different engravings on the coins.  If you visited either of those places and then head to London, you may encounter some difficulties using them.

    It is still a legitimate currency in the UK, but some places can be funny accepting it. To get around this just pop into a bank and they will be able to give you the English version. I tend to find that chain stores will accept the currency with no issues.

    Staying Safe with Money

    London is considered a safe city by most measures. With any city, there are things you need to be careful of. Here are some things to watch out for:

    • Pick pocketer which operate mainly in high tourist areas and crowded trains (tubes) or buses. Be on alert and ensure your wallet is kept in a place you’ll notice something happening. I personally like to keep my wallet in secret pocket or in a hard to get place in your bag, in your front trouser pocket or keep your handbag at the front of your body.
    • Try to avoid walking alone at night in places such as parks and side streets or any unfamiliar environment. If you do have to walk, stick to busy places where is a lot of activity CCTV and good lighting.

    Of course, any time you go into a touristy area you risk spending money on things you could purchase elsewhere for much less.  

    A Pretravel Checklist

    • Make sure you have contacted your bank regarding travel dates and locations
    • Check your cards for expiration dates
    • Memorise your pin
    • Adjust your ATM withdrawal limit. You will want to exchange larger amounts if your bank charges a single withdrawal fee.
    • European ATMs will withdraw funds from your checking account, not your savings account
    • Ask about fees so you won’t be surprised later
    • Traveller’s checks will incur extra fees and lines at banks to cash them.  Not worth your time

    Determining How Much Something Costs

    Wonder how much that cup of coffee costs in American dollars? You can use a currency converter, but why would you use up your phone data when you can use your head? Since the pound is decimalized, knowing the currency rate and doing a little mental math will get you to a close estimate.

    Say the currency rate was 1.3 pounds for a dollar.  Since the price charged is the price you pay—taxes are calculated in the amount—your 3 quid cup of coffee costs you $3.90. Of course, it was a freshly-made Americano, not something that might have been sitting around for two hours.

    Final Thoughts

    Hopefully you are travelling to London for pleasure, or at least you are able to add a little pleasure if it is a business trip. If you do some planning ahead, you will be able to limit the extra expenses so that you come home with fond memories, some treasures (who can resist buying something a little extra), and no surprises.

    More London Articles